






Elementor has no page loading screen of its own. The Pre Loader widget from The Plus Addons for Elementor adds one, and gives you eight different things to show while the page loads.
This page covers the whole widget: where to switch it on, what each preloader type does, and what the four Content-tab sections control.
Requirement – This widget is a part of The Plus Addons for Elementor Pro, make sure it’s installed & activated to enjoy all its powers.
Before You Start
- Edition: Pro — the Pre Loader widget ships only in The Plus Addons for Elementor Pro. The free plugin does not contain it.
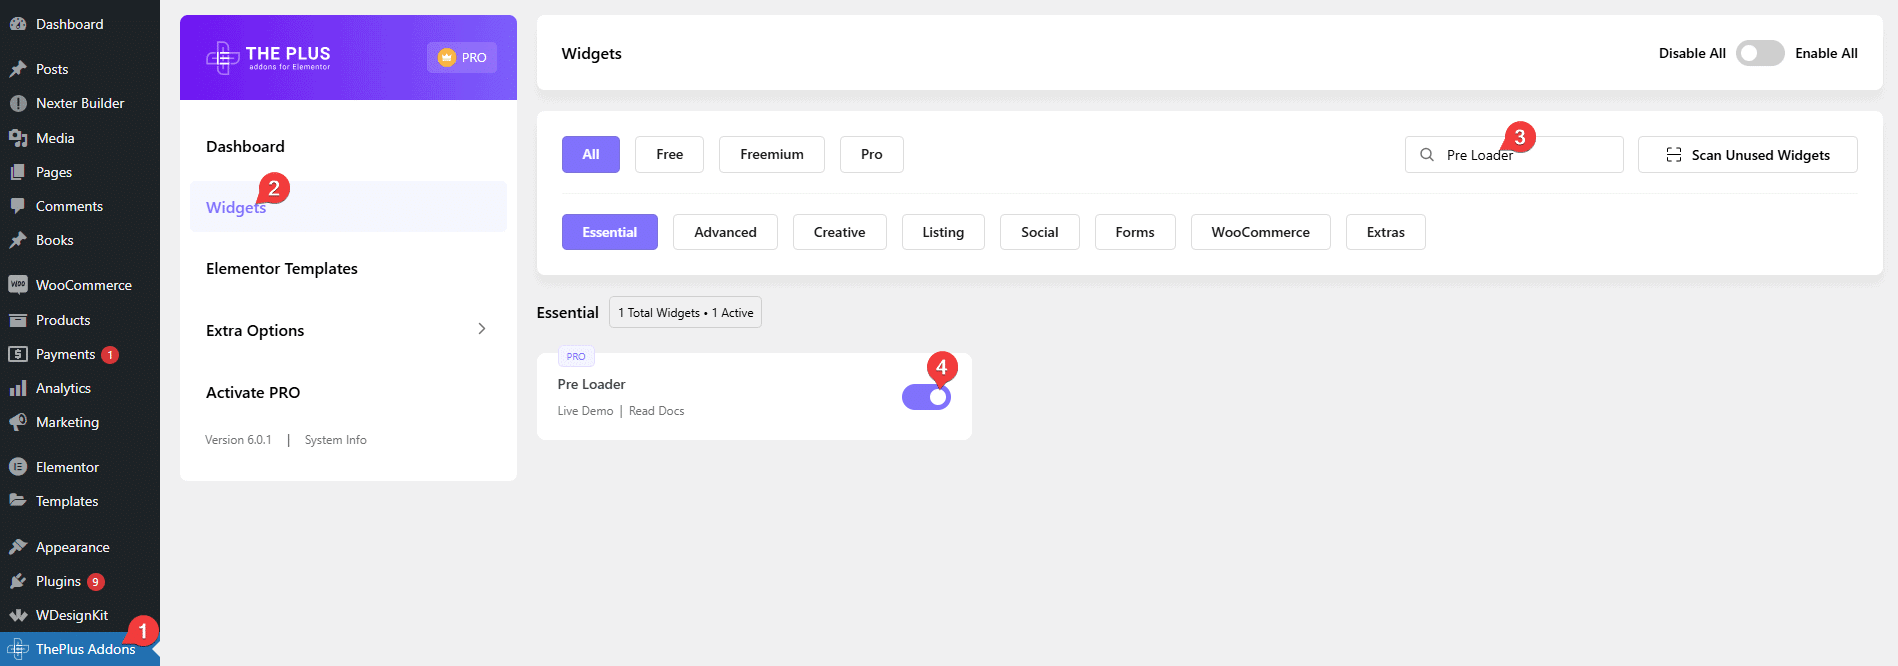
- Widget to enable: Pre Loader, under The Plus Addons > Widgets. Search for it and turn the toggle on.
- Site-wide switch: go to ThePlus Addons > Extra Options > Settings, open the Design tab, click the gear on the Pre Loader card and set Pre Loader to Entire Site, then Save. Until this is set, the preloader’s CSS and JavaScript are never loaded on the front end and nothing appears.
- Where the settings are: select the Pre Loader widget and use the Content tab’s four sections — Content, Load First, Page Transition and Extra Option — plus the Style tab.
Switch It On
Two switches, in two different places, and both are needed.
- The widget. Go to The Plus Addons > Widgets, search for Pre Loader and turn its toggle on.
- The site-wide setting. Go to ThePlus Addons > Extra Options > Settings, open the Design tab and click the gear on the Pre Loader card.
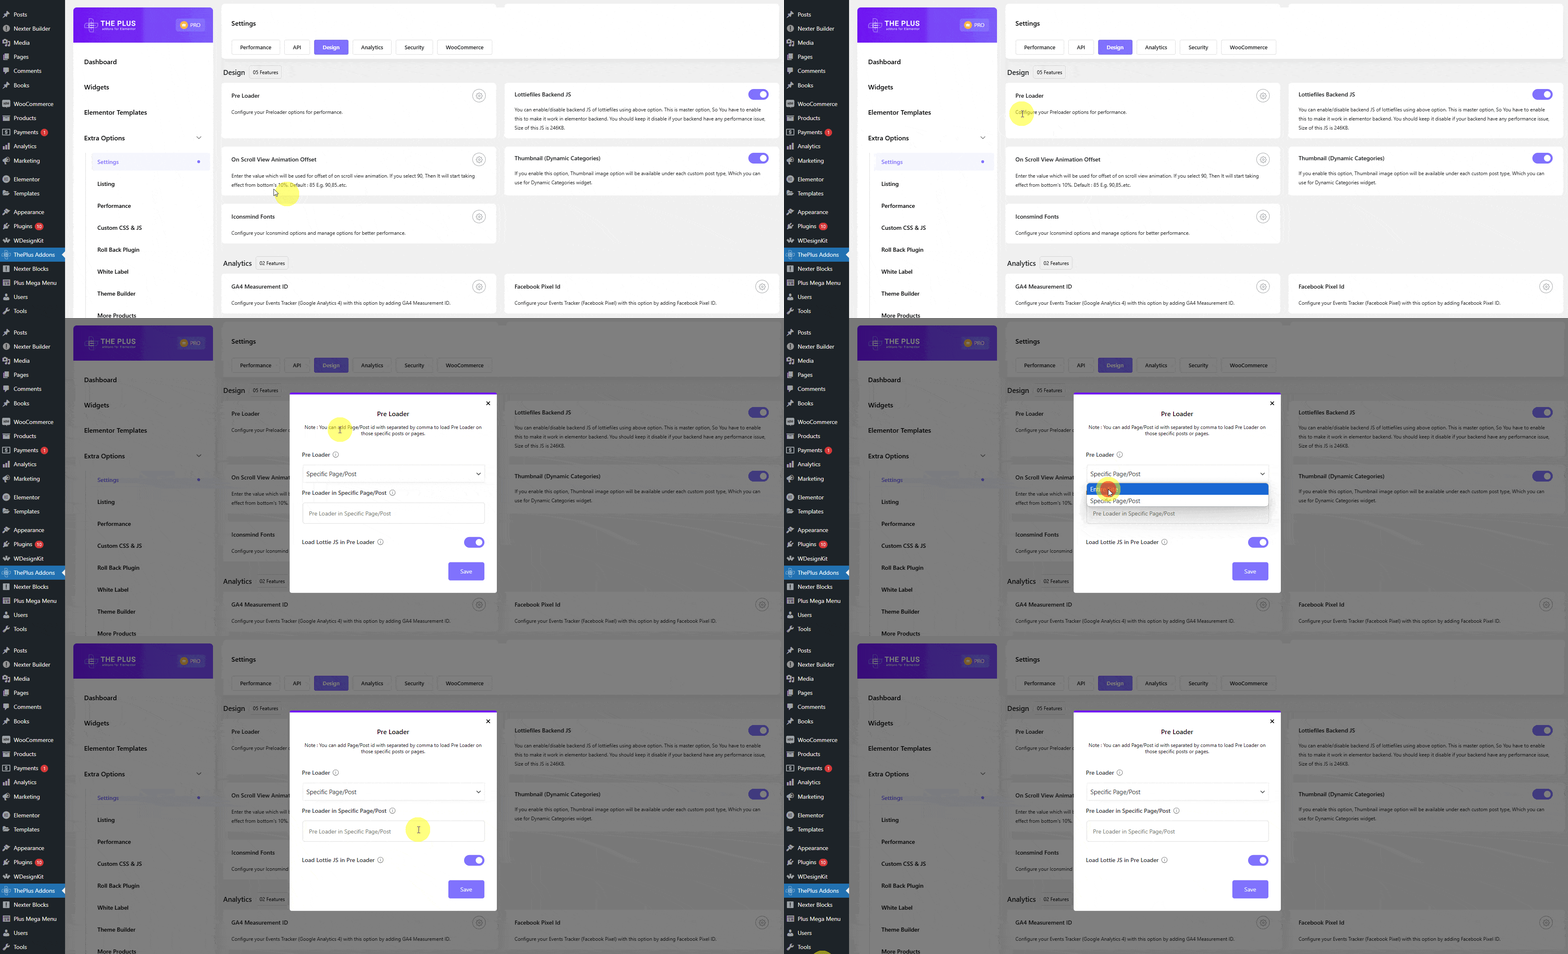
- In the popup, set Pre Loader to Entire Site, or to Specific Page/Post and list the page or post IDs, separated by commas, in Pre Loader in Specific Page/Post. Turn on Load Lottie JS in Pre Loader if you plan to use a Lottie animation, then save.
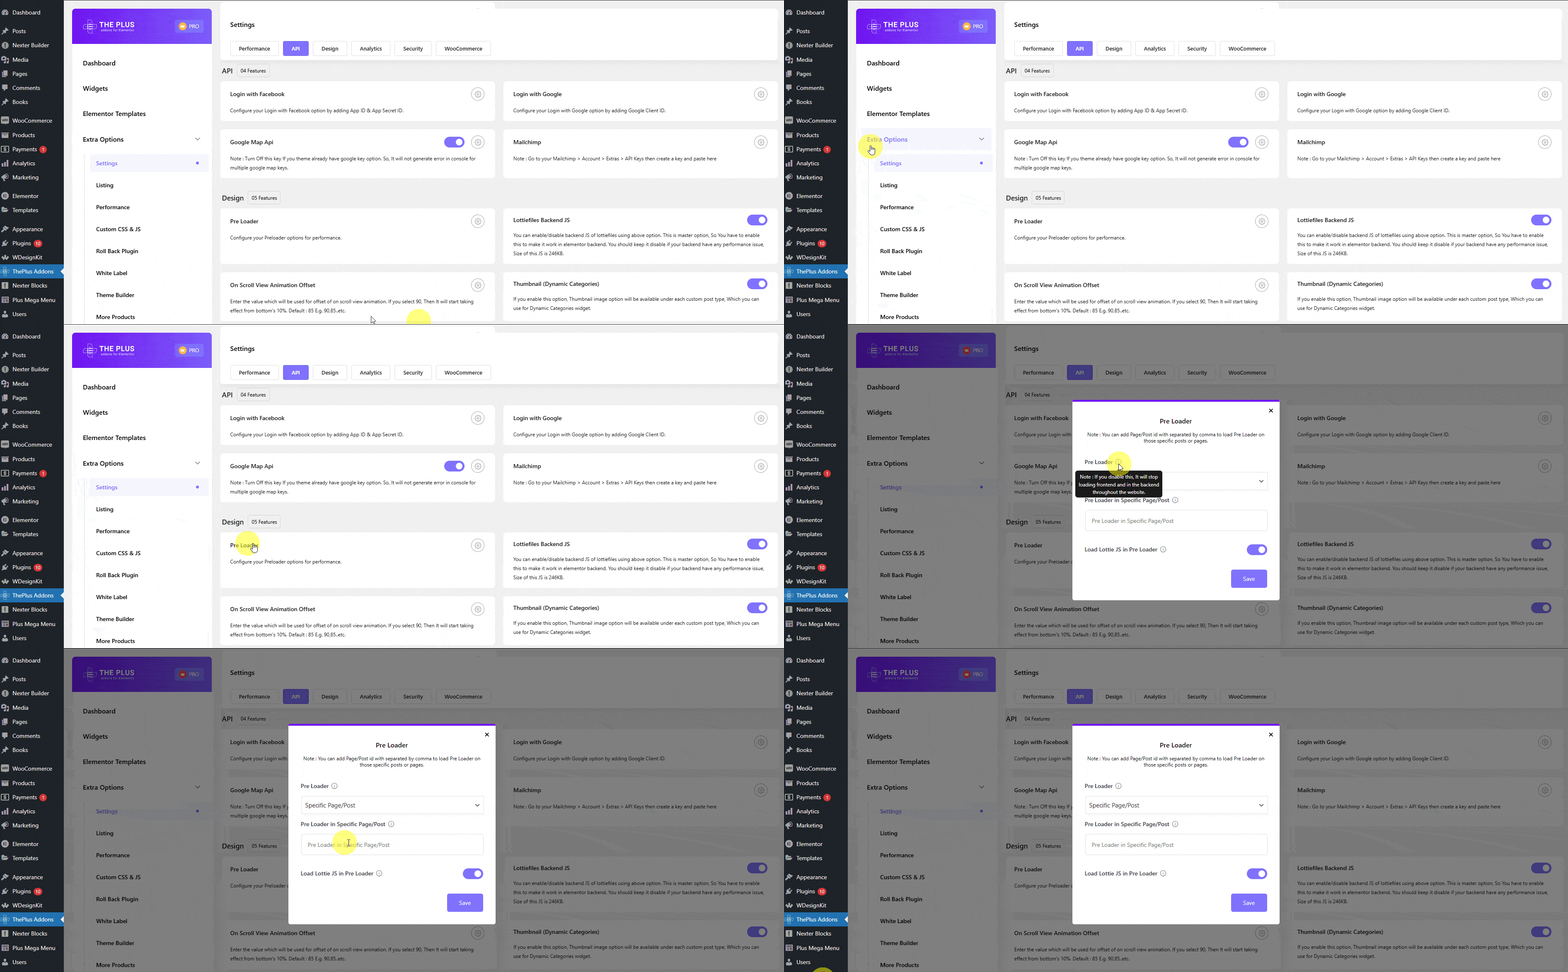
The second switch is not optional. The preloader’s stylesheet and script are only loaded when this setting says Entire Site, or says Specific Page/Post and the page’s ID is in the list. Until then the widget’s markup is in the page but nothing covers the screen. The Elementor editor preview is more forgiving, so a preloader can look right in the editor and do nothing on the published page.
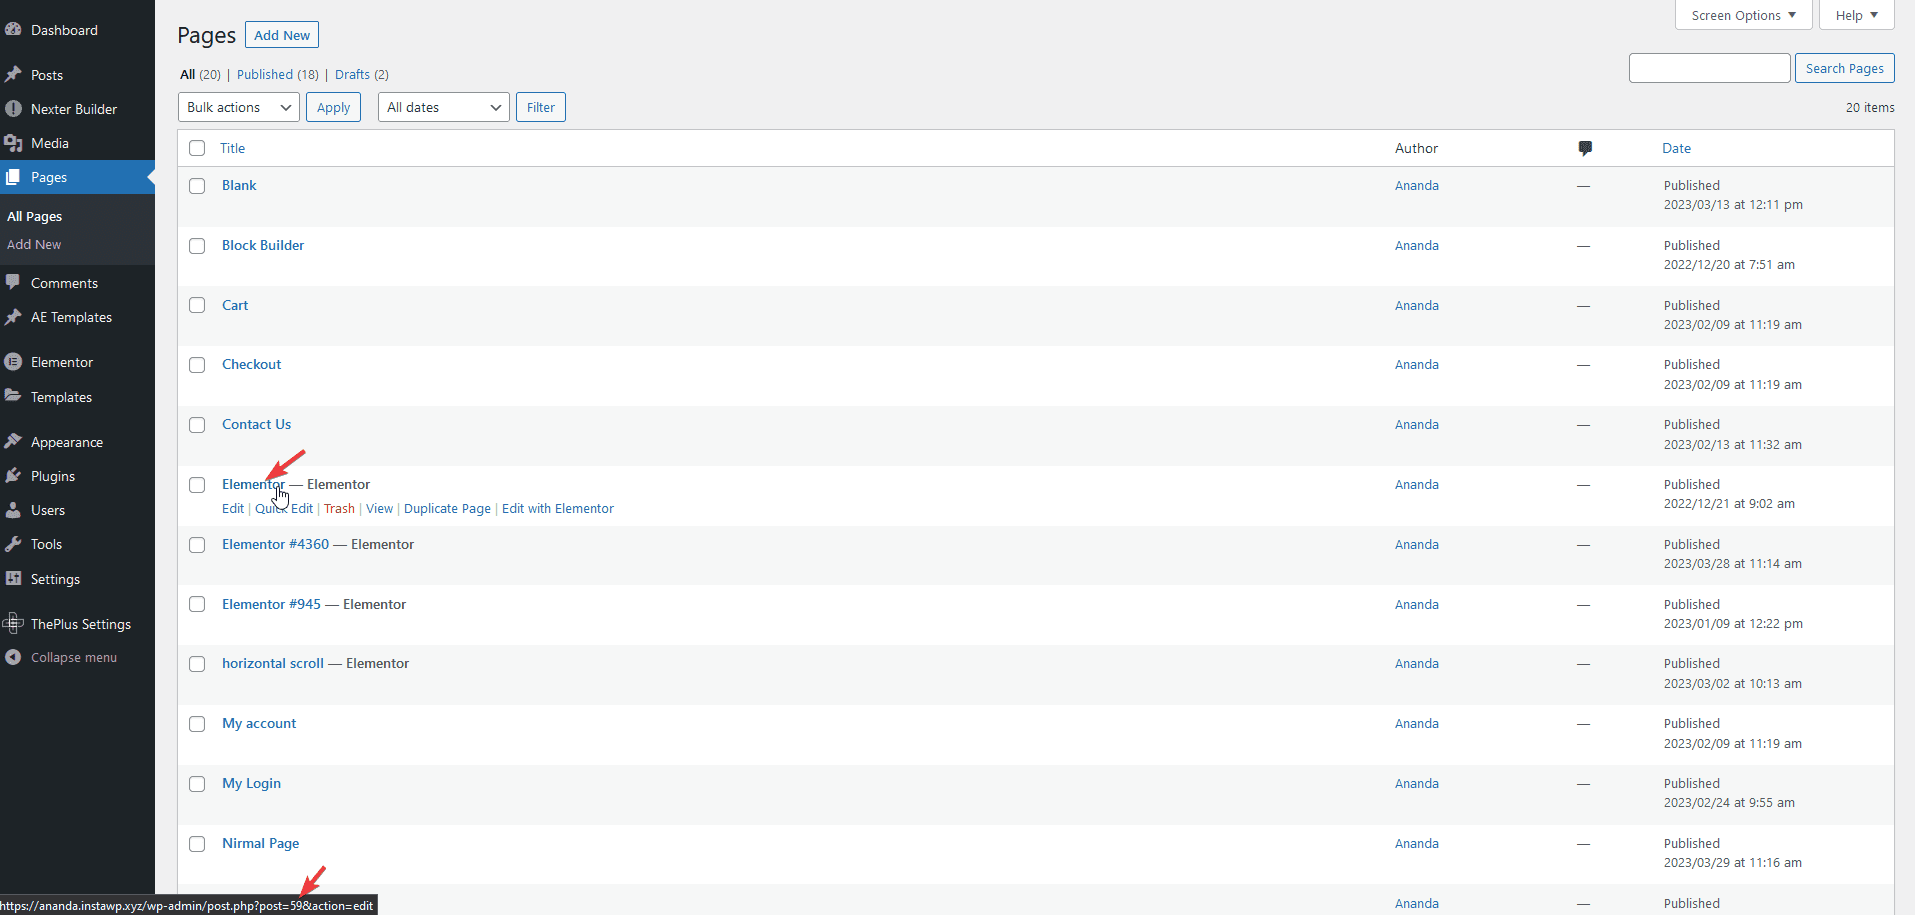
To find a page’s ID, go to Pages > All Pages and hover the page: the number after post= in the link your browser shows at the bottom is the ID. The same works for any post type.
Learn via Video Tutorial

Add the Widget
Put the Pre Loader widget on a single page to cover that page only, or in a header or footer template to cover the whole site. Then open the item in the Preloader list on the Content tab and choose a type in Select.
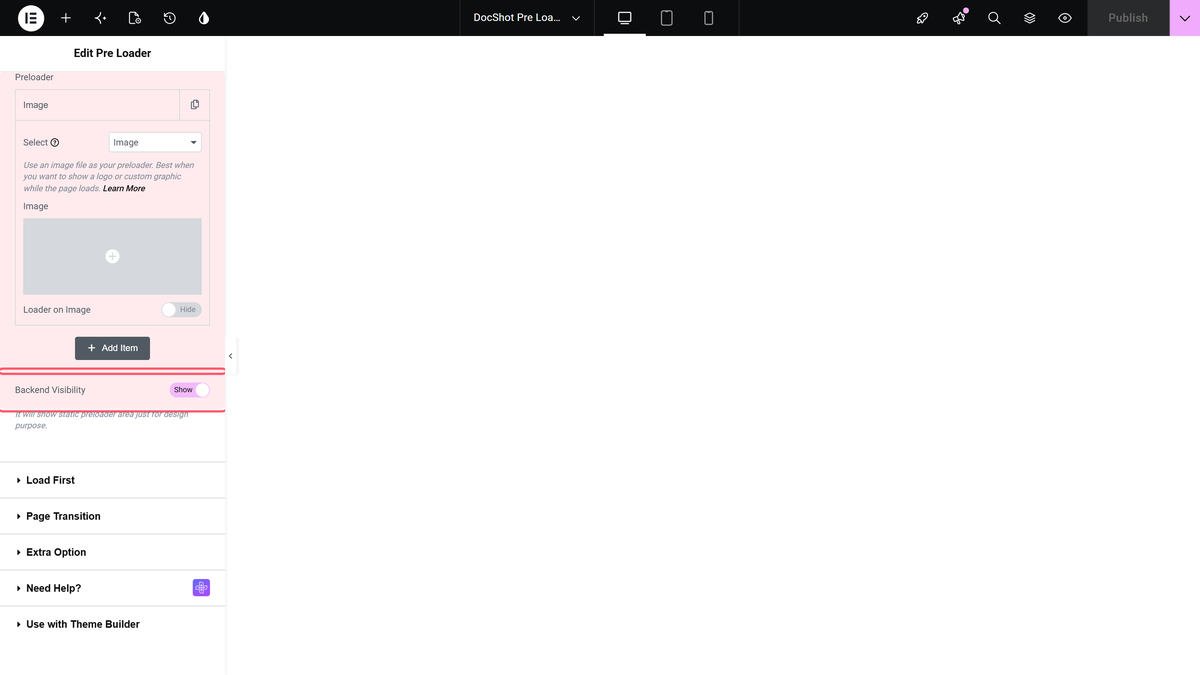
The Eight Preloader Types
| Select | What it shows | Main settings |
|---|---|---|
| Image (default) | Any image, optionally filling as the page loads | Image, Loader on Image |
| Icon | An Elementor icon or your own SVG | Icon; set Size on the Style tab |
| Text Content | A word such as Loading, optionally filling | Content, Loader on Text |
| Predefined | One of thirteen built-in animations | Select: Animation 1 to Animation 13 |
| Lottie | A Lottie JSON animation | Lottie URL, Width, Height, Speed, Loop Animation |
| Custom Code | Your own markup | Code |
| Shortcode | Anything a shortcode outputs, including a saved template | Shortcode |
| Progress | A progress bar or a percentage counter | Layout: Layout 1 to Layout 6 |
Click + ADD ITEM to stack more than one type on the same loading screen. How to combine multiple preloaders.

Backend Visibility shows a static preloader inside the editor so you can design it. It changes nothing on the published page, and some types have no editor preview at all.
The Four Content Sections
| Section | What it is for | Doc |
|---|---|---|
| Content | The preloader itself: the list of items and Backend Visibility | this page |
| Load First | Keep one element visible above the loading screen | Exclude content from a preloader |
| Page Transition | How the loading screen comes and goes | Page loading transition effects |
| Extra Option | How long the loading screen stays | below |
Extra Option: Load Time
By default the loading screen lasts exactly as long as the page takes to load. Load Time changes that.
| Load Time | What it does | Example |
|---|---|---|
| Default | Follows the real page load time | — |
| Minimum | Keeps the screen for at least the time you set | Set 3 and a page that loads in 2 seconds still shows the preloader for 3 |
| Maximum | Removes the screen after the time you set at the latest | Set 2 and a page that takes 5 seconds still only shows the preloader for 2 |
Time (Second) appears once you pick Minimum or Maximum, and runs from 1 to 60 seconds in steps of 1.
Styling
The Style tab has one section per preloader type, plus two that always apply.
| Section | Covers |
|---|---|
| Image | Max Width, Margin, Border, Border Radius, and the Normal and Fill opacity of Loader on Image |
| Icon | Size, Color, Background, Padding, Margin, Border, Border Radius |
| Text | Typography, Color, Background, spacing, and the fill colour under Text Loader |
| Predefined | Padding and Margin. Color 1 had no effect in our test. |
| Progress Bar | Width, Height, colours and per-layout options |
| Progress Number | Typography and colour of the percentage |
| Progress Circle | Empty colour, fill colour, stroke width and the percentage type, for Layout 6 |
| Transition Effect | Colours used by some of the page transitions |
| Box | The preloader container. Whole Background had no effect in our test; the loading screen stayed white. |
How It Behaves
- The loading screen is a fixed overlay covering the viewport at
z-index: 12345. - It is removed about a second after the page has finished loading, or after the Load Time you set.
- A preloader added to a header or footer template applies wherever that template is used; one added to a page applies to that page.
- If the preloader is in a template and you only want it on some pages, use Specific Page/Post in the site-wide setting rather than adding the widget many times.
Limitations
- The widget does nothing on the front end until the site-wide Pre Loader setting is on.
- Exclude Class under Page Transition currently makes the out transition fire only on the class you name, instead of skipping it. Details.
- The Code field of Custom Code strips
<style>tags. Details. - Two Style controls did nothing in our test: Box > Whole Background and Predefined > Color 1. The widget’s own stylesheet is loaded after Elementor’s generated CSS, so a few Style controls whose rules are not scoped to the widget are overridden. The correct CSS is generated; the plugin’s own rule simply wins. The loading screen therefore stays white, so choose a preloader that reads on white — an image, coloured text, an icon with a Size and Color set, a Lottie file or a progress bar.
Troubleshooting
The preloader works in the editor but not on the site
The site-wide Pre Loader setting is not on, or is on Specific Page/Post without this page’s ID.
The loading screen flashes past
That is a fast page. Use Extra Option > Load Time > Minimum to hold it.
The loading screen stays too long
Use Load Time > Maximum to cap it, and check the page for a slow third-party script.
The animation is invisible on the white screen
The Predefined animations are drawn in white and their Color 1 control did not change that in our test. Use a type you can colour, such as Icon, Text Content or Custom Code.
The preloader covers my logo and menu
That is expected. Use Load First > Exclude Content to lift the header above it.
