---
title: "Cascading Image Widget: Settings Overview"
url: https://theplusaddons.com/docs/cascading-image-widget-settings-overview/
date: 2024-05-13
modified: 2026-09-18
lang: en
author: "Aditya Sharma"
description: "The Image Cascading widget from The Plus Addons for Elementor stacks images, text and Lottie animations on top of each other in one block, each one placed exactly where you..."
image: https://theplusaddons.com/wp-content/uploads/2024/05/Cascading-Image-Widget_-Settings-Overview-1024x536.jpg
word_count: 997
---

# Cascading Image Widget: Settings Overview

## 

- The Image Cascading widget from The Plus Addons for Elementor stacks images, text, and Lottie animations in one block, with each layer placed separately for desktop, tablet, and mobile.
- Image Cascading ships only in the Pro version of The Plus Addons for Elementor, and it appears under The Plus Addons > Widgets after the toggle is turned on and the Elementor editor is reloaded.
- Add Multiple Cascading Sections uses one repeater item per layer, and Import Presets inserts a ready-made arrangement that can be edited.
- Image Animation uses GSAP with Enable Animation, Basic or Global animation modes, and trigger types On Load, On Scroll, or On Hover.

The **Image Cascading** widget from The Plus Addons for Elementor stacks images, text and Lottie animations on top of each other in one block, each one placed exactly where you want it.

Because every layer is positioned separately for desktop, tablet and mobile, you can build overlapping hero images, collages and photo stacks without writing any CSS.

***Requirement - This widget is a part of The Plus Addons for Elementor Pro, make sure it's installed & activated to enjoy all its powers.***

[LIVE WIDGET LINK](https://theplusaddons.com/elementor-widget/image-cascading/?utm_source=tpae&utm_medium=docs&utm_campaign=text)

https://www.youtube.com/watch?v=lnPIIOvAWhY

## Before You Start

- **Edition:** **Pro** — Image Cascading ships only in the Pro version of The Plus Addons for Elementor. The widget file is not in the free plugin at all, so it does not appear in the widget list without Pro.- **Widget to enable:** **Image Cascading**, under **The Plus Addons > Widgets**. Search for it and turn the toggle on, then reload the Elementor editor.- **Where the settings are:** drop the **Image Cascading** widget on the page. The **Content** tab holds three sections — **Image Cascading** (the layers), **Image Animation** and **Styling**.- **How it is built:** each item in the **Add Multiple Cascading Sections** repeater is one layer. Layers are absolutely positioned inside the widget, so they can overlap.
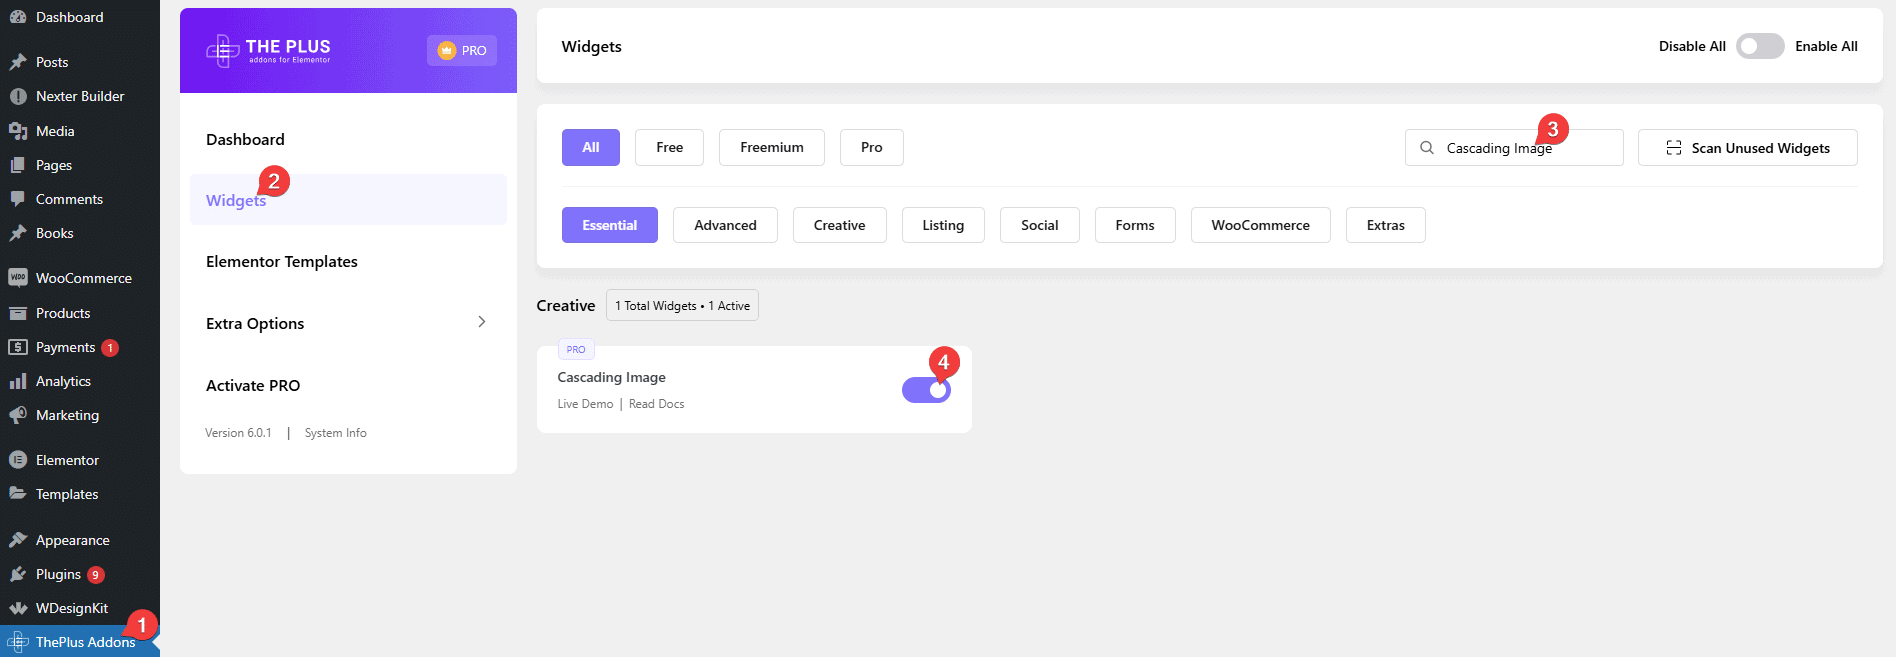
![The Plus Addons Widgets screen with the Image Cascading widget toggle turned on](https://theplusaddons.com/wp-content/uploads/2024/05/cascading-image.png)

## How the Widget Is Built

Everything starts in the **Image Cascading** section of the **Content** tab. The **Add Multiple Cascading Sections** repeater holds one item per layer, and **+ Add Item** adds another. A new widget starts with one item already in place.

> *The **Import Presets** button at the top of the section drops in a ready-made arrangement you can then edit.*

## Layer Position

Each item opens on a **Layer Position** block with **Desktop**, **Tablet** and **Mobile** tabs. The four position controls are switches: **Left (Auto / %)**, **Right (Auto / %)**, **Top (Auto / %)** and **Bottom (Auto / %)**. Switch one to **%** and a slider appears for that edge; leave it on **Auto** and the edge is not set.

| Setting | What it does | Default |
| ------- | ------------ | ------- |
| **Left (Auto / %)** | Reveals a **Left** slider, -100 to 100 %. | **%** (on) |
| **Right (Auto / %)** | Reveals a **Right** slider. | **Auto** (off) |
| **Top (Auto / %)** | Reveals a **Top** slider. | **%** (on) |
| **Bottom (Auto / %)** | Reveals a **Bottom** slider. | **Auto** (off) |
| **Width** | Sets the layer's maximum width. | Empty (the layer's natural width) |
| **Responsive Values** | On the Tablet and Mobile tabs. Until you turn it on, those devices reuse the desktop position. | Off |

## Layer Type

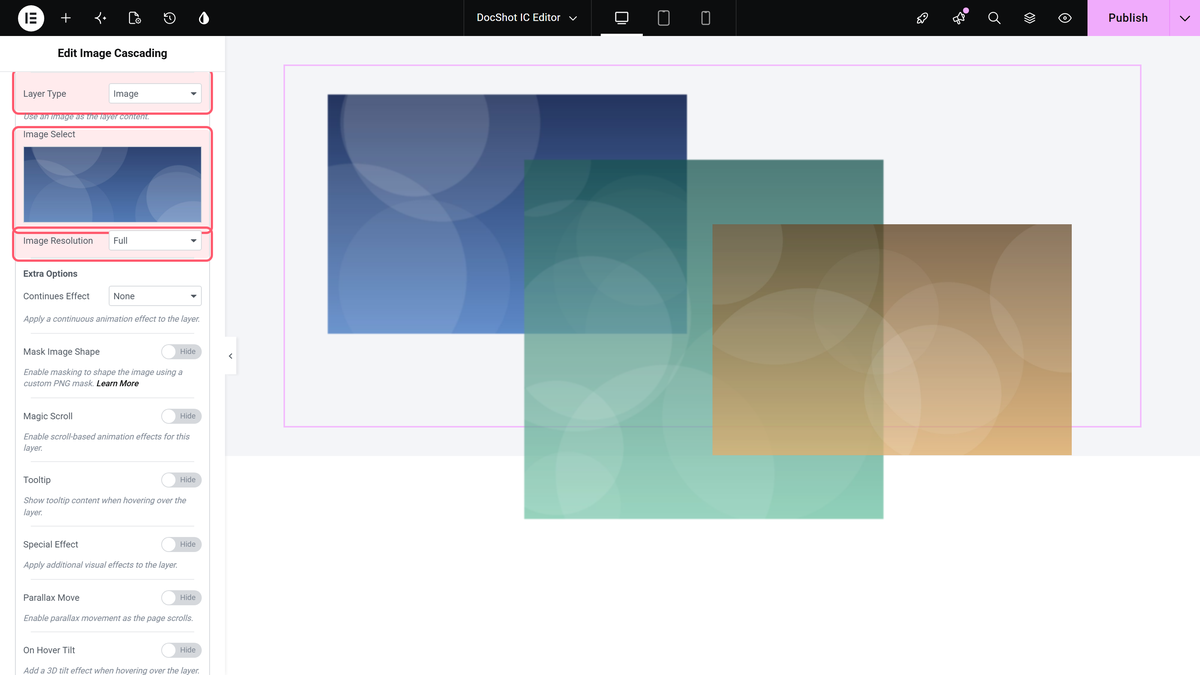
**Layer Type** decides what the layer contains. The rest of the item's settings change with it.

- **Image** — pick the file in **Image Select** and the size in **Image Resolution**.- **Text Content** — type the text in **Text Content** and style it with **Text Typography**, **Text Color**, **Text Hover Color**, **Text Background**, **Border Radius** and **Text Shadow**. [Full steps](https://theplusaddons.com/docs/add-text-content-in-elementor-image-cascading-widget/)- **Lottie** — paste a JSON URL in **Lottie URL**. [Full steps](https://theplusaddons.com/docs/add-lottiefiles-in-the-elementor-image-cascading-widget/)

![The Image Cascading panel with Layer Type set to Image, plus Image Select and Image Resolution](https://theplusaddons.com/wp-content/uploads/2026/09/imgcascading-layer-type.webp)

## Extra Options

Below the content settings, the **Extra Options** block adds effects to the layer. They are the same effects other The Plus Addons widgets offer.

| Setting | What it does | Default |
| ------- | ------------ | ------- |
| **Continues Effect** | A looping animation on the layer: Pulse, Floating, Tossing, Rotating, Kenburns Scale and more. | None |
| **Mask Image Shape** | Clips the layer to a PNG or SVG shape. [Full steps](https://theplusaddons.com/docs/add-mask-on-images-in-elementor-image-cascading-widget/) | Off |
| **Magic Scroll** | Moves, fades, scales or rotates the layer as the page scrolls. | Off |
| **Tooltip** | Shows a tooltip when the visitor hovers the layer. | Off |
| **Special Effect** | A two-colour reveal overlay on the layer. | Off |
| **Parallax Move** | The layer drifts with the mouse pointer. | Off |
| **On Hover Tilt** | A 3D tilt while the pointer is over the layer. | Off |
| **Link /Popup** | **Link** opens a URL, **Popup** opens embedded content in a lightbox. [Full steps](https://theplusaddons.com/docs/add-a-popup-in-elementor-image-cascading-widget/) | Empty |

> *Image layers also carry **Normal** and **Hover** tabs with **Overlay Background**, **Opacity**, **Transform css** and **Border Radius**, and a **Responsive Visibility** switch that can hide the layer on **Desktop**, **Tablet** or **Mobile**.*

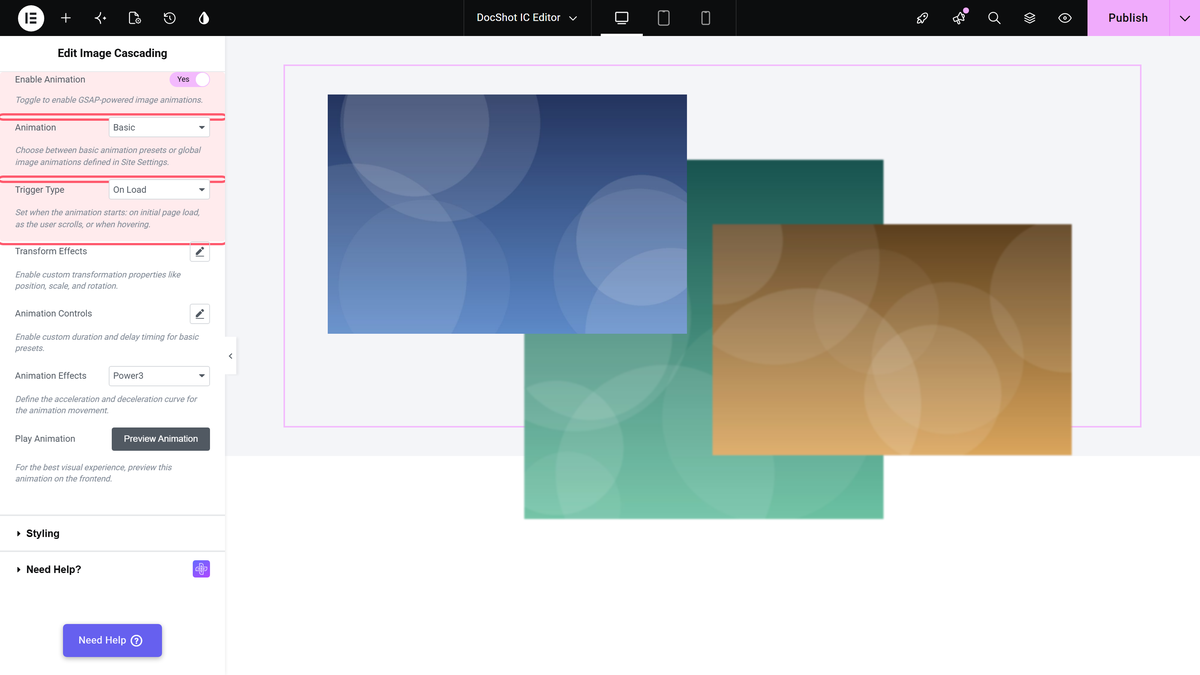
## Image Animation

The **Image Animation** section animates the layer images with GSAP. Turn on **Enable Animation**, then pick **Basic** or **Global** in **Animation**, a **Trigger Type** of **On Load**, **On Scroll** or **On Hover**, and set **Transform Effects** and **Animation Controls**. [Full steps](https://theplusaddons.com/docs/add-image-animation-in-elementor-image-cascading-widget/).

![The Image Animation section with Enable Animation on, Animation set to Basic and Trigger Type On Load](https://theplusaddons.com/wp-content/uploads/2026/09/imgcascading-animation.webp)

## Styling

The **Styling** section holds the settings for the widget as a whole.

| Setting | What it does | Default |
| ------- | ------------ | ------- |
| **Minimum Height** | The height of the widget box. Layer positions in % are measured against it, so set this first. | Empty |
| **Slide Show** | Brings layers to the front one at a time. [Full steps](https://theplusaddons.com/docs/create-image-cascading-slide-show-in-elementor/) | Off |
| **SlideShow Type** | **On Click** or **Autoplay**. | On Click |
| **Autoplay Duration** | Milliseconds between slides. | 4000 |
| **Overflow Hidden (Desktop / Tablet / Mobile)** | Meant to clip layers that stick out of the widget. | Off |
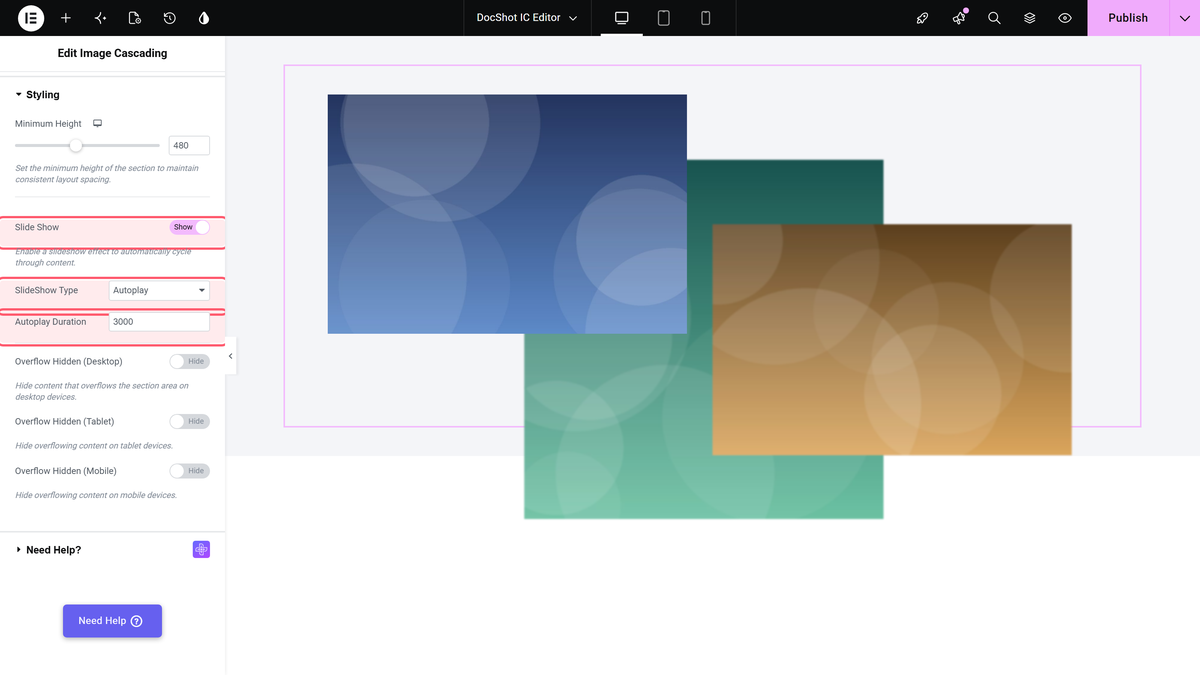
![The Styling section with Minimum Height, Slide Show on, SlideShow Type Autoplay and Autoplay Duration](https://theplusaddons.com/wp-content/uploads/2026/09/imgcascading-slideshow.webp)

## The Result

Three image layers with **Width** 42 % and **Left** / **Top** set to 5/8, 28/26 and 50/44 % produced this cascade on the published page:

![Three photos overlapping in a diagonal cascade on a published page](https://theplusaddons.com/wp-content/uploads/2026/09/imgcascading-result-cascade.webp)

## Limitations

- A Lottie layer only plays if it is the **first** item in **Add Multiple Cascading Sections**. In any later position the player script is never loaded and nothing is drawn. We saw this on two otherwise identical test pages in 6.5.0.- **Overflow Hidden (Desktop)**, **(Tablet)** and **(Mobile)** do nothing on a page built with Elementor containers. The script that applies them looks for an old-style `section` wrapper, and a container page has none. Clip the overflow on the parent container instead, under **Advanced > Layout > Overflow**.- Layers are absolutely positioned, so the widget does not grow to fit them. If a layer is cut off, raise **Minimum Height**.- Percentages are measured against the widget box, so a layer that sits nicely on desktop can land in the wrong place on a phone. Turn on **Responsive Values** and set the tablet and mobile positions yourself.

## Troubleshooting

### The widget is empty on the page

Set a **Minimum Height** in **Styling**. With no height the box collapses and the absolutely positioned layers have nothing to sit in.

### The layers all sit on top of each other

Each item needs its own **Left** and **Top** values. A new item copies the defaults, so change them before adding the next one.

### A layer disappears on mobile

Check **Responsive Visibility** on that item, and the **Mobile** tab of **Layer Position**.

## Related Docs

- [How to Create Image Cascading Effect in Elementor?](https://theplusaddons.com/docs/create-image-cascading-effect-in-elementor/)- [How to Create Image Cascading Slide Show in Elementor?](https://theplusaddons.com/docs/create-image-cascading-slide-show-in-elementor/)- [How to Add Mask on Images in Elementor Image Cascading Widget?](https://theplusaddons.com/docs/add-mask-on-images-in-elementor-image-cascading-widget/)- [How to Add Image Animation in Elementor Image Cascading Widget?](https://theplusaddons.com/docs/add-image-animation-in-elementor-image-cascading-widget/)

## Frequently Asked Questions

**Q: Why is my Cascading Image Widget empty on the page?**
A: A collapsed widget box is the usual cause. The Styling section has a Minimum Height setting, and the page notes that without a height the box collapses, so the absolutely positioned layers have nowhere to sit. The Plus Addons for Elementor, The Plus Addons, Plus Addons for Elementor, POSIMYTH uses that height as the base for layer placement, so set it first if the widget looks blank.

**Q: How do I stop all the layers from stacking in the same spot?**
A: Each layer needs its own Left and Top values in Layer Position. A new item copies the default values, so if you add several layers without changing those positions, they will sit directly on top of each other. The practical fix is to give every item a unique placement before adding the next one, especially when building overlapping hero images or photo stacks.

**Q: Does the Cascading Image Widget work for overlapping hero images and photo collages?**
A: That is exactly what it is built for. The Image Cascading widget from The Plus Addons for Elementor stacks images, text, and Lottie animations in one block, with each layer placed separately for desktop, tablet, and mobile. That makes it a fit for overlapping hero images, collages, and photo stacks without writing CSS.

**Q: What is the best way to handle mobile layout changes in a cascading image stack?**
A: Turn on Responsive Values in Layer Position and set tablet and mobile positions separately. Percentages are measured against the widget box, so a layer that looks right on desktop can drift on a phone if you reuse desktop values. The Plus Addons for Elementor, The Plus Addons, Plus Addons for Elementor, POSIMYTH gives you separate Desktop, Tablet, and Mobile tabs for that reason.

**Q: Why does a Lottie layer not show up in the cascading widget?**
A: A Lottie layer only plays when it is the first item in Add Multiple Cascading Sections. The page says that in any later position the player script is never loaded, so nothing gets drawn. If you need Lottie in this widget, put it first in the repeater or use one of the related setup guides such as [Full steps](https://theplusaddons.com/docs/add-lottiefiles-in-the-elementor-image-cascading-widget/).

**Q: What should I use instead of Overflow Hidden on an Elementor container page?**
A: Use overflow clipping on the parent container instead of relying on Overflow Hidden inside the widget. The page says Overflow Hidden on Desktop, Tablet, and Mobile does nothing on pages built with Elementor containers because the script looks for an old-style section wrapper. If layers stick out of the box, clip them under Advanced &gt; Layout &gt; Overflow on the parent container.