A countdown timer can be an effective marketing tool, whether it’s for a sale, event, or limited-time offer, it can create a sense of urgency and drive conversions.
With the Countdown widget from The Plus Addons for Elementor, you can easily add different types of countdown timers to your Elementor website.
Required Setup
- Elementor FREE Plugin installed & activated.
- You need to have The Plus Addons for Elementor plugin installed and activated.
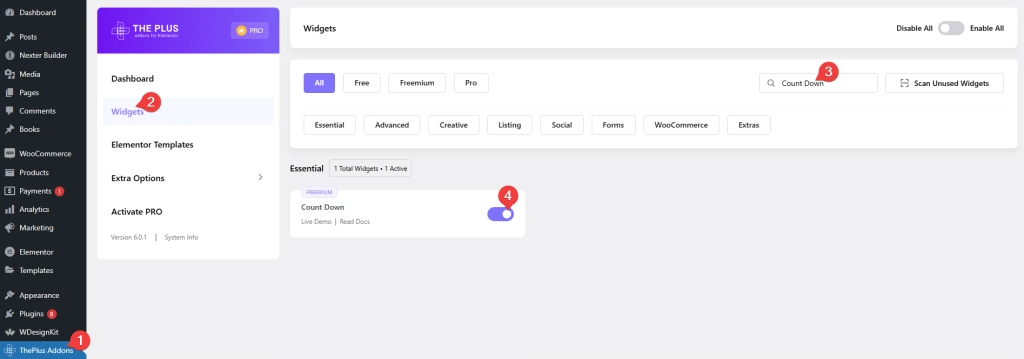
- Make sure the Countdown widget is activated, to verify this visit The Plus Addons → Widgets → and Search for Countdown and activate.
- This is a Freemium widget, to unlock the extra features, you need the PRO version of The Plus Addons for Elementor.
Learn via Video Tutorial:
How to Activate the Countdown Widget?
Go to
- The Plus Addons → Widgets
- Search the widget name and turn on the toggle.
Key Features
- Multiple Countdown Types – You can choose from three countdown types Normal Countdown, Scarcity Countdown (Pro) and Fake Number Countdown (Pro).
- Multiple Countdown Styles – You can choose from multiple countdown styles.
- Show Message (Pro) – You can show a message after the countdown timer ends.
- Show Elementor Template (Pro) – You can show content using the Elementor template after the countdown timer ends.
- Page Redirect (Pro) – You can easily redirect to a new page after the countdown timer ends.
- Change Content (Pro) – You can easily change content after the countdown timer ends.
How to Add Countdown Timer in Elementor?
Add the Countdown widget to the page.
Countdown Date
From the Countdown Setup dropdown, you have to select the countdown type. Here you’ll find three options –
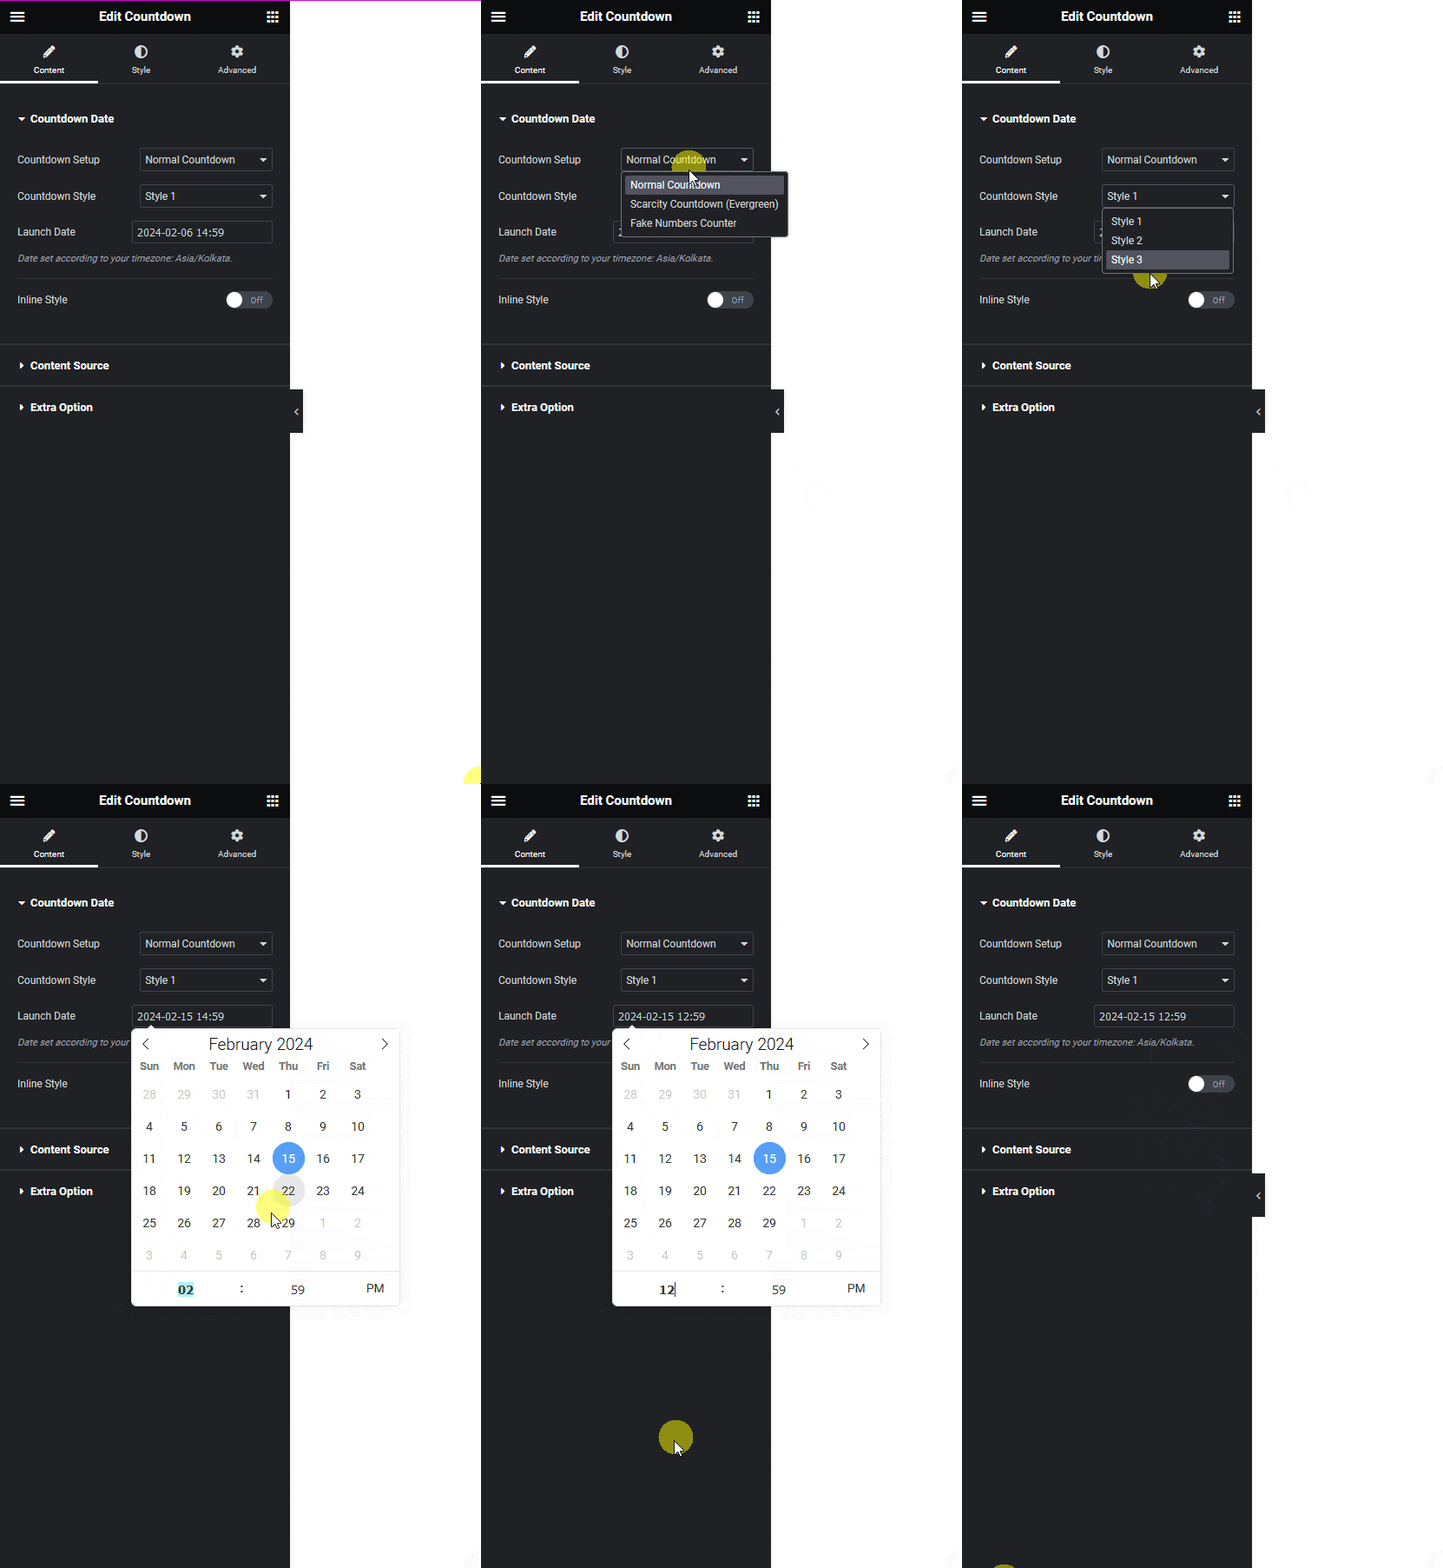
- Normal Countdown – To create a normal countdown.
- Scarcity Countdown (Evergreen) – To create a scarcity or evergreen countdown timer.
- Fake Numbers Counter – To create a fake number counter, like a stock scarcity counter.
Select the option as per your requirements, let’s select Normal Countdown here.
You can select a countdown style from the Countdown Style dropdown.
Then in the Launch Date field, you have to set the countdown end date and time.
Note: The time will be set based on your time zone.
You’ll see an Inline Style toggle option for the Style 1 only, from here you can make the countdown timer layout inline.
Also read, how to style Elementor countdown timer in block or Inline Style.
Content Source
From the Content Source tab, you can edit the timer content.
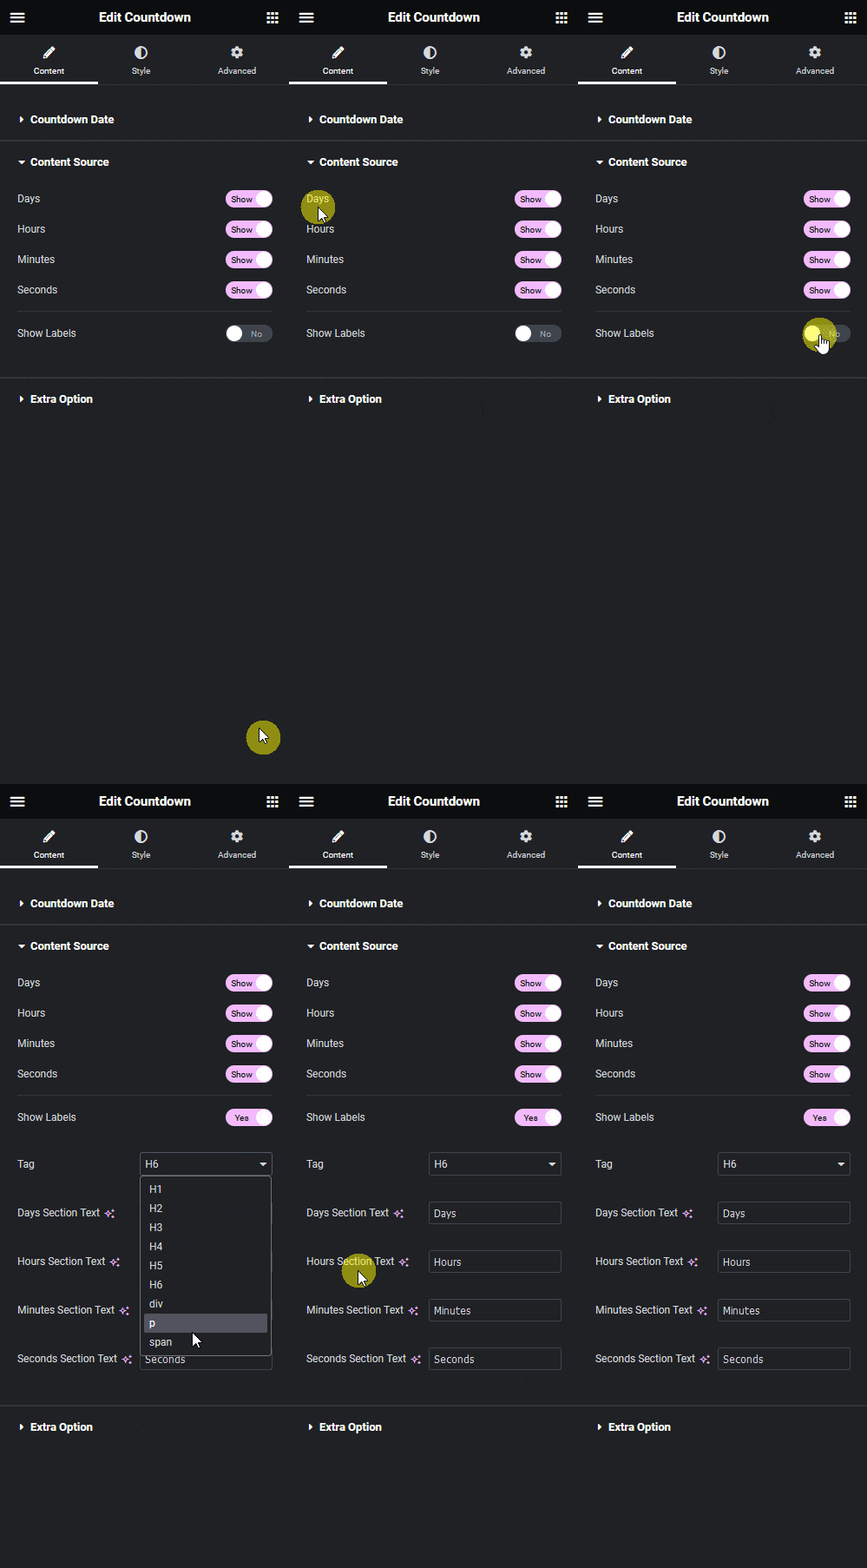
Note: The Content Source tab is not available for the Fake Numbers Counter option.
Days – From this toggle, you can show or hide the Days counter from the countdown timer.
Hours – From this toggle, you can show or hide the Hours counter from the countdown timer.
Minutes – From this toggle, you can show or hide the Minute counter from the countdown timer.
Seconds – From this toggle, you can show or hide the Seconds counter from the countdown timer.
Show Labels – From this toggle, you can show or hide the labels from the countdown timer. When enabled you’ll see individual label options –
- Tag – From here, you can set the HTML tag of the counter labels.
- Days Section Text – From here, you can manage the Days label.
- Hours Section Text – From here, you can manage the Hours label.
- Minutes Section Text – From here, you can manage the Minutes label.
- Seconds Section Text – From here, you can manage the Seconds label.
Also read, the 5 best WordPress countdown timer plugins.
Extra Option
From the Extra Option tab, you can add some extra features to the countdown timer.
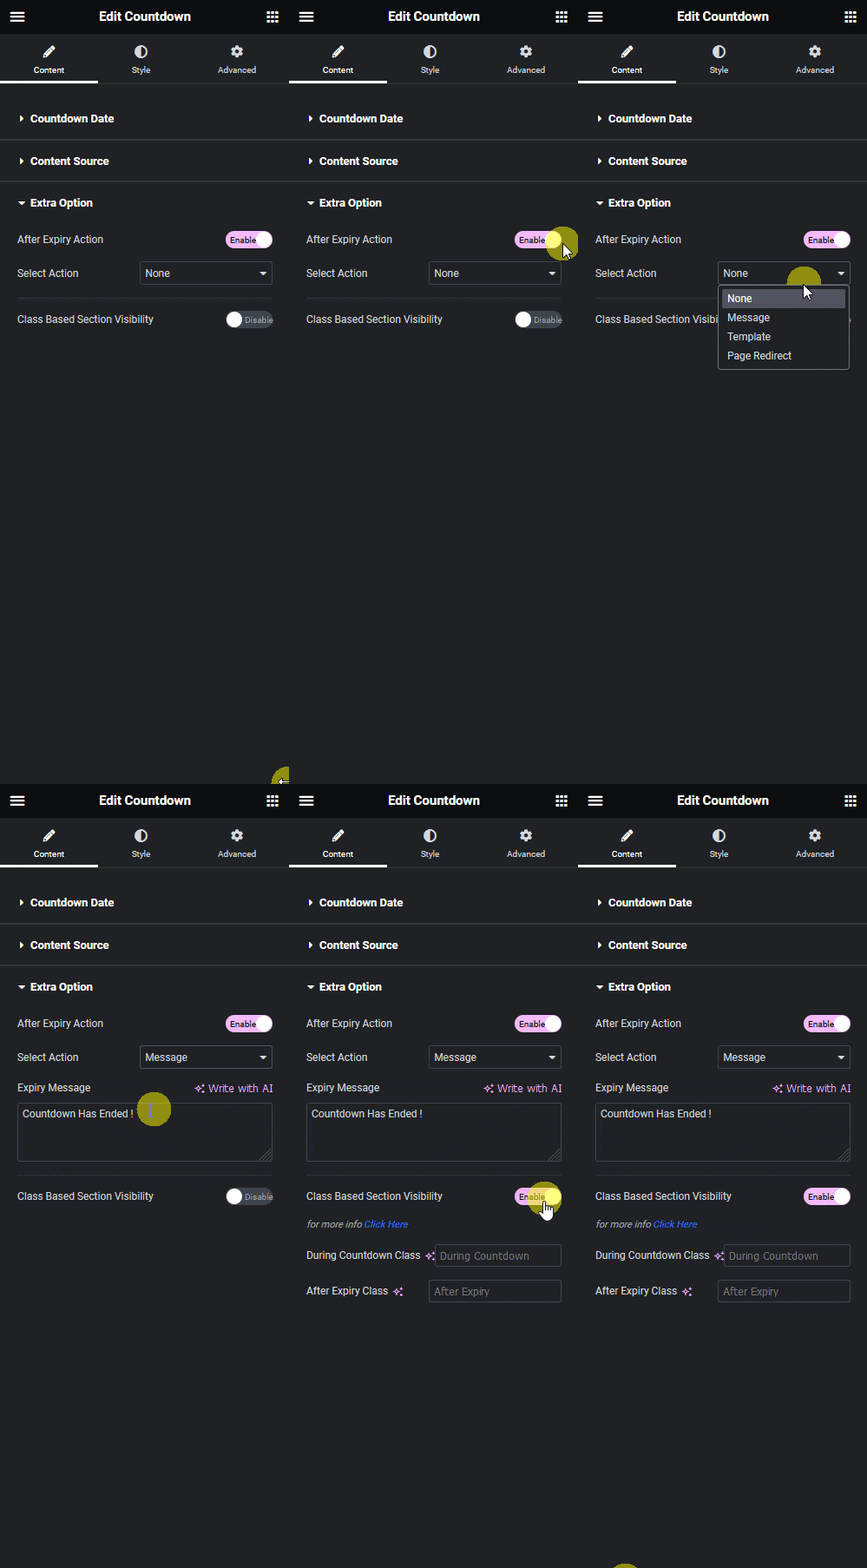
After Expiry Action – From this toggle, you can set different actions after the countdown ends. When enabled you’ll see the Select Action dropdown, here you’ll find four options –
- None – This is the default option, it does nothing after the countdown ends.
- Message – With this option, you can show a message after the countdown ends.
- Template – With this option, you can show any content using an Elementor template after the countdown ends.
- Page Redirect – With this option, you can redirect to another page after the countdown ends.
Note: After Expiry Action option is not available with the Fake Numbers Counter option.
Class Based Section Visibility – With this option you can change content after the countdown ends based on CSS class names.
Note: Class Based Section Visibility is not available with the Fake Numbers Counter option.
WooCommerce
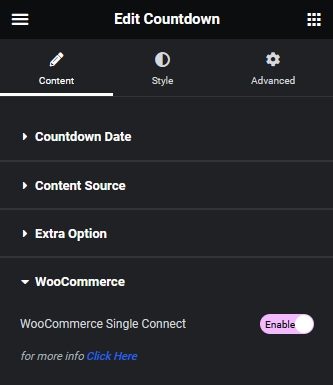
By enabling the WooCommerce Single Connect toggle, you can connect the countdown timer to the WooCommerce single product page.
Must read, how to show WooCommerce stock scarcity countdown on the product page in Elementor.
How to Style the Countdown Widget?
You can style the Countdown timer from the Style tab.
Counter – From here, you can manage the countdown timer typography, color, padding, margin, border etc. You can also manage the countdown label color, background and border individually as well.

Expiry Message – You’ll see this option when the Message option is selected as the After Expiry Action. From here, you can manage the message style.
Fake Message – You’ll see this option when the Fake Numbers Counter option is enabled. From here, you can manage the message alignment, typography, color, padding, margin, border etc.
Fake Number – You’ll see this option when the Fake Numbers Counter option is enabled. From here, you can manage the counter number style.
Background – From here, you can manage the countdown timer container background style.
On Scroll View Animation – This is our global extension available for all our widget, this adds scrolling animation as the widget comes in viewport. You can learn more about this from here.
Advanced options remain common for all our widgets, you can explore all it options from here.
Also read, how to create a sticky countdown timer in Elementor.


