
A page that still advertises a discount an hour after the discount ended does real damage. So does a full-price section sitting visible while the sale is still on.
The Countdown widget can show one part of the page while the timer runs and a different part once it has finished, using two CSS class names you choose.
For the full settings tour of the Countdown widget, see Countdown Widget: Settings Overview.
Requirement – This widget is a part of The Plus Addons for Elementor, make sure it’s installed & activated to enjoy all its powers.
Before You Start
- Edition: the Countdown widget itself is in the free plugin, but this page uses a Pro setting (see the next line).
- Pro feature: Class Based Section Visibility is part of The Plus Addons for Elementor Pro. In the free plugin the control is either missing or replaced by an upgrade notice.
- Prerequisite: Elementor (free) installed and active.
- Widget to enable: go to The Plus Addons > Widgets, search for Countdown and turn its toggle on.
- Prerequisite: two sections or containers on the same page — one for while the offer is live, one for after it ends.
Steps
- Select the section you want shown while the countdown runs. In Advanced > Layout, put a class name in CSS Classes, for example
sale-live. - Select the section for after the countdown and give it a different class, for example
sale-over. - Select the Countdown widget and open Content > Extra Option.
- Turn Class Based Section Visibility on.
- Type
sale-liveinto During Countdown Class andsale-overinto After Expiry Class. Enter the names without a leading dot, and fill in both. - Publish and check the page.
Then tell the widget which class is which:
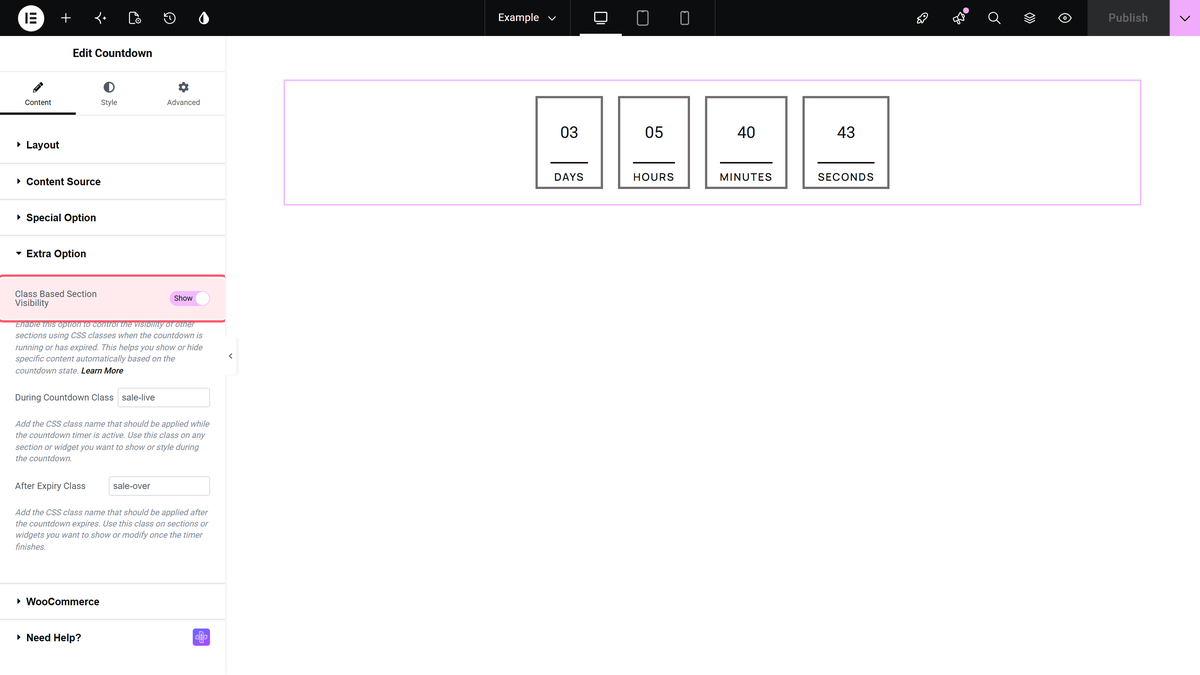
Settings
| Setting | What it does | Default |
|---|---|---|
| Class Based Section Visibility | Turns the whole feature on. | Off |
| During Countdown Class | The class on the element shown while the timer is running. The other one is hidden. | Empty |
| After Expiry Class | The class on the element shown once the deadline has passed. | Empty |
How It Behaves
Checked on published pages, three separate loads while the timer ran and two after it had expired:
- While the countdown is running, the During Countdown Class element is displayed and the After Expiry Class element is hidden. This was the same on every load and at every moment sampled.
- Once the deadline has passed, a fresh page load reverses it: the during element is hidden and the after element is displayed.
- The widget sets each element’s
displaydirectly, so the hidden one is not rendered at all rather than merely made transparent. - It works with the Normal Countdown and the Scarcity Countdown (Evergreen) setups.

Limitations
- With Style 1 nothing happens at the moment the clock hits zero. This was watched on published pages: with Style 1 the timer reaches 00 00 00 00 and stays there for as long as the visitor leaves the page open — the message, the template, the page redirect and the class swap all wait for the next page load. With Style 2 and Style 3 the same settings do act the instant the timer runs out. Since Style 1 is the default, assume the change happens on reload unless you have deliberately chosen another style, and never write copy promising visitors that the page will change in front of them.
- Class Based Section Visibility does nothing with Style 3. The feature is skipped for the Style 3 preset, and it is skipped for the Fake Numbers Counter setup. Use Style 1 or Style 2 with Normal Countdown or Scarcity Countdown (Evergreen).
- Both class fields must be filled. If either During Countdown Class or After Expiry Class is left empty, no class data is written to the page at all and nothing is shown or hidden. Fill in both, even if one of the two sections is only ever a single element.
- One element per class. The widget acts on the first element it finds with each class. If you need several blocks to appear together, put them inside one container and tag that container.
- The hidden section is still in the page source. Its content is downloaded and simply not displayed, so do not use this to hide a price, a coupon or anything else that must not be seen.
- Turn Elementor’s element cache off for this widget. Elementor’s Element Cache is on by default and stores rendered markup for a day, which can serve a stale deadline. Set Advanced > Layout > Cache Settings to Inactive on the Countdown widget, or disable it site-wide under Elementor > Settings > Performance.
Troubleshooting
Nothing is being shown or hidden
The usual cause is an empty field. Both During Countdown Class and After Expiry Class have to be filled in; with one blank, the widget writes no class information to the page at all. The second cause is Style 3, which skips the feature entirely.
I typed the class with a dot and it did not work
Enter just the name, sale-live, not .sale-live. Elementor’s CSS Classes field wants the same.
The countdown ended in front of me and the sections did not swap
Reload the page. With Style 1 the swap happens on page load, not at the moment the clock hits zero.
Both sections are visible for a moment when the page loads
The swap is done by JavaScript after the page renders, so there can be a brief flash. Giving the after-expiry section display: none in your own CSS avoids it.
Not verified
So you know exactly what has and has not been checked:
- The Scarcity (Evergreen) setup driving the class swap. The behaviour was measured with Normal Countdown and Style 1.
- More than one Countdown widget on a page, each with its own pair of classes.