---
title: "How to Create Custom Loop Skin for Blog Post in Elementor?"
url: https://theplusaddons.com/docs/create-custom-loop-skin-for-blog-post-in-elementor/
date: 2023-08-28
modified: 2026-04-10
author: "Aditya Sharma"
description: "Do you want to create a custom design for your blog post loop in Elementor? The default loop style, may not be suitable for everyone's blog design. This is where..."
image: https://theplusaddons.com/wp-content/uploads/2023/08/How-to-Create-Custom-Loop-Skin-for-Blog-Post-in-Elementor_-1024x536.jpg
word_count: 694
---

# How to Create Custom Loop Skin for Blog Post in Elementor?

## Key Takeaways

- Utilizes the Dynamic Listing widget from The Plus Addons for Elementor to create custom blog post loop designs.
- Recommends Elementor Pro for fetching dynamic data when creating custom blog post loop templates.
- Incorporates various Elementor widgets like Image, Icon List, and Text Editor to display dynamic content such as Featured Image and Post Title.
- Enables Multiple Loops feature to use up to 5 different custom templates for blog post listings.

Do you want to create a custom design for your blog post loop in Elementor? The default loop style, may not be suitable for everyone's blog design. This is where custom loop skins can help you stand out from the crowd.

With the Dynamic Listing widget from The Plus Addons for Elementor, you can design a custom layout for your blog post loop.

*To check the complete feature overview documentation of The Plus Addons for Elementor Dynamic Listing widget, [click here](/docs/dynamic-listing-widget-settings-overview/).*

***Requirement  - This widget is a part of The Plus Addons for Elementor, make sure its installed & activated to enjoy all its powers.***

[LIVE WIDGET LINK](https://theplusaddons.com/elementor-listing//#dynamic-listing-wgts?utm_source=tpae&utm_medium=docs&utm_campaign=text)

https://www.youtube.com/watch?v=NMlKOW65xVU

To do this, follow the steps -

First, you have to create a custom blog post loop template using Elementor. For instance, we will be creating this custom blog post layout design.

![dynamic listing post custom skin demo](https://theplusaddons.com/wp-content/uploads/2023/08/dynamic-listing-post-custom-skin-demo.png)

For creating custom loop skin, we recommend using the [Elementor Pro](https://elementor.com/pro/) plugin for fetching dynamic data.

### Create a Custom Blog Post Loop Template

1. To do this from the Dashboard, go to **Templates** and click on **Add New**, then select **Section** as the template type, give a name to the template, then click on the **Create Template** button.

![create elementor post loop template](https://theplusaddons.com/wp-content/uploads/2023/08/create-elementor-post-loop-template-1024x487.png)

2. Add a container then to add the post image, we’ll use the Elementor Image widget, in the **Choose Image** field, click on the **Dynamic Tags** and select **Featured Image** under Post.

![dynamic post image](https://theplusaddons.com/wp-content/uploads/2023/08/dynamic-post-image.png)

Style it according to your requirements.

3. Then, we’ll add another container inside the main container and position it accordingly to overlap the featured image.

4. To show the category we’ll use the Elementor Icon List widget, click on the **Dynamic Tags** and select **Post Term** under Post. Then click on the Wrench icon and choose **Category** from the **Taxonomy **dropdown.

Style it according to your requirements.

5. For the post title, we’ll use the Elementor Heading widget and to make it dynamic, click on the **Dynamic Tags** in the **Title** field and select **Post Title** under Post.

![dynamic post title](https://theplusaddons.com/wp-content/uploads/2023/08/dynamic-post-title.png)

Style it according to your requirements.

6. Now, to add the post content we’ll use the Elementor Text Editor widget and to make it dynamic, click on the **Dynamic Tags** field and select **Post Excerpt** under Post.

![dynamic post content](https://theplusaddons.com/wp-content/uploads/2023/08/dynamic-post-content.png)

Style it according to your requirements.

7. After that, we’ll add a two column container inside the main container. To add the post date we’ll use the Elementor Text Editor widget in the left column and to make it dynamic, click on the **Dynamic Tags** field and select **Post Date** under Post.

![dynamic post date](https://theplusaddons.com/wp-content/uploads/2023/08/dynamic-post-date.png)

Style it according to your requirements.

8. Then to add the post author name we’ll use the Elementor Text Editor widget in the right column and to make it dynamic, click on the **Dynamic Tags** field and select **Author Name** under Author.

![dynamic post author name](https://theplusaddons.com/wp-content/uploads/2023/08/dynamic-post-author-name.png)

Style it according to your requirements.

9. Once done, publish the template.

> *Note: Following this process, you can use different widgets to create the layout as well and make them dynamic using the Dynamic Tags of Elementor Pro.*

### Use the Template With Dynamic Listing Widget

Once you have created your custom blog post loop layout, use it with the Dynamic Listing widget.

1. Add the Dynamic Listing widget on a page or template.

2. Select the appropriate listing type from the **Post Listing Types** dropdown (except ACF Repeater) and select **Post **from the **Post Type** dropdown.

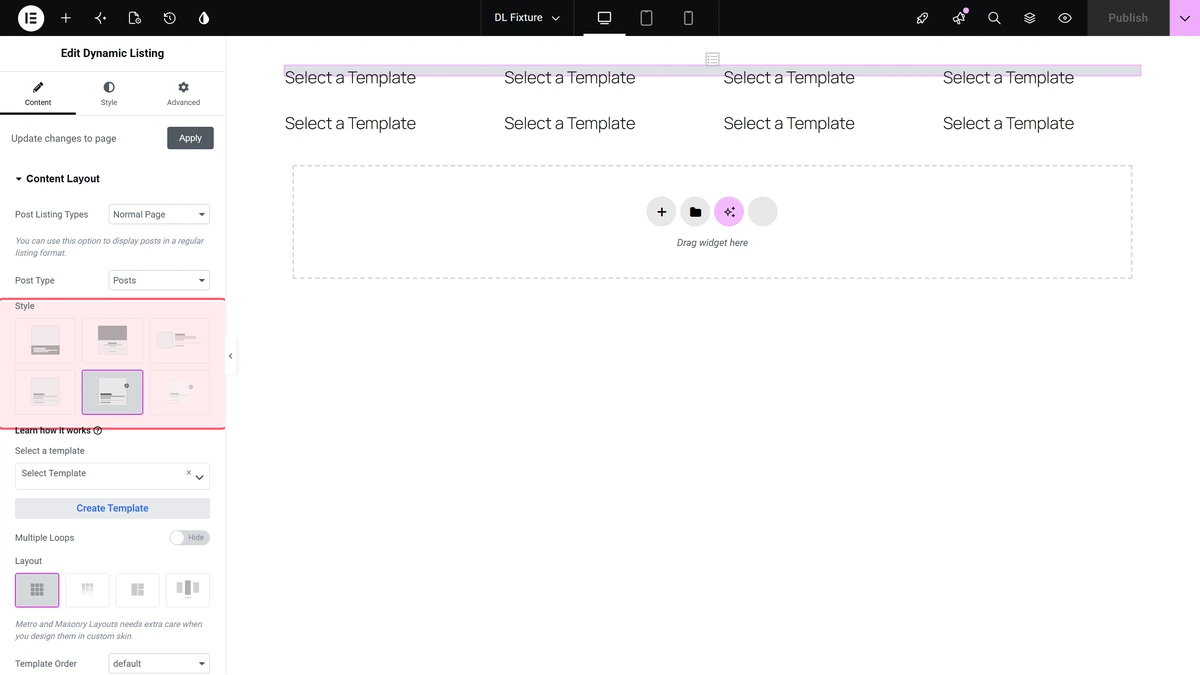
2. Then select **Custom Skin** from the **Style** section.

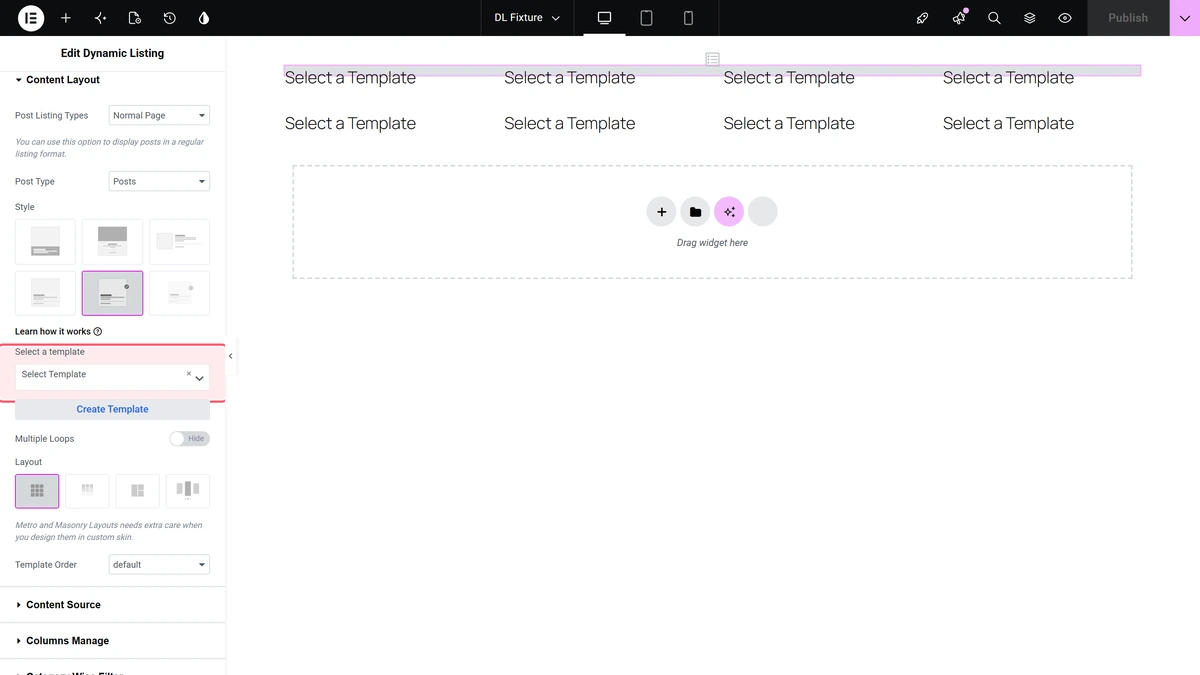
3. Now, you have to select your template from the **Select a template** dropdown.

You can turn on the **Multiple Loops** toggle to use multiple layout designs together for your listing. You can use up to 5 templates together.

> *Note: In order to use Multiple Loops, you have to create separate custom templates for each loop template.*

4. Then, you have to select the appropriate layout type from the **Layout** section.

> *Note: For using Masonry and Metro layout, you have to design your templates accordingly.*

5. If you are using multiple loops, you can arrange the templates in reverse or random order from the **Template Order** dropdown.

Now, your blog post will show in your custom layout.

Also, read [How to Add Filters to Elementor Custom Post Loop Skin](https://theplusaddons.com/docs/add-filters-to-elementor-custom-post-loop-skin/).