Are you looking to add Sticky Sections to show some additional content on your Image Scroll Sequence? Image scroll sequences are visually appealing and can keep users engaged with the content. However, by showing some information or content over the image sequence scroll animation through sticky sections you can make them more dynamic and informative.
To check the complete feature overview documentation of The Plus Addons for Elementor Scroll Sequence widget, click here.
Requirement – This widget is a part of The Plus Addons for Elementor, make sure it’s installed & activated to enjoy all its powers.
With the Scroll Sequence widget from The Plus Addons for Elementor, you can easily add different content on top of the Scroll Sequence through Sticky Sections.
To do this follow the steps –
1. Add a section or container (for flexbox), then add the Scroll Sequence widget there.
2. Now add the appropriate widget that you want to use to show content over the image scroll sequence. For instance, we’ll use the Elementor Heading widget.
Let’s add the Heading widget in the same section or container (for flexbox) and adjust the content and style according to your requirement.
3. Then go to the Advanced tab, add a higher Z-index value than the Scroll Sequence widget (by default z-index is set to 1) and in the CSS ID field add an id.
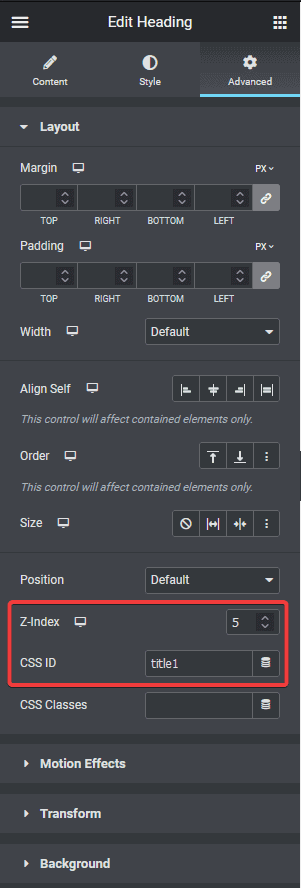
4. Now select the Scroll Sequence widget, then select the appropriate option from the Apply To dropdown where you want to add the sequence animation.
5. Then select the appropriate image source from the Upload Type dropdown.
6. To add sticky sections go to Extra Options and turn on the Sticky Sections toggle and click on the +ADD ITEM button.
7. In the Item #1 tab, you’ll find some options –
Section ID – Add the same id that you used on the content widget, here it is the Heading widget.
Start – Mention the image number from where you want the Heading widget to be visible.
End – Mention the image number from where you want the Heading widget to be hidden.
Note; Start and End range will depend on the number of images you have in your sequence.
Top (%) – From here you can manage the top position of the element.
Start Animation – You can add different start animations to the element.
End Animation – You can add different end animations to the element as well.

8. You can click on the +ADD ITEM button to add multiple sticky sections. Just keep in mind you have to add individual widgets then follow steps 3 and 7.
If you don’t have long enough content on the section or container (for flexbox) then you have to set a minimum height for the container or section with the Scroll Sequence widget.
This is how you can use Sticky Sections to add content over an image scroll sequence.
Also, check How to Add Image Sequence on the Page Body in Elementor.
