When it comes to creating a visually appealing and organized website, the use of headings is crucial. Not only do headings help break up content and make it easier to read, but they also improve SEO for your Elementor website.
Using the Heading Title Widget from The Plus Addons for Elementor makes it very easy to create nice and stylish headings that draw user attention and organize your website’s content.
Required Setup
- Elementor FREE Plugin installed & activated.
- You need to have The Plus Addons for Elementor plugin installed and activated.
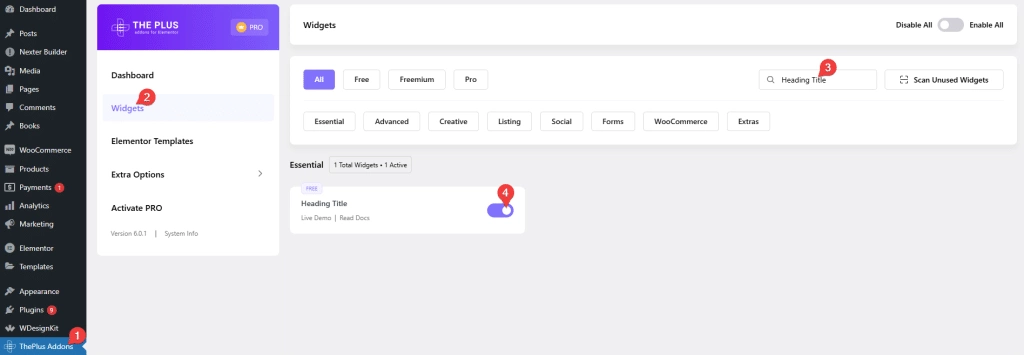
- Make sure the Heading Title widget is activated, to verify this visit The Plus Addons → Widgets → and Search for Heading Title and activate.
How to Activate the Heading Title Widget?
Go to
- The Plus Addons → Widgets
- Search the widget name and turn on the toggle.

Key Features
- Style Options: Choose from 9 unique styles to personalize your heading titles.
- Limit Word Count: Set a specific word count for your headings in Elementor.
- Page Heading Title: Easily add page heading titles directly within Elementor.
How to Add Heading Title in Elementor?
Add the Heading Title widget to the page.
From the Style dropdown, you can select any one from multiple style options.
Modern – In this style, you will get a modern look in the heading title.
Simple – In this style, you will get a simple basic look in the heading title.
Classic – In this style, you will add a separator between title & description.
Double Border – In this style, you will add a double border as a separator between the title & description.
Vertical Border – In this style, you will add a vertical border as a separator above/down.
Dashing Dots – In this style, you will add dots as separators between title & description.
Unique – In this style, you will get a unique style for the title & description.
Stylish – In this style, you will add a border plus dots as separators between the title & description.
Animated Split – In this style, you can add an animated heading title.

Let’s select the style as Modern here.

In the Select Heading section, you have to select the heading type, here you’ll find two options – set as Default or Page Title.
Default – This will add a normal heading.
Page Title – With this option, you can add a page title dynamically for a current page.
Let’s select Default here.
In the Heading Title field, you can add the main title.
In the Sub Title field, you can add a subtitle.
Then in the Extra Title field, you can add an extra title.
You can place the extra title before or after the main heading from the Extra Title Position dropdown.
From the Alignment section, you can align the heading.
From the Heading Title & Sub Title Limit toggle, you can limit the Heading Title and Sub Title.
Heading Title Limit – From here, you can limit the heading word count.
Sub Title Limit – From here, you can limit the subheading word count.
How to Style the Heading Title Widget in Elementor?
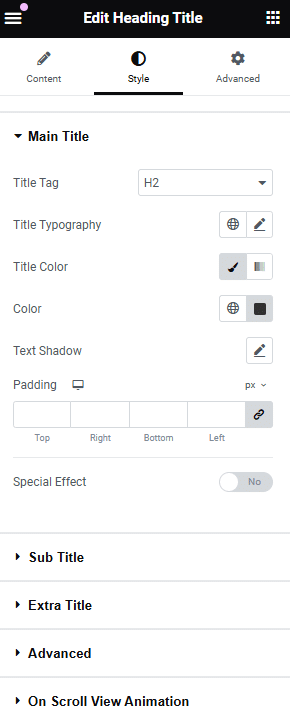
To style the Title, you’ll find all the options in the Style tab.
Main Title – From here, you can manage the main heading style. You can change the title HTML tag, title typography, color, padding, etc. You can also add special effects to the title from here.

Advanced Options: You can select the position of the main title to show it either after or before the sub title.
On Scroll View Animation: This global extension is available for all widgets and adds a scrolling animation as the heading title widget comes into view during scrolling.


