Do you want to add filter search on your WooCommerce store or custom post types listing? Adding filters is a great way to improve the user experience, allowing them to find relevant content quickly.
With the WP Search Filters widget from The Plus Addons for Elementor, you can easily add different types of search filters on your normal blog posts, custom post types or WooCommerce product listing.
Required Setup
- Elementor FREE Plugin installed & activated.
- You need to have The Plus Addons for Elementor plugin installed and activated.
- This is a Premium widget, and you need the PRO version of The Plus Addons for Elementor.
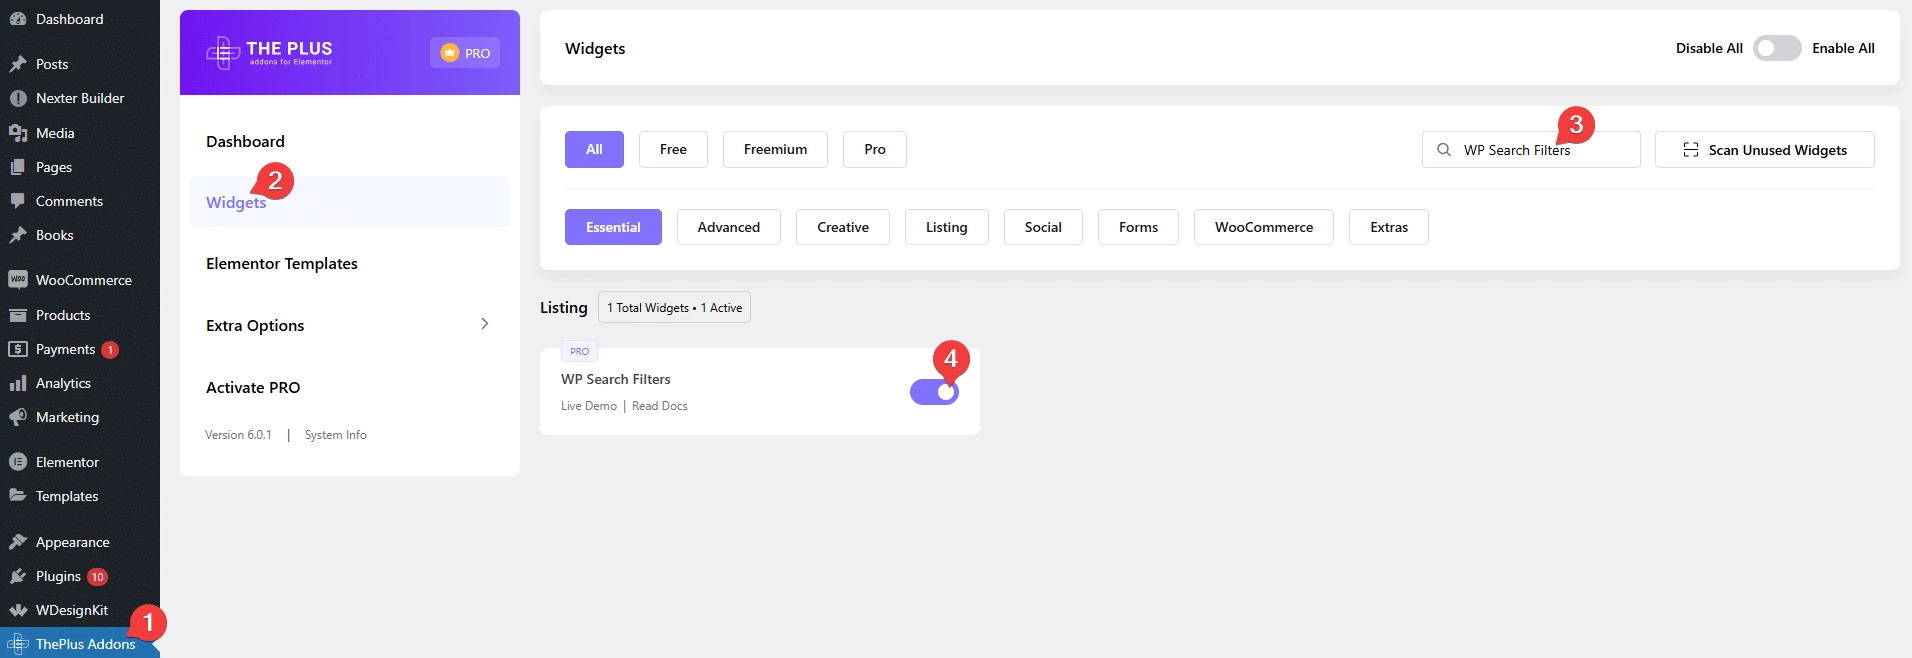
- Make sure the WP Search Filters widget is activated, to verify this visit The Plus Addons → Widgets → and Search for WP Search Filters and activate.
Learn via Video Tutorial:
How to Activate the WP Search Filters Widget?
Go to
- The Plus Addons → Widgets
- Search the widget name and turn on the toggle.
Key Features
- Multiple Filter Type – You can add filters on normal blog post, custom post types and WooCommerce products.
- Multiple Types of Filters – You can add different types of filters such as checkbox, radio, search, alphabet and more.
- Filter Based on Different Taxonomy – You can create filters based on different taxonomies such as post category, post tag, product category, product tag, custom taxonomy and product attribute.
- Filter Based on Custom Fields – You can easily add filters based on custom fields created using different plugins like ACF, Pods, Metabox etc.
- Filter Based on Product Attributes – You can add filters based on different custom product attributes.
- Combine Different Types of Filters – You can easily combine different types of filters together.
- URL Parameter – You can easily share the URL with applied filters using the URL Parameter feature.
How to Use the WP Search Filters Widget?
In order to use the WP Search Filters widget, you have to use it with either Dynamic Listing or Product Listing widget from The Plus Addons for Elementor. It can’t be used as a standalone widget.
So add the WP Search Filters widget along with the Dynamic Listing or Product Listing widget on the page or template.
Filter Area
Open the Category item under the Filter Area.
From the Filter Type dropdown, you have to select the filter type. Depending on the filter type, options will vary.
Here, you’ll find three options –
WP Filter – For creating filters based on different taxonomies and custom fields.
Woo Filter – For creating filters based on different product attributes.
Filter Meta – For adding different options to manage the filter menu and listing column layout.
WP Filter
When you select WP Filter, you’ll find the following options.
From the Select Source dropdown, you can choose different types of filters. Depending on the filter types, options will vary.
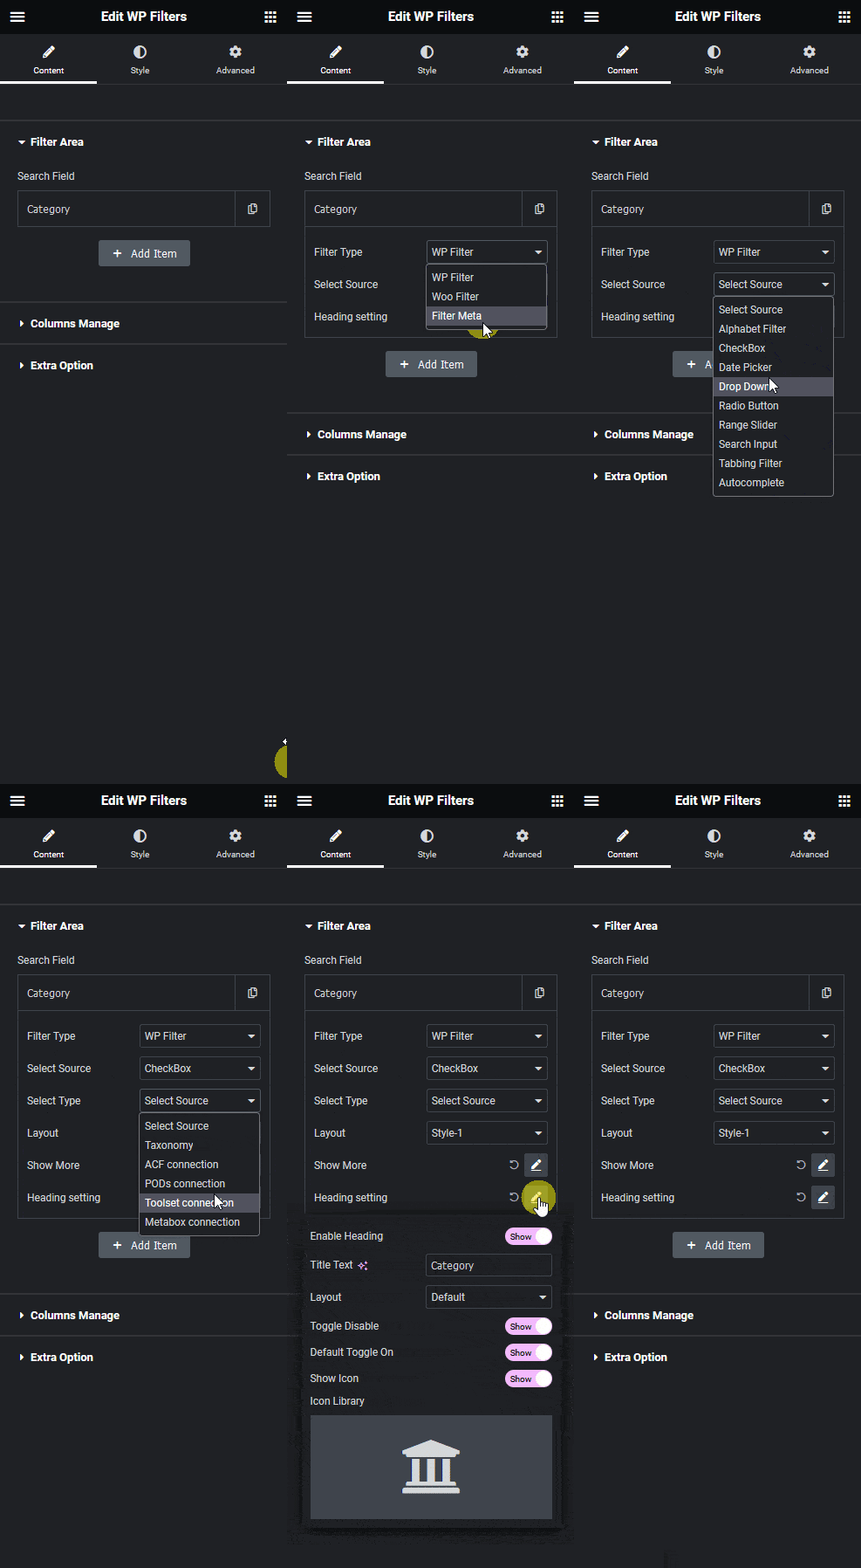
Here you’ll find nine options –
Alphabet Filter – For adding alphabet and number filter.
CheckBox – For adding a checkbox filter.
Date Picker – For adding a date picker filter.
Drop Down – For adding a select dropdown filter.
Radio Button – For adding a radio button filter.
Range Slider – For adding a range slider filter.
Search Input – For adding a search filter.
Tabbing Filter – For adding a tabbed button filter.
Autocomplete – For adding a location based filter.
Select the appropriate filter type that fits your needs.
Once you select an option (except Alphabet Filter) you’ll see a Select Type dropdown you have to select the source based on which filters will work. Depending on the source type, options will vary.
Taxonomy – To set filters based on different taxonomies.
ACF connection – To set filters based on custom fields created with ACF.
PODs connection – To set filters based on custom fields created with PODs.
Toolset connection – To set filters based on custom fields created with Toolset.
Metabox connection – To set filters based on custom fields created with Metabox.
Select the appropriate source that fits your needs.
Then from the Heading setting section, you can manage the filter heading. From here you can show or hide the heading, change the title text, change the layout, enable or disable the toggle, show or hide the icon and change the icon.
Woo Filter
When you select Woo Filter, you’ll find the following options.
From the Select Source dropdown, you can choose different types of filters. Depending on the filter types, options will vary.
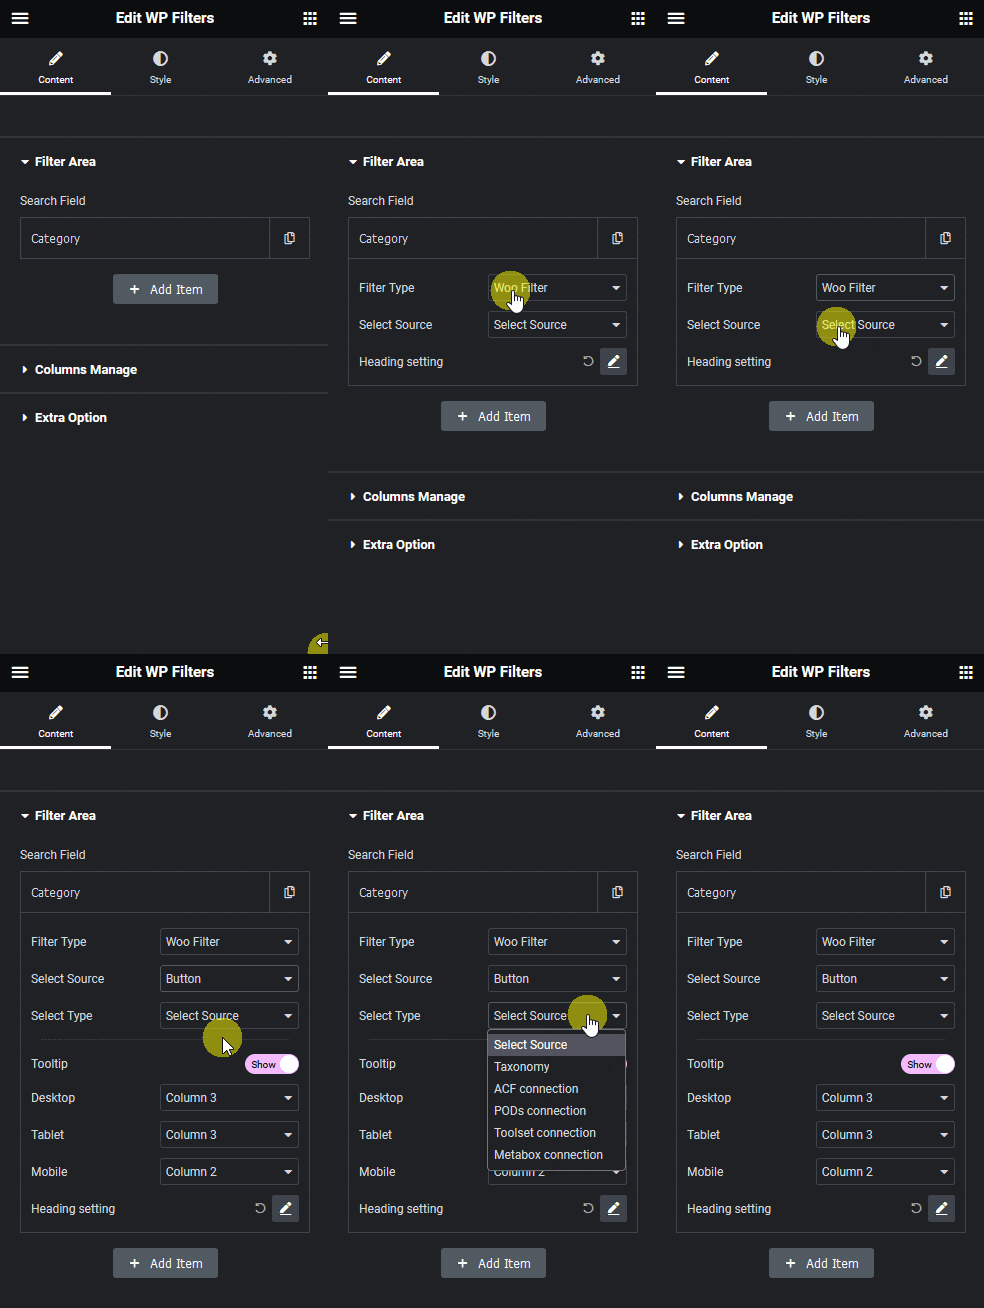
Here you’ll find four options –
Button – For adding a button filter.
Color – For adding a color swatch filter.
Image – For adding an image filter.
Rating – For adding a rating filter.
Once you select an option, you’ll find the same source options under the Select Type dropdown which are available in the WP Filter option. You can also enable the tooltip and manage columns for desktop, tablet and mobile.
You’ll also find the same Heading setting option available in the WP Filter option.
Filter Meta
When you select Filter Meta, you’ll find the following options.
From the Select Source dropdown, you can choose different types of options to manage the filter menu and listing column layout.
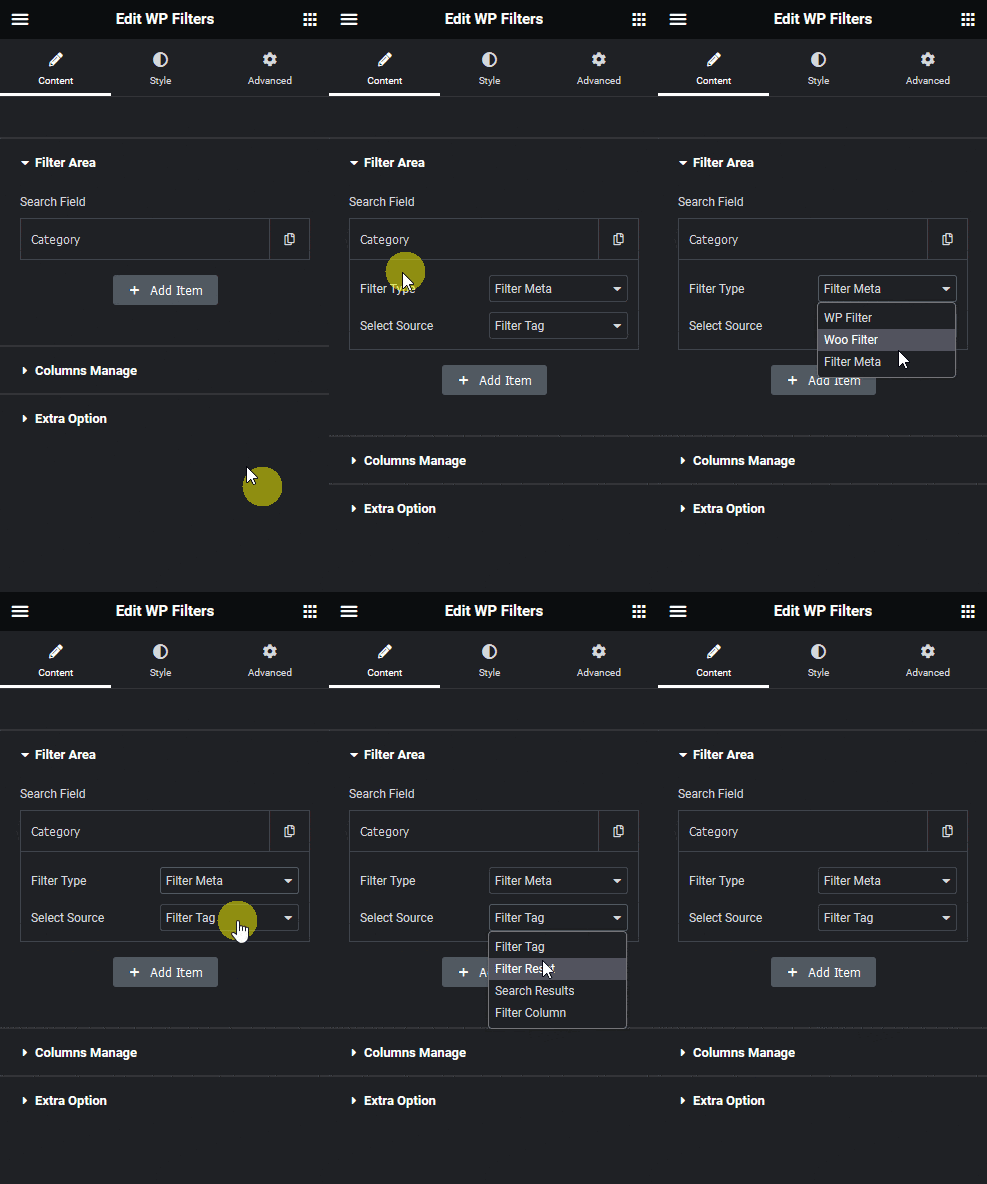
Filter Tag – To show applied filters as tags.
Filter Reset – To add a filter reset button.
Search Results – To show a number of results message.
Filter Column – To allow users to manage the product column layout.
You can click on the +Add Item button to add multiple filters.
Columns Manage
From the Columns Manage tab, you can split the filters into multiple columns for desktop, tablet and mobile separately.
You can also manage the column gap and margin.
Extra Options
In the Extra Options tab, you’ll find some additional options to manage the filter menu.
Filter Toggle Button – With this option, you can limit the number of visible filters and add a toggle button to show all the options.
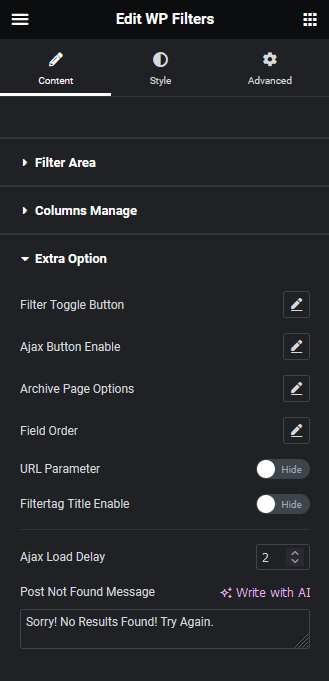
Ajax Button Enable – With this option, you can disable the search query from running every time you select a filter option, instead it will add a button to allow you to select multiple filter options then you have to click on the button to run the search query.
This can be a good option to reduce the load on your server.
Archive Page Options – With this option, you can show only active category item in the category archive page, or you can only show active sub category in the category archive page.
Field Order – With this option, you can order the filter options within a filter type in ascending or descending order based on different parameters.
URL Parameter – With this option, you can easily share the URL with your applied filter.
Filtertag Title Enable – This option will show the filter category name on the tag.
Ajax Load Delay – From here, you can delay the result load time. At times the layout may not show properly after applying a filter, delaying the load time can solve the issue.
Post Not Found Message – From here, you can customize the message if there are no posts to show.
How to Style the WP Search Filters Widget?
To style the WP Search Filters widget, you’ll find all the styling options under the Style tab.
Title – From here, you can manage filter title padding, margin, typography, color, background, icon size, icon color etc.

Alphabet – From here, you can manage the alphabet filter padding, margin, typography, color, background, box padding, box margin, box background etc.
Check box – From here, you can manage the style of the checkbox filter.
DatePicker – From here, you can manage the style of the date picker filter.
DropDown – From here, you can manage the style of the dropdown filter.
Radio Button – From here, you can manage the style of the radio button filter.
Range slider – From here, you can manage the style of the range slider filter.
Search Input – From here, you can manage the style of the search filter.
Tab Button – From here, you can manage the style of the tab button filter.
Woo Button Field – From here, you can manage the style of the button filter when you use the Woo Filter.
Woo Color Field – From here, you can manage the style of the color swatch filter when you use the Woo Filter.
Woo Image Field – From here, you can manage the style of the image filter when you use the Woo Filter.
Woo Rating – From here, you can manage the style of the rating filter when you use the Woo Filter.
Woo Tooltip – From here, you can manage the tooltip style when you use the Woo Filter.
Autocomplete – From here, you can manage the style of the autocomplete filter.
Filter Tag – From here, you can manage the style of the filter tag.
Filter Reset Button – From here, you can manage the filter reset button style.
Total Result (Filter Meta) – From here, you can manage the style of the total result message.
Column Filter (Filter Meta) – From here, you can manage the column filter button style.
Showmore / Showless – From here, you can manage the show more toggle button style.
Background Option – From here, you can manage the filter menu background style.
Advanced options remain common for all our widget, you can explore all it options from here.


