Are you looking to add neumorphism effect to elements in your Elementor website? This design style brings visual depth and realism to user interfaces with a combination of light and shadow.
With the Advanced Shadows extension from The Plus Addons for Elementor, you can easily add multiple shadows to an element in Elementor to create a neumorphism effect.
To check the complete feature overview documentation of The Plus Addons for Elementor Advanced Shadows extension, click here.
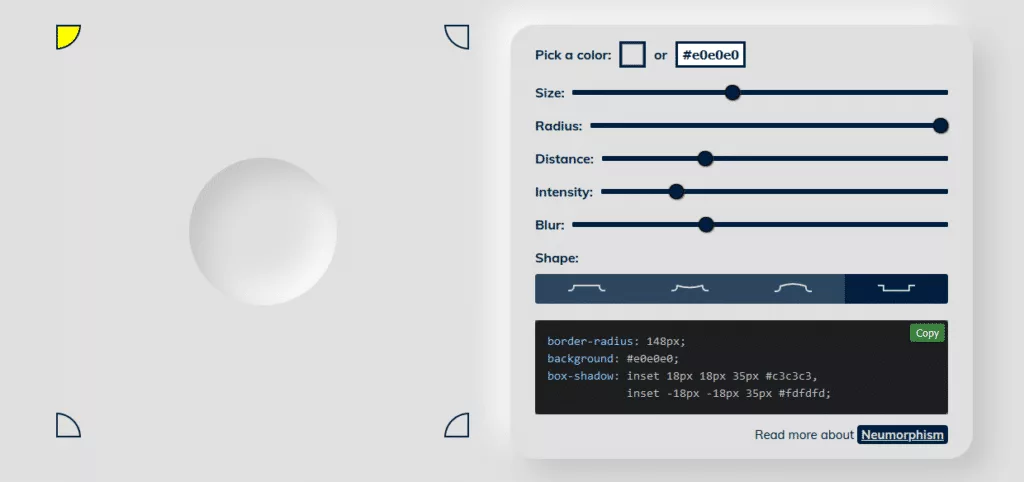
You can play with this tool to create a neumorphism effect, here you can find the exact box-shadow values.
Let’s say we want to create this neumorphism effect.
Now to add a neumorphism effect follow the steps –
1. Add a container or section with the background color of #e0e0e0 as per the example code.
2. Then add a widget.
Note: You can also add box shadows to a container as well.
For instance, we’ll use the Icon widget with the Stacked view and do the necessary styling adjustments.
3. Then go to Advanced > Advanced Shadows and enable the Box Shadows toggle.
4. From the Apply to dropdown, you have to select where you want to apply the box shadow. Here you’ll find two options –
Default – This will apply the box shadow to the widget container or the default container.
Add Custom Class – With this option, you can target an element by class name within a widget or container.
For our example, we want to apply the box shadow to the icon stacked background only, so we’ll select Add Custom Class and add .elementor-icon class in the Enter Custom Class Name field.
Note: You can use the browser Developer tools to find the element’s class name.
5. Then in the Normal tab you can add a box shadow by clicking on the +Add Item button.
In the Label field, you can add a name to the box shadow.
From the Type dropdown, you can select the drop shadow type. Here you’ll find two options –
Inset – For adding inner box shadow.
Outset – Fro adding box shadow outside.
As per the example code, we’ll set the type to Inset here.
From the X field, you can move the shadow horizontally.
From the Y field, you can move the shadow vertically.
From the Blur field, you can add blur to the box shadow.
From the Spread field, you can spread the shadow.
As per our example code, we’ll add the values of 18, 18 and 35 to the X, Y and Blur fields respectively and we’ll leave the Spread field blank since it doesn’t have any value.
In the Color field, you have to add the shadow color. We’ll add the color as per the example code.
6. Following the same process click on the +Add Item button to add the second shadow value as per the example code.
Note: In a similar process you can add multiple normal box shadows to an element.
In the Transition css field, you can add a transition value. It is useful if you are looking to add a hover animation.
In the Hover tab, you can enable the Hover Box Shadows toggle to add different sets of box shadows to animate the box shadow on the mouse hover.
Since we are not animating the box shadow we’ll leave it blank.
Now you should have a similar neumorphism effect as the above example.

Read more about, How to Change Drop Shadow on Hover in Elementor.


