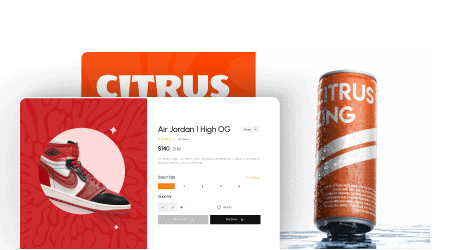


Are you looking to create a custom product loop skin in Elementor for your WooCommerce shop and product archive pages? With the Smart Loop Builder, you can design unique product listing templates that perfectly fit your store’s branding. By using a custom design, you can highlight product details the way you want while maintaining a consistent style across your store. This not only helps your shop look more professional but also creates a better shopping experience that encourages more conversions.
With the Dynamic Listing widget from The Plus Addons for Elementor, you can easily add a custom design to the product listing items using custom HTML and CSS.
To check the complete feature overview documentation of The Plus Addons for Elementor Dynamic Listing widget, click here.
Requirement – This widget is a part of The Plus Addons for Elementor, make sure its installed & activated to enjoy all its powers.
To do this, make sure you have the WooCommerce plugin installed and activated on your site and created at least one product.
Once done, follow the steps –
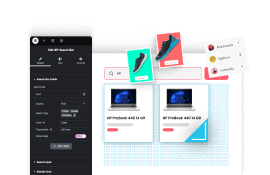
1. Add the Dynamic Listing widget to the page.
2. After selecting the appropriate listing type from the Post Listing Types dropdown (except ACF Repeater and Custom Query), select Product from the Post Type dropdown.
3. Then select Smart Loop Builder from the Style section.
After that, select the appropriate layout from the Layout section.
4. Then go to the Smart Loop Builder tab, here you have to add custom HTML and CSS to create your design or you can use a ready preset style and customize it.
Note: To use this feature effectively, you should know HTML and CSS.
Use Ready Preset
To use ready presets, click on the Ready Presets button.
It will open a popup, where you’ll find some free and pro preset templates.
Click on the download icon of the template you want to use and the HTML and CSS code of that template will be added in the HTML and CSS sections.
Then you can easily modify the HTML and CSS code as per your requirements.
Custom Template
But if you want to create the template from scratch, you can do that as well by writing your custom HTML and CSS code.
In the HTML section, you have to write the HTML of your template.
In your HTML template, you have to use the following tags to show the respective data.
- For the Post Title – {{tpae_title}}
- For the Post Excerpt – {{tpae_excerpt}}
- For the Featured Image – {{tpae_image}}
- For the Featured Image URL – {{tpae_image_url}}
- For the Post Description – {{tpae_description}}
- For the Post URL – {{tpae_permalink}}
- For the Post Author – {{tpae_author_meta}}
- For the Post Author Avatar – {{tpae_author_logo}}
- For the Post Date (publish date) – {{tpae_date_created}}
- For the Post Time (publish time) – {{tpae_time_created}}
- For the Post Category – {{tpae_category}}
- For the Post Tag – {{tpae_tag}}
- For the Post Author URL – {{tpae_author_url}}
- For the Post Date (publish date – month / year / day) – {{tpae_date_created_m_y_d}}
- For the Post Date (publish date – month (full month name) / year / day) – {{tpae_date_created_f_d_y}}
- For the Post Date (publish date – day / month / year) – {{tpae_date_created_d_m_y}}
- For the Post Date (publish date – month / day / year) – {{tpae_date_created_m_d_y}}
- For the Post Date (publish date – day / month / year / hour) – {{tpae_date_created_d_m_y_h}}
- For the Post Date (publish date – Hour:Minute AM/PM) – {{tpae_date_created_h_m_a}}
- For the Post Date (publish date – Date with GMT offset) – {{tpae_date_created_d_m_y_g}}
- For the Post Date (publish date – ISO 8601 Date Format) – {{tpae_date_created_iso}}
- For the Post Date (publish date – RFC 2822 Date Format) – {{tpae_date_created_rfc}}
- For the Post Date (publish date – day month) – {{tpae_date_created_day_month}}
- For the Post Date (publish date – month year) – {{tpae_date_created_month_year}}
- For the Post Date (publish date – Just the day) – {{tpae_date_created_day}}
- For the Post Date (publish date – Time ago) – {{tpae_date_created_time_ago}}
- For the Post Date (publish date – month (short month name) / year / day) – {{tpae_date_created_M_D_Y}}
- For Custom Field Data – {{custom_field_id}} i.e. if the field id is customer_data then it will be {{customer_data}}
- For the Product Price – {{tpae_product_price}}
- For the Product Regular Price – {{tpae_product_regular_price}}
- For the Product Sale Price – {{tpae_product_sale_price}}
- For the Product SKU – {{tpae_product_sku}}
- For the Product Price and Add to Cart button – {{tpae_product_add_to_cart}}
Note: You can add custom class and static content in your HTML but for dynamic data, you have to use these tags.
Then in the CSS section, you have to write custom CSS to style your template.
Example
Here, we will add a custom (static) HTML and CSS code, then will add the dynamic tags to make it dynamic.
In this code, we have a product image, product title, product category, product price, product description and a view button with a link to the product details page.
For the product image, we will use the {{tpae_image}} tag without any <img> tag.
To make the product title dynamic, we will use {{tpae_title}} tag.
Then, for the product category will use the {{tpae_category}} tag.
For the product price, we will use the {{tpae_product_price}} tag.
Then, for the product description, we will use the {{tpae_description}} tag without a <p> tag.
Finally, to make the button URL dynamic, we will use {{tpae_permalink}} tag in the <a> tag.
Following this process you can also convert your static HTML and CSS code into a template for the product listing. You can also use code from Codepen, JSFiddle etc.

