Do you want to create a dynamic coupon code listing on an Elementor website? If you are creating a coupon code listing website adding coupon code listings dynamically can reduce the manual work of adding each listing.
With the Coupon Code and Dynamic Listing widgets from The Plus Addons for Elementor, you can easily create a dynamic coupon code listing in Elementor.
To check the complete feature overview documentation of The Plus Addons for Elementor Coupon Code widget, click here.
Requirement – This widget is a part of The Plus Addons for Elementor, make sure it’s installed & activated to enjoy all its powers.
First, you have to create a custom coupon code listing item template using Elementor. For instance, we will be creating this coupon code listing.
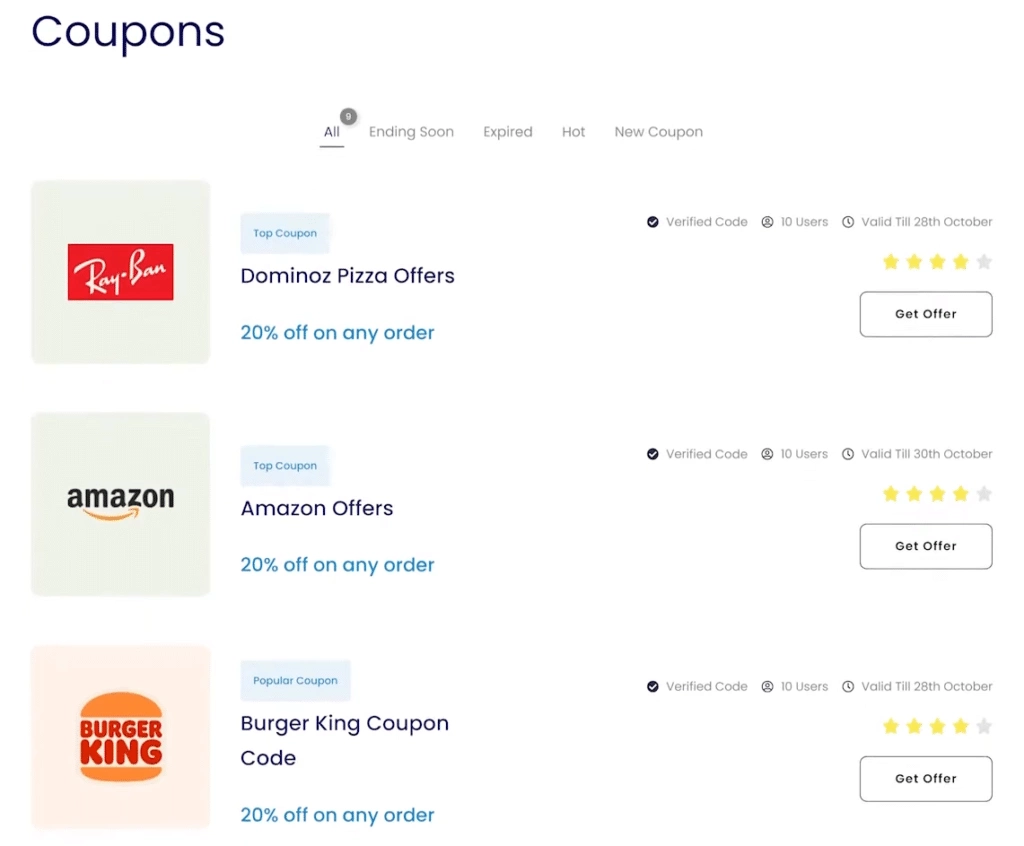
For this design, we will need the Advanced Custom Fields (ACF) plugin for adding a custom post type and some custom fields, and Elementor Pro plugin for fetching dynamic data.
Add a Custom Post Type
We’ll create a custom post type for adding coupons.
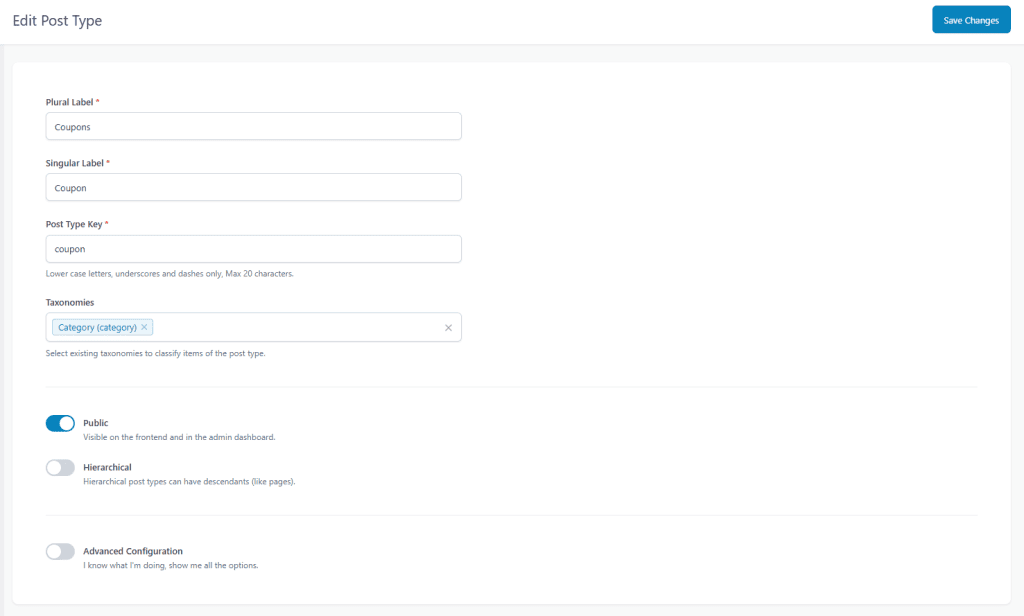
1. To do this from the Dashboard, go to ACF > Post Types and click on the Add New button.
2. Add Coupons, Coupon, and coupon in the Plural Label, Singular Label, and Post Type Key fields, respectively.
3. Then select Category (category) from the Taxonomies field to create a filter for coupons based on categories.
4. Once done, click on the Save Changes button.
Add Custom Fields for Coupon Post Type
Now we’ll create some custom fields for the Coupon post type.
1. To do this from the Dashboard, go to ACF > Field Groups and click on the Add New button.
2. Add a name to the field group.
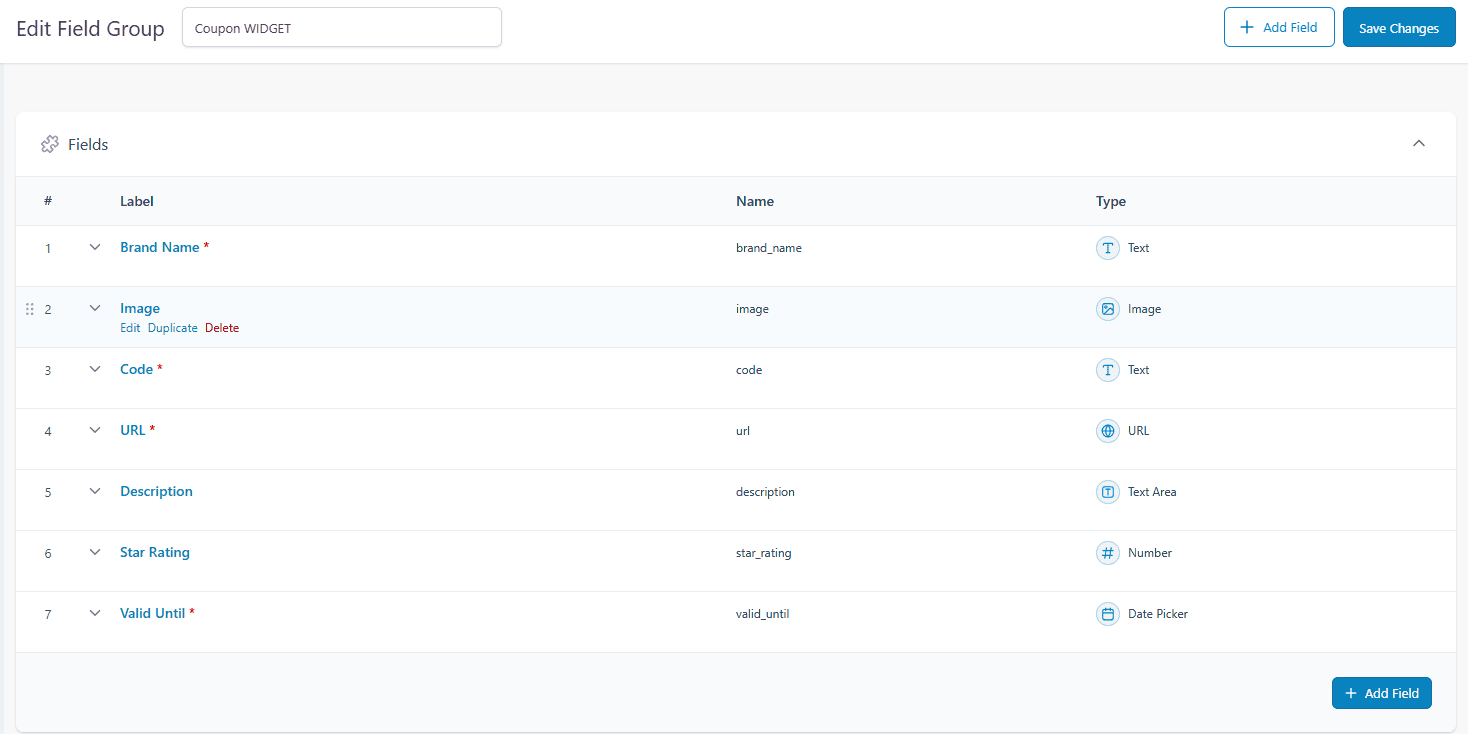
3. Then click on the +Add Field button to add a custom field for the brand name with Brand Name as the field label and text as the field type.
4. In this process, we’ll add the following custom fields –
- Field Label – Brand Name and Field type – Text
- Field Label – Image and Field type – Image
- Field Label – Code Field type – Text
- Field Label – URL Field type – URL
- Field Label – Description Field type – Text Area
- Field Label – Star Rating Field type – Number
- Field Label – Valid Until Field type – Date Picker
5. Once done, from the Location Rules section under the Settings tab, we’ll set the location to Coupon (coupon) under Rules.
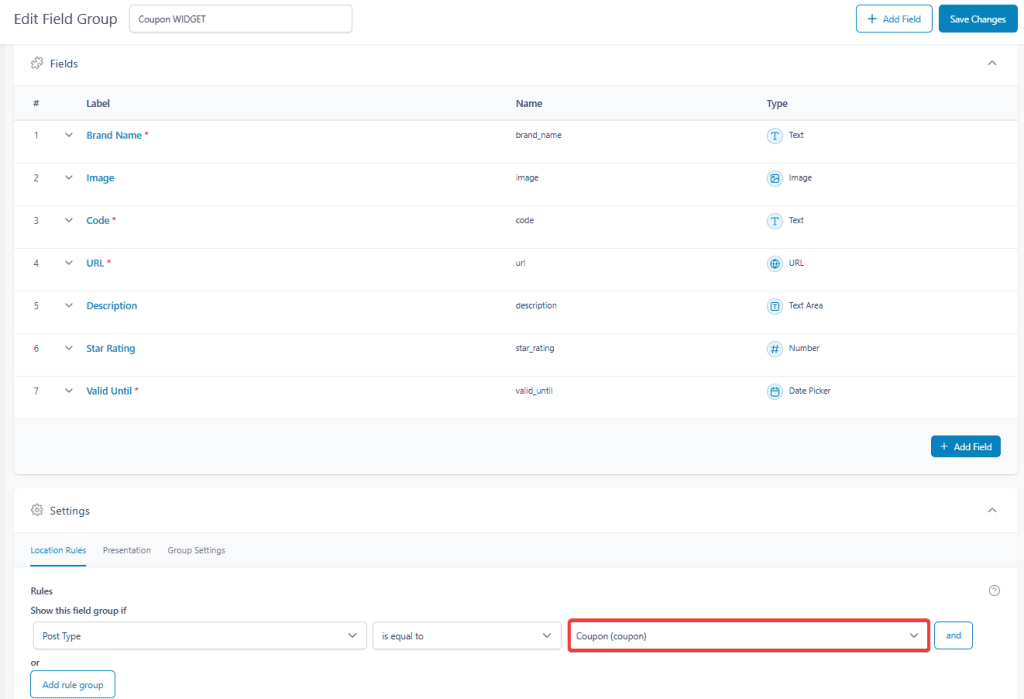
6. Once done, click on the Save Changes button.
Add Coupons with Custom Fields
Now you have to add a coupon with custom fields.
1. To do this from the Dashboard, go to Coupon > Add New.
2. Add a name to the post type, then add data in custom fields.
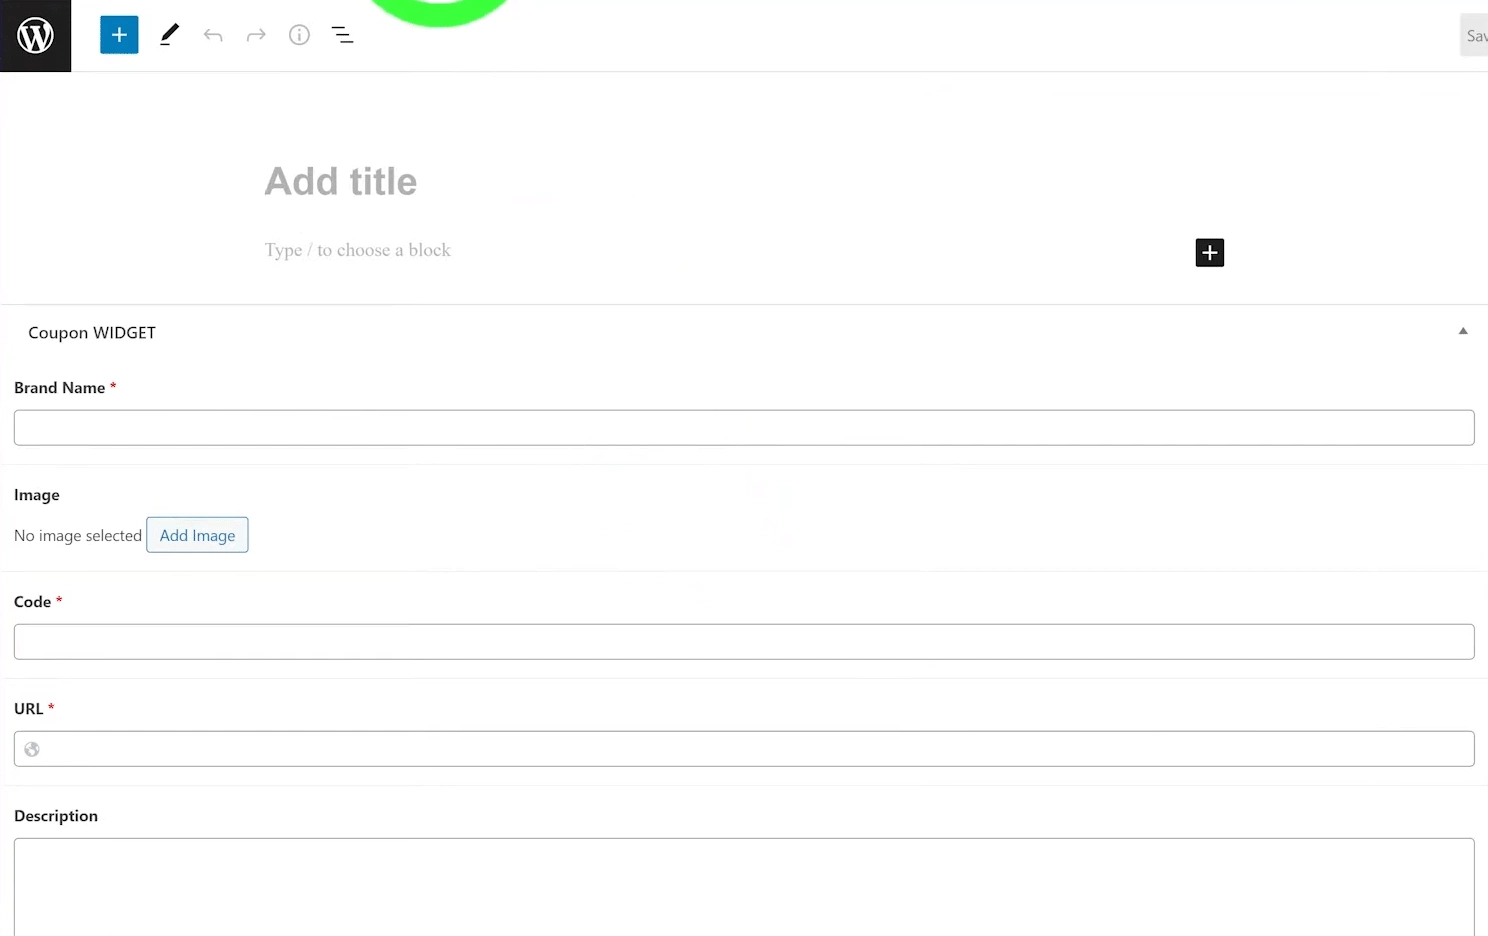
Following this process, we’ll add multiple coupons.
You can create categories and assign them to specific coupons for adding a category-wise filter in the listing.
Create a Template using the Coupon Code Widget
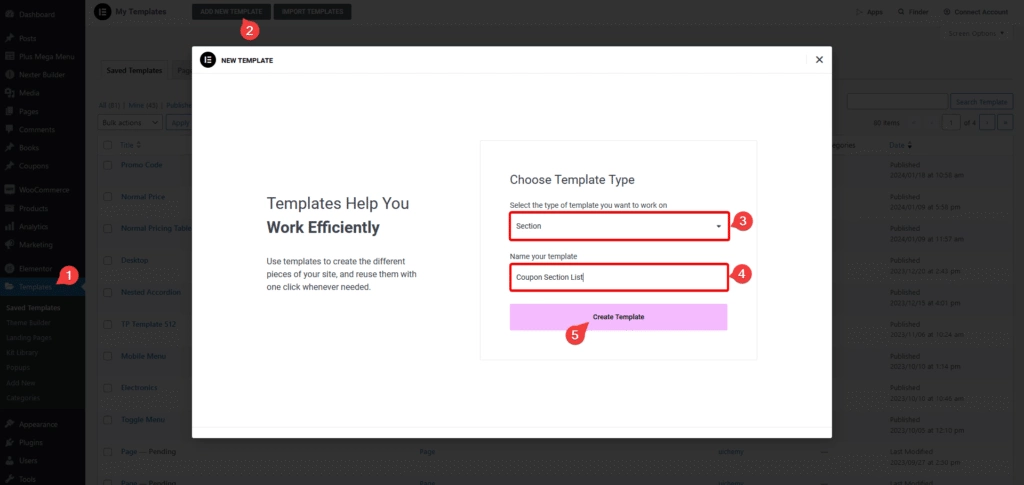
1. To do this from the Dashboard, go to Templates and click on Add New, then select Section as the template type, give a name to the template then click on the Create Template button.
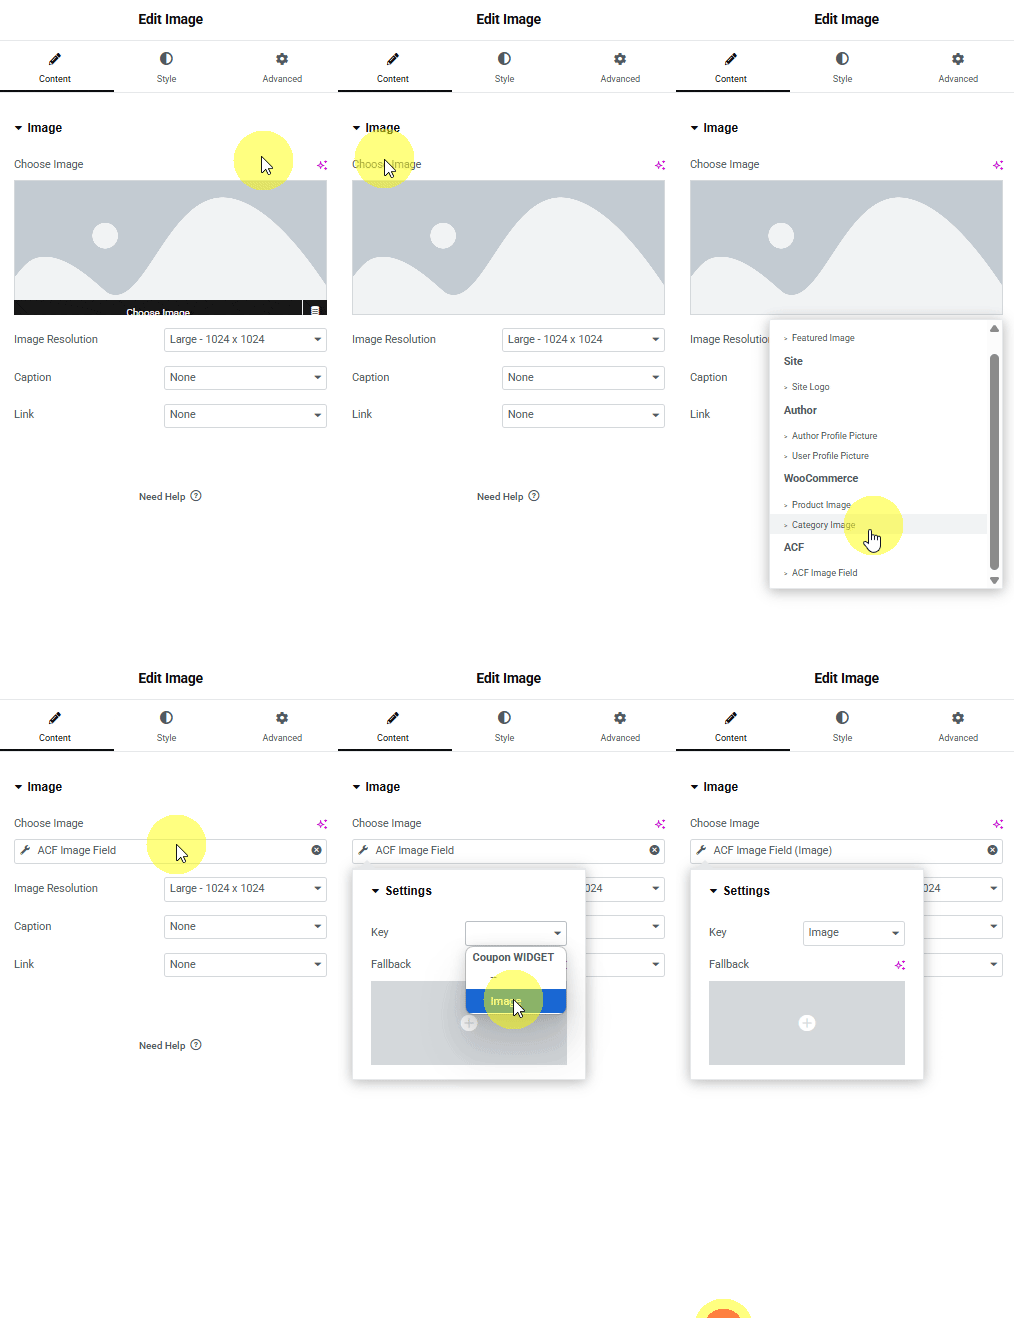
2. Then we’ll create a three-column section as per our design, after adjusting the column sizes, we’ll add the Elementor Image widget in the left column.
Click on the Dynamic Tags and select ACF Image Field under ACF. On the next screen, click on the ACF Image Field again and select Image from the Key dropdown in the Settings popup.
You can adjust the image size.
3. Then, to add the title, we’ll use the Elementor Heading widget in the middle column.
Click on the Dynamic Tags and select ACF Field under ACF. On the next screen, click on the ACF Field again and select Brand Name from the Key dropdown in the Settings popup.
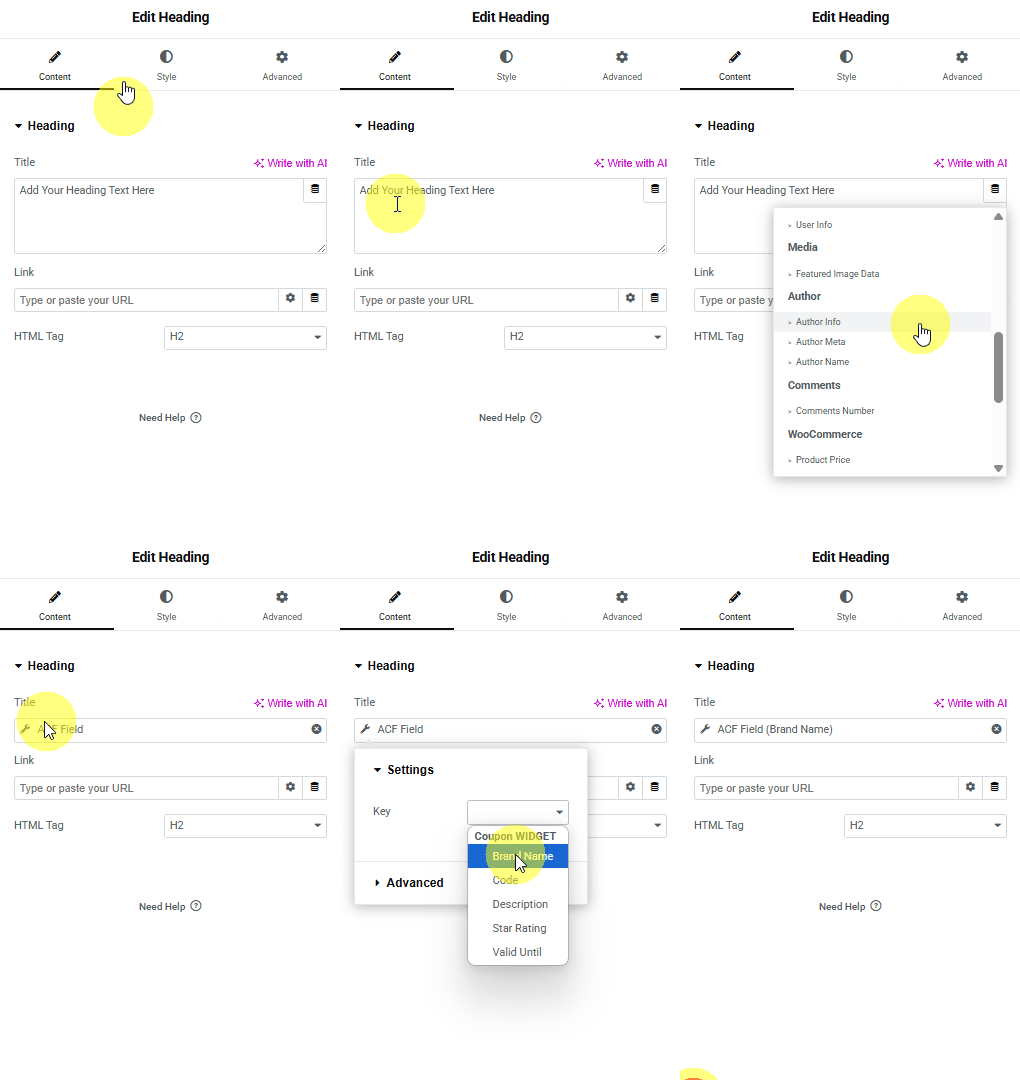
Style it further according to your requirements.
4. We’ll add another Elementor Heading widget for description in the middle column. Following the above process, we’ll make the text dynamic by selecting Description as the Key value.
Style it further according to your requirements.
5. In the last column, we’ll add the Elementor Icon List widget. As per our design, we’ll add some coupon information like Verified Code, Users, and the coupon validity date.
For Verified Code and User, we’ll add static text with appropriate icons.
Then, for the coupon validity date, we’ll open the third item.
We’ll click on the Dynamic Tags in the Text field and select ACF Field under ACF. On the next screen, click on the ACF Field again and select Valid Until from the Key dropdown in the Settings popup.
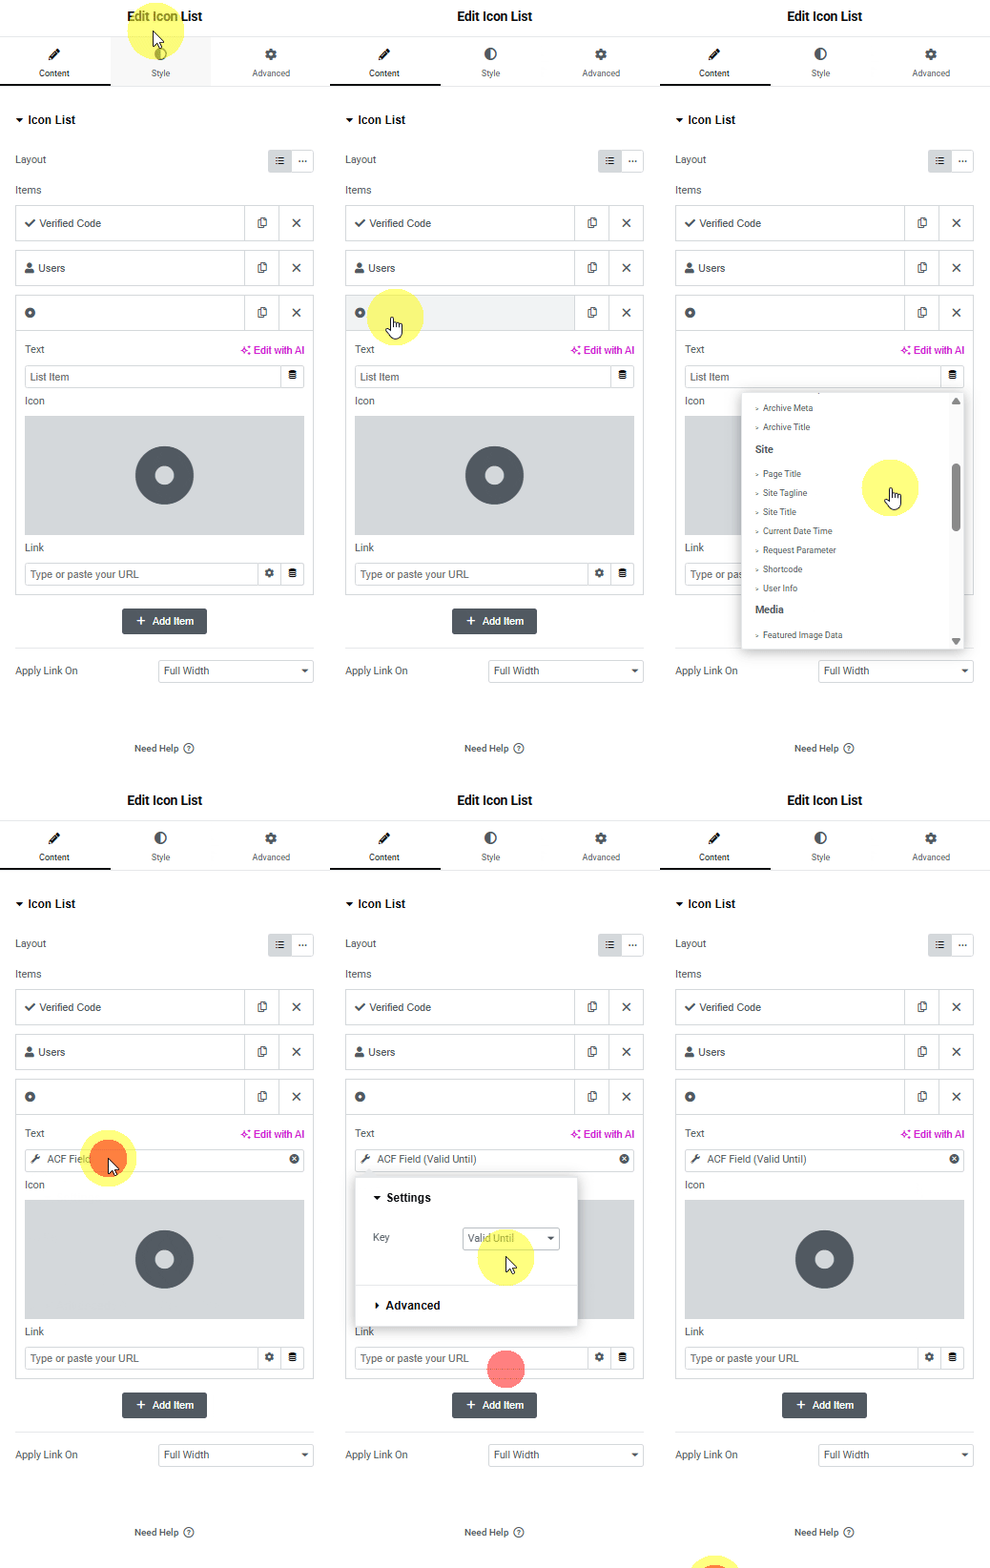
Then we’ll select the appropriate icon and set the listing to inline.
Style it further according to your requirements.
6. Now we’ll add a Star Rating. For this, we’ll add the Elementor Rating widget in the last column.
To make it dynamic, click on the Dynamic Tags in the Rating field and select ACF Number Field under ACF. On the next screen, click on the ACF Number Field again and select Rating from the Key dropdown in the Settings popup.
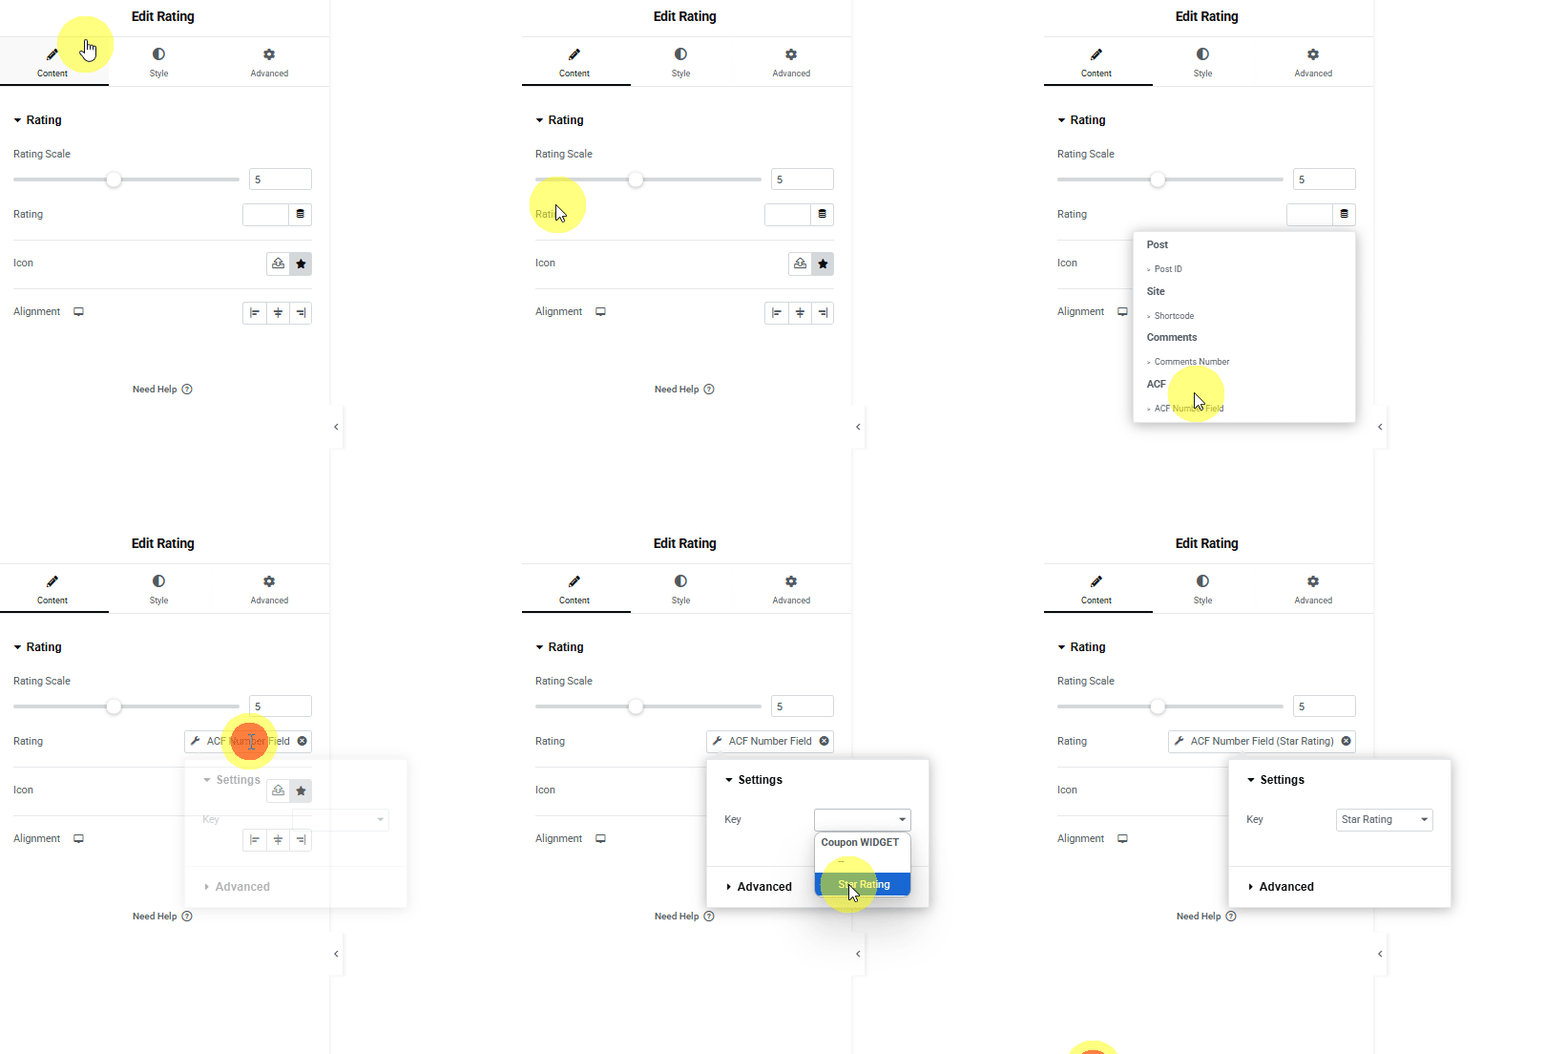
Style it further according to your requirements.
7. For the coupon code, we’ll add the Coupon Code widget from The Plus Addons for Elementor in the last column.
8. In the Layout tab, select Standard from the Coupon Type section.
9. Selecting an appropriate style from the Standard Style dropdown, then add a title in the Title field under the Content tab.
10. To make the redirect link dynamic, click on the Dynamic Tags in the Redirect Link field and select ACF Field under ACF. On the next screen, click on the ACF Field again and select URL from the Key dropdown in the Settings popup.
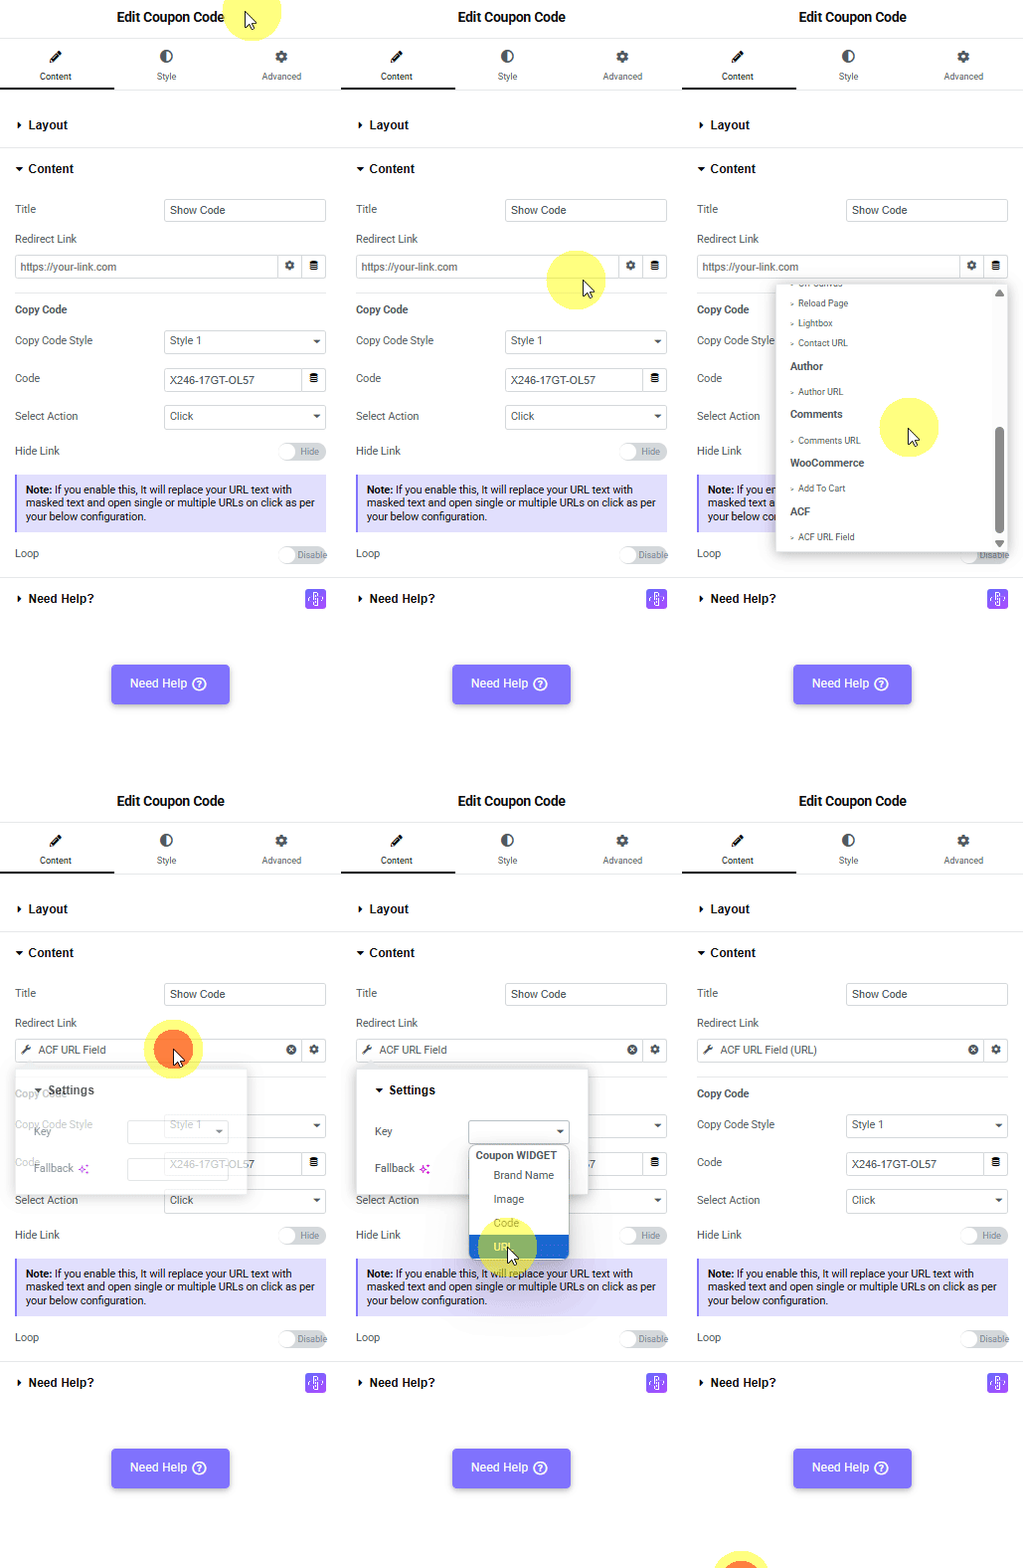
11. After selecting the appropriate style for the coupon code, we’ll make the code dynamic.
For this, click on the Dynamic Tags in the Code field and select ACF Field under ACF. On the next screen, click on the ACF Field again and select Code from the Key dropdown in the Settings popup.
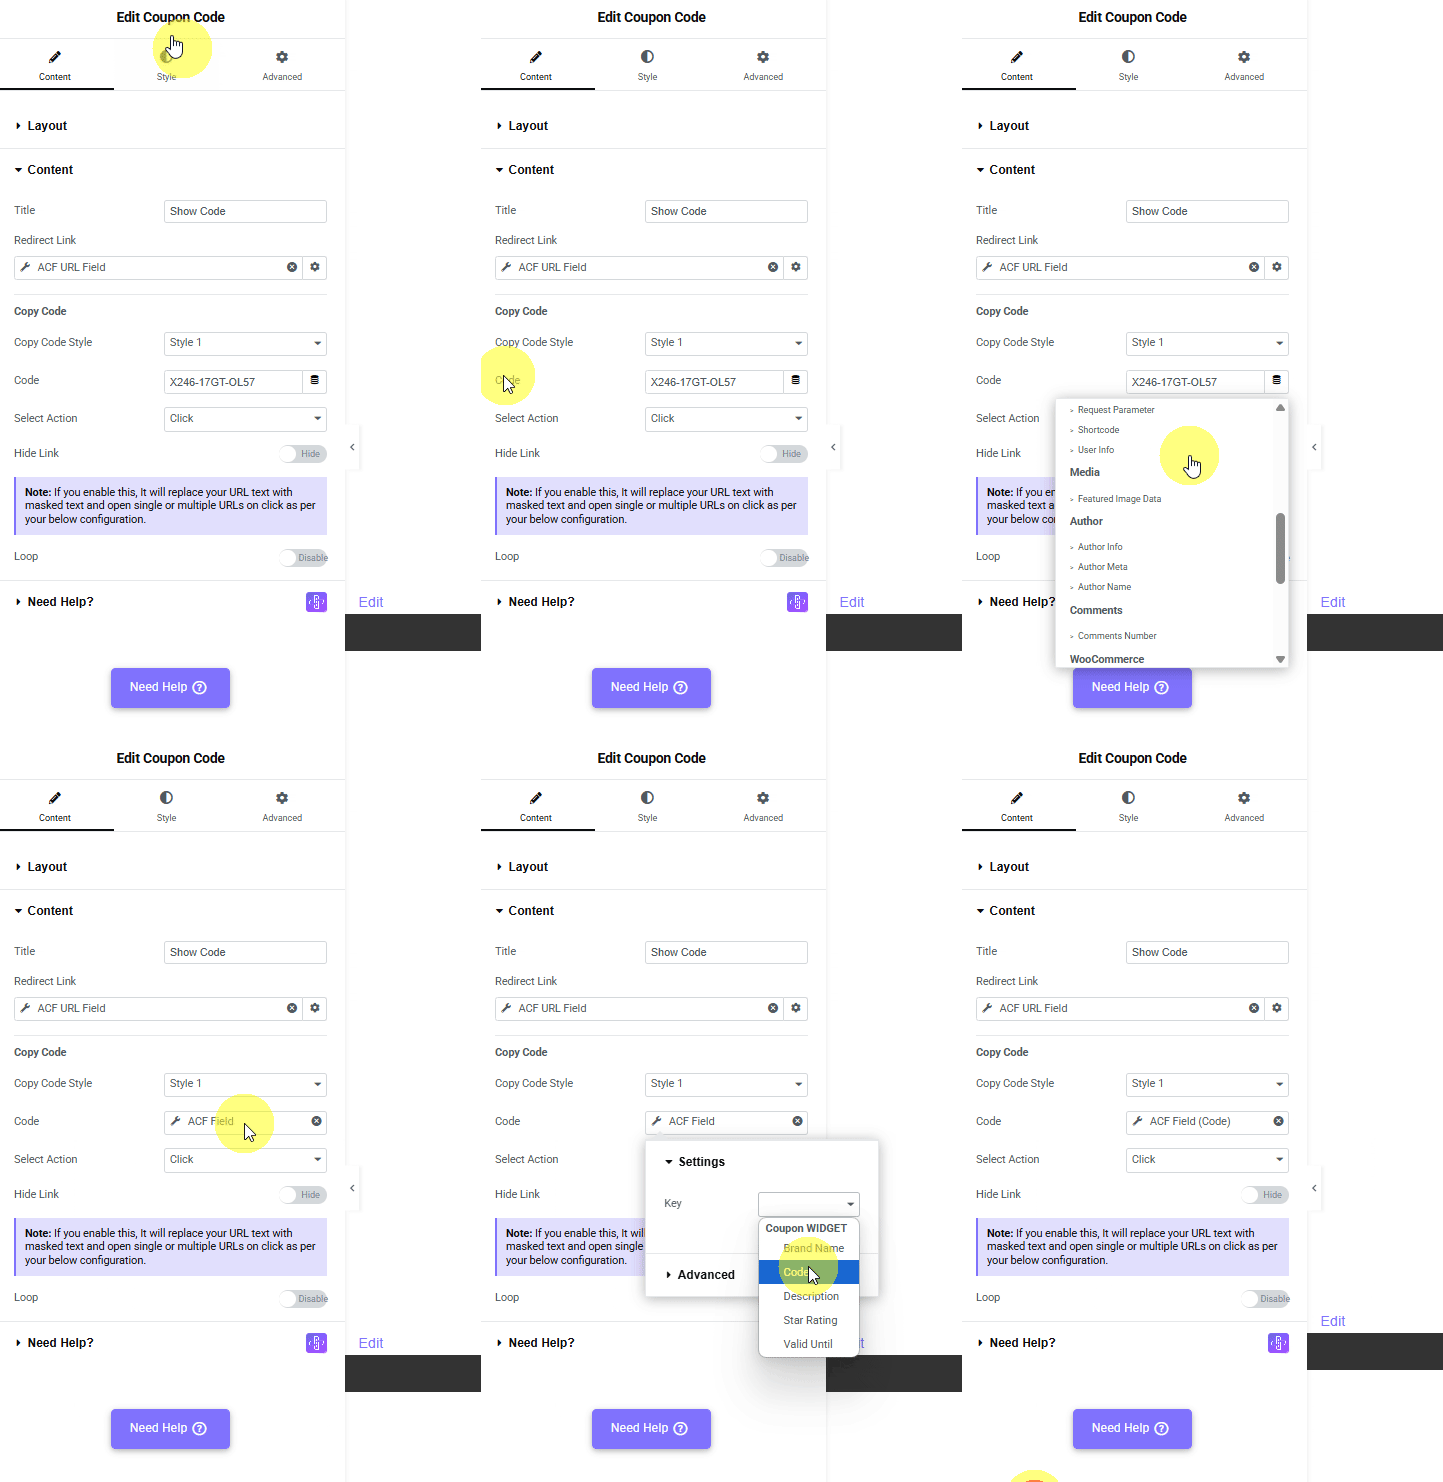
As per your requirement, you can set the appropriate action from the Select Action dropdown.
Click – To show the coupon code on a click,
Popup – To show the coupon code in a popup.
Style it further according to your requirements.
12. Once done, publish the template.
Use the Template with the Dynamic Listing Widget
Now, to create the coupon code listing, you have to use the Dynamic Listing widget from The Plus Addons for Elementor.
1. Add the Dynamic Listing widget on a page or template.
2. In the Content Layout tab, select the Normal Page from the Post Listing Types dropdown.
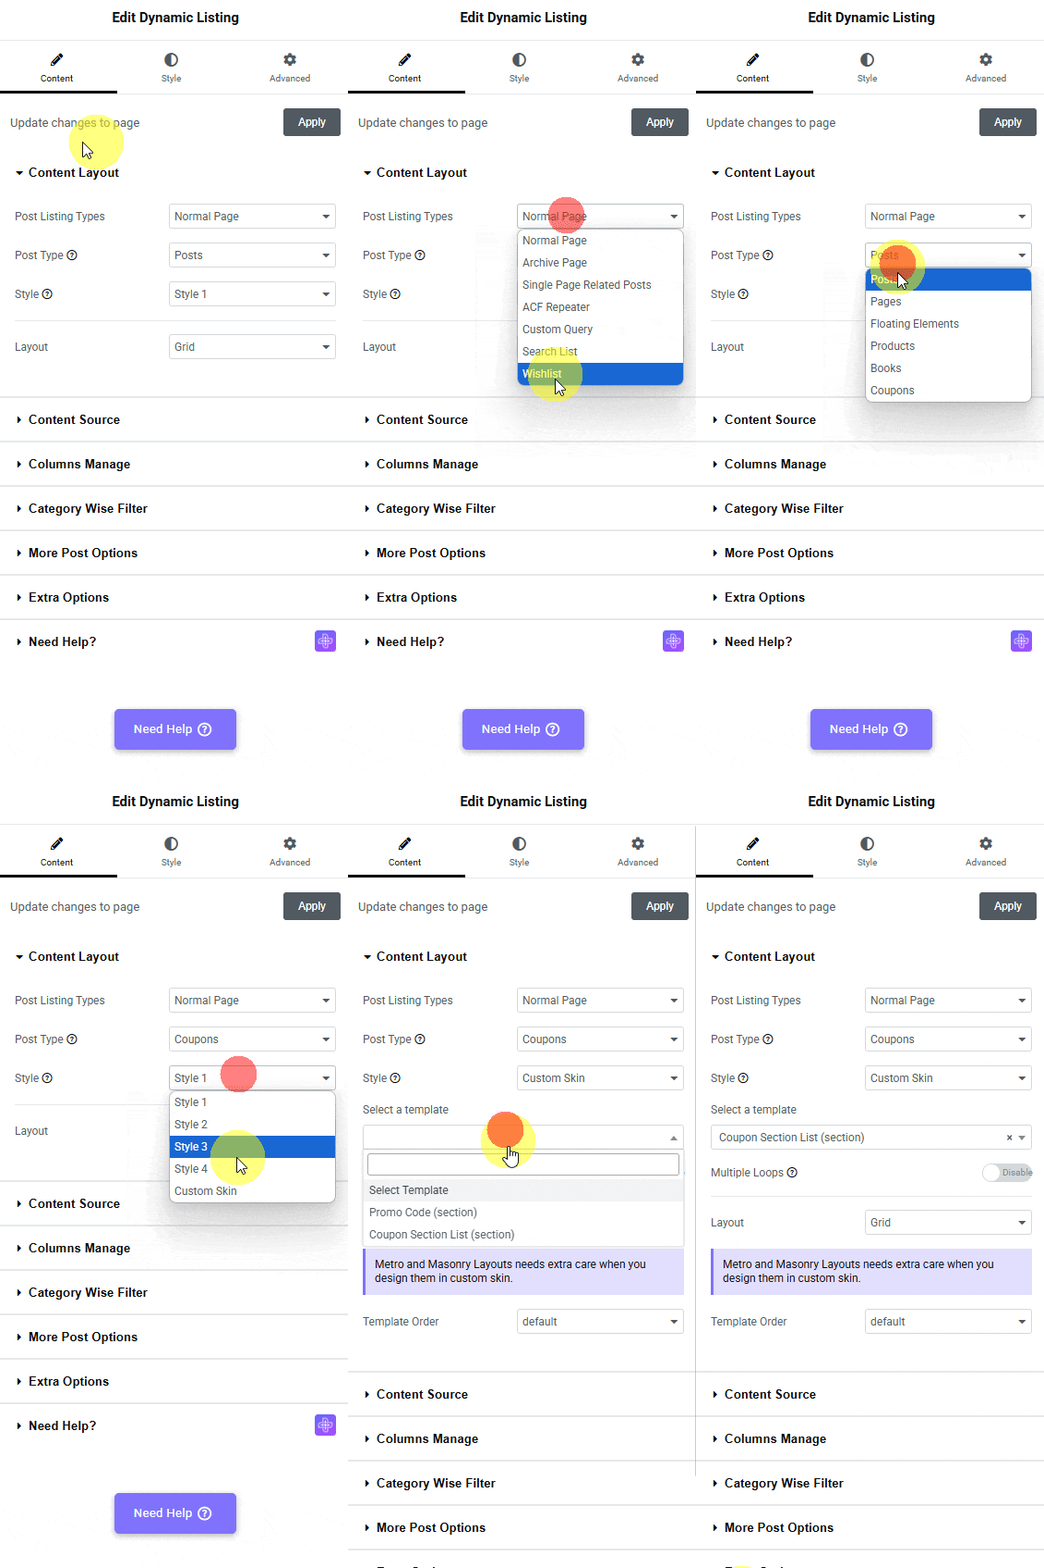
3. Then, from the Post Type dropdown, select your custom post type. Here it will be Coupons.
4. From the Style dropdown, select Custom Skin.
5. Then you have to select your template from the Select a template dropdown.
As per your requirements, you can adjust the number of columns from the Columns Manage tab.
Now it will show the custom-designed coupon code listing.
If you want, you can add a category wise filter from the Extra Options tab.
Suggested Read: How to Create a Scratch Coupon Card in Elementor
