---
title: "How to Create an Elementor Form for Free?"
url: https://theplusaddons.com/docs/create-an-elementor-form-for-free/
date: 2024-11-20
modified: 2026-09-13
lang: en
author: "Aditya Sharma"
description: "Need a contact form, a lead form or a quote request form in Elementor, without paying for Elementor Pro? The Form widget from The Plus Addons for Elementor builds forms..."
image: https://theplusaddons.com/wp-content/uploads/2024/11/How-to-Create-an-Elementor-Form-for-Free-1024x536.png
word_count: 729
---

# How to Create an Elementor Form for Free?

## 

- The Plus Addons for Elementor Form widget crea formularios en el editor y funciona en la edición Free, mientras que Pro añade más tipos de campos, protección contra spam e integraciones de marketing.
- The Plus Addons for Elementor permite activar Form desde The Plus Addons > Widgets en el panel de WordPress, con Elementor (free) instalado y activado.
- El modo Free incluye Text, Long Text, Email, Number, Hidden, HoneyPot, Dropdown, Date y Time, además de las acciones Email y Redirect; Pro añade Phone Number, Radio, Checkbox, URL, Agree to Terms, Cloudflare y ReCAPTCHA.
- La sección Limitations indica que HoneyPot no detiene envíos en la prueba, que no existe campo de subida de archivos y que cada caja de correo To, CC y BCC acepta una sola dirección.

Need a contact form, a lead form or a quote request form in Elementor, without paying for Elementor Pro?

The **Form** widget from The Plus Addons for Elementor builds forms right in the editor. The free plugin covers the basics; Pro adds more field types, spam protection and marketing integrations.

***Requirement - This widget is a part of The Plus Addons for Elementor, make sure it's installed & activated to enjoy all its powers.***

[LIVE WIDGET LINK](https://theplusaddons.com/elementor-builder/form-builder/?utm_source=tpae&utm_medium=docs&utm_campaign=text)

## Before You Start

- **Edition:** Free — works in the free plugin and in Pro. Some field types and actions need Pro, as marked below.- **Widget to enable:** Form, switched on under **The Plus Addons > Widgets**.- Elementor (free) installed and activated.

https://www.youtube.com/watch?v=7DVDIACjSSQ

## Switch On the Form Widget

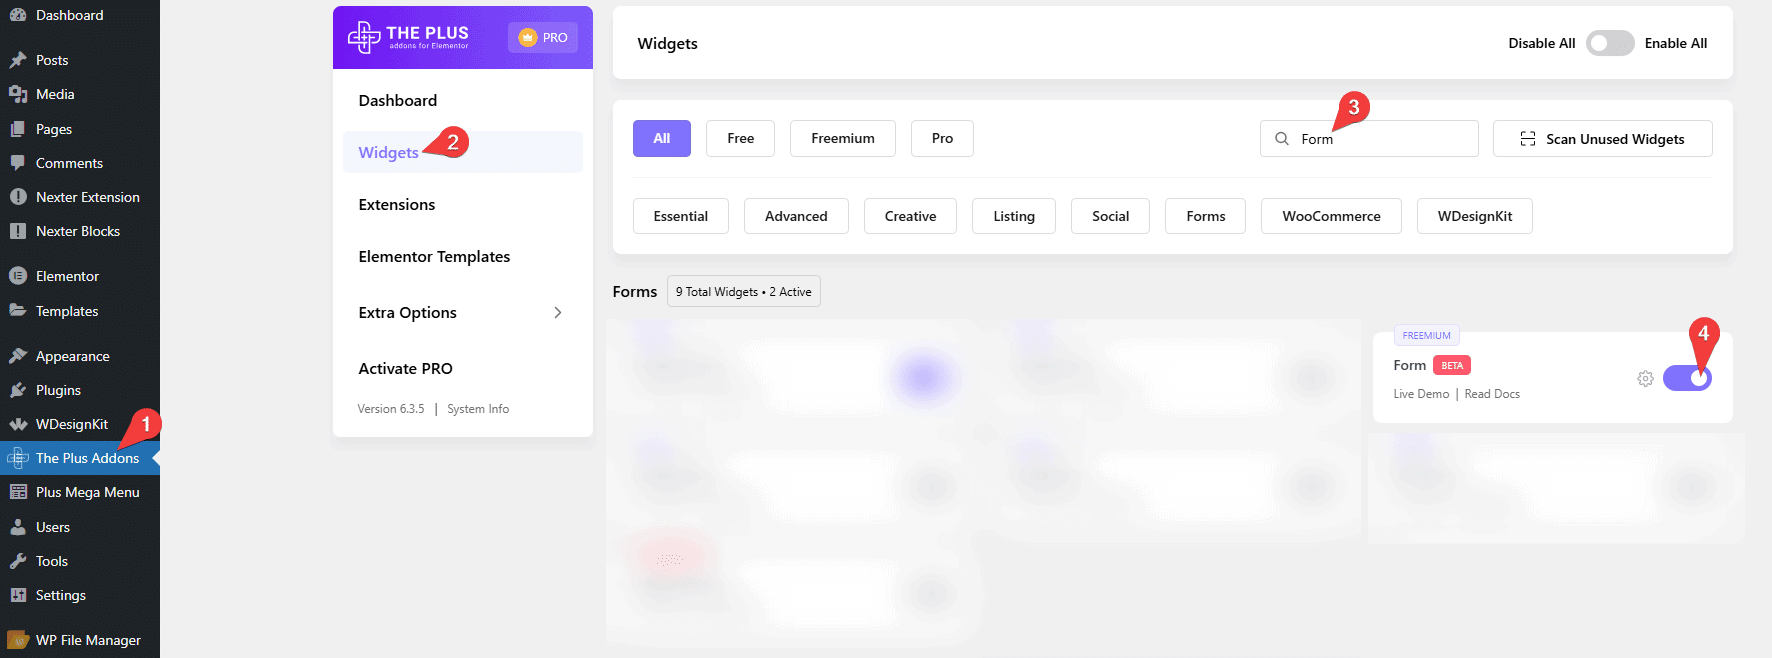
- In your WordPress dashboard, go to **The Plus Addons > Widgets**.- Search for **Form** and turn on its toggle.

![Screenshot: Search for Form and turn on its toggle](https://theplusaddons.com/wp-content/uploads/2024/11/tpae-form-new-active.png)

## Free vs Pro

| Feature | Free | Pro |
| ------- | ---- | --- |
| Field types | Text, Long Text, Email, Number, Hidden, HoneyPot, Dropdown, Date, Time | Everything in Free, plus Phone Number, Radio, Checkbox, URL, Agree to Terms, Cloudflare, ReCAPTCHA |
| Submit actions | Email, Redirect | Everything in Free, plus Database Entry, Auto Respond Email, Active Campaign, Brevo, ConvertKit, GetResponse, Mailchimp, MailerLite, Drip, Webhook, Slack, Discord |
| Spam protection | HoneyPot field | Google reCAPTCHA v3 and Cloudflare Turnstile |

## Build the Form (General)

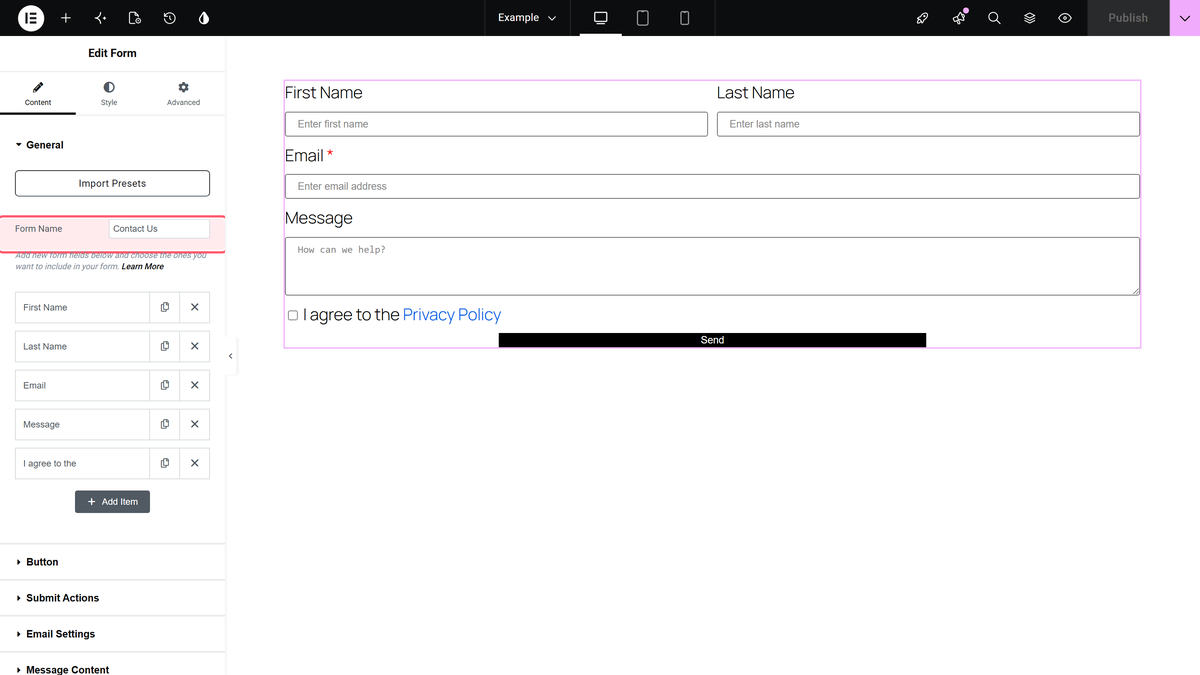
- Add the Form widget to your page.- In **Content > General**, enter a **Form Name** (called **Unique Form Name** in the free plugin). You can also start from **Import Presets**.

![The General section of the Form widget with the Form Name and the list of fields](https://theplusaddons.com/wp-content/uploads/2026/09/form-form-name.webp)

- Open a field in the list. On its **Content** tab, choose the **Type** and set the **Label**, **Placeholder**, **Required** and **Column Width**.- Use **+ Add Item** to add fields, and drag them to reorder.
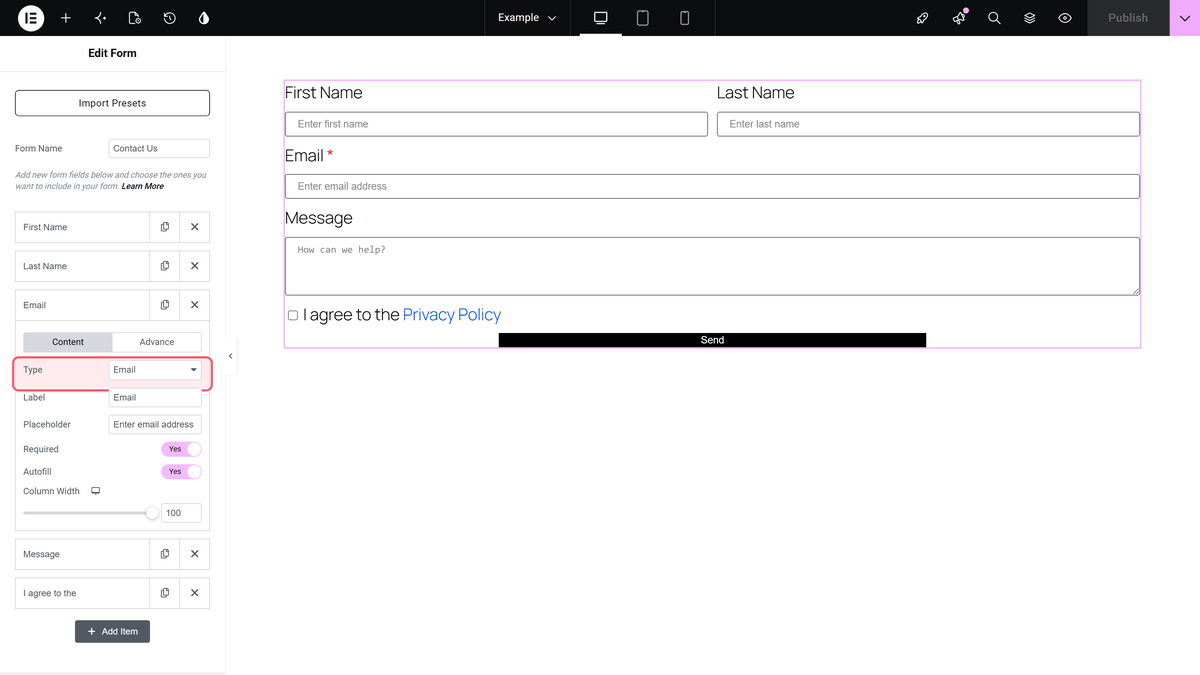
![A field opened in the Form widget with Type set to Email and the Required switch on](https://theplusaddons.com/wp-content/uploads/2026/09/form-field.webp)

| Field setting | What it does |
| ------------- | ------------ |
| Type | The kind of field (see the table above) |
| Options | For Dropdown, Radio and Checkbox: one option per line (called Dropdown Options in the free plugin) |
| Autofill *(Pro)* | Lets the browser fill the field from saved details. On by default |
| Column Width | The field width in %, per device. Two fields at about 50% sit side by side |
| Default Value, Help Text, Aria Description | On the field's **Advance** tab |
| Unique ID | The field's ID, used in emails and integrations. Letters, numbers and underscores only, no spaces, and unique on the page |
| Data Shortcode | The shortcode that inserts this field's value into an email: `[value_id="` + the Unique ID + `"]`, for example `[value_id="email"]`. In Pro it fills in when you type the Unique ID |

## Button

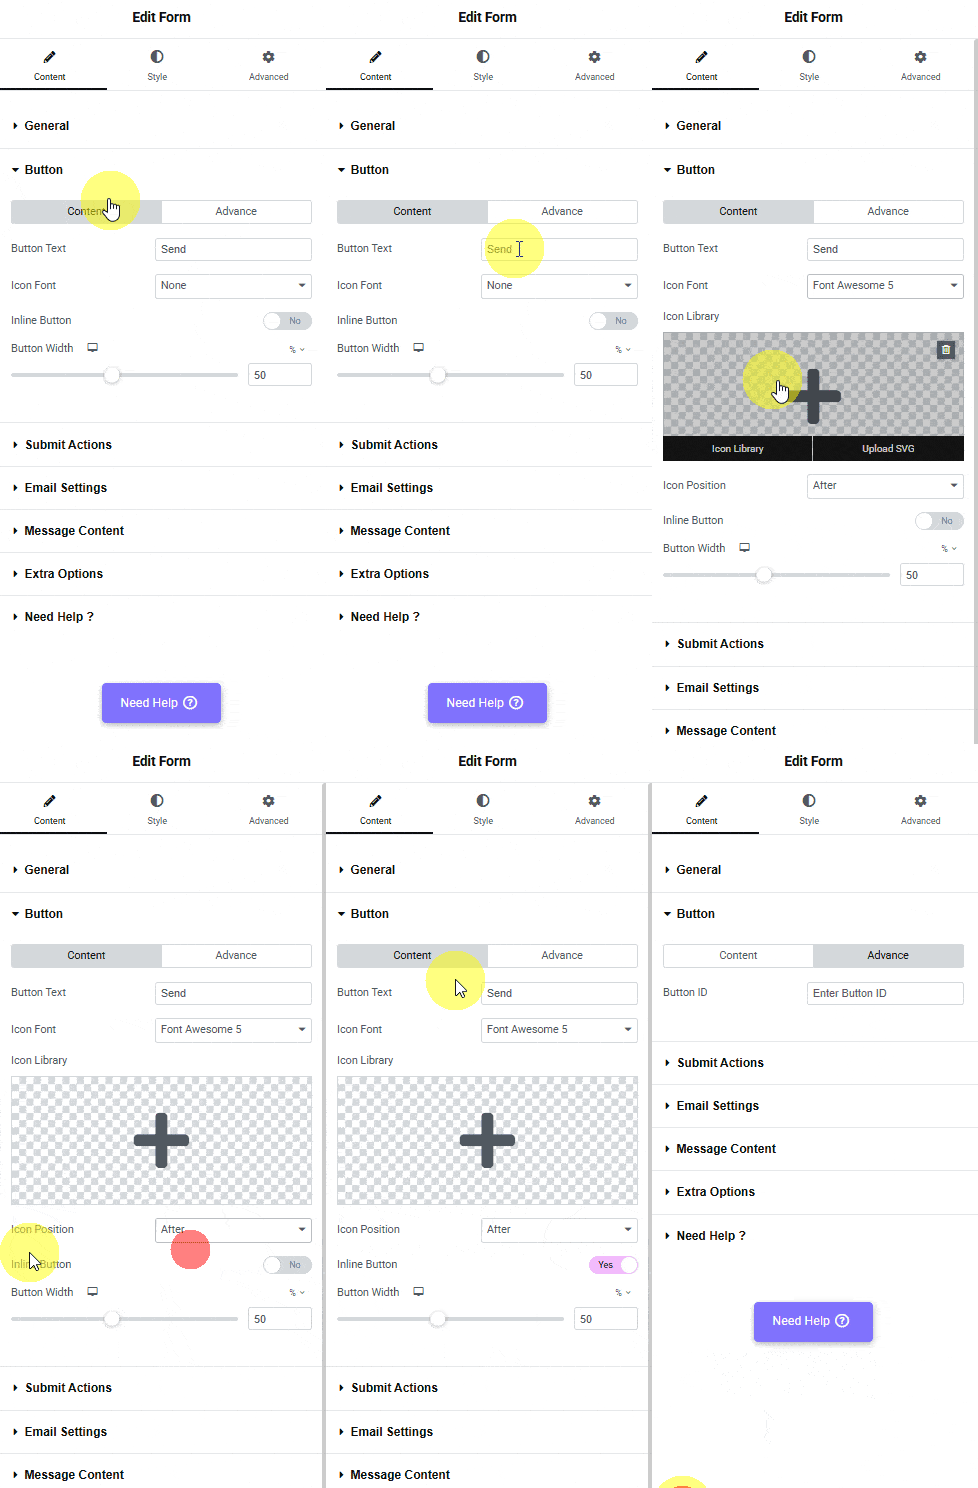
Set the **Button Text** (default *Send*), an optional Font Awesome icon with **Icon Position** (Before or After), **Inline Button** and **Button Width**. The button's **Advance** tab has a **Button ID**.

![Screenshot: Set the Button Text (default Send), an optional Font Awesome icon with Icon Position (Before or After), Inline Button and Button](https://theplusaddons.com/wp-content/uploads/2024/11/form-button-new-1.gif)

## Submit Actions

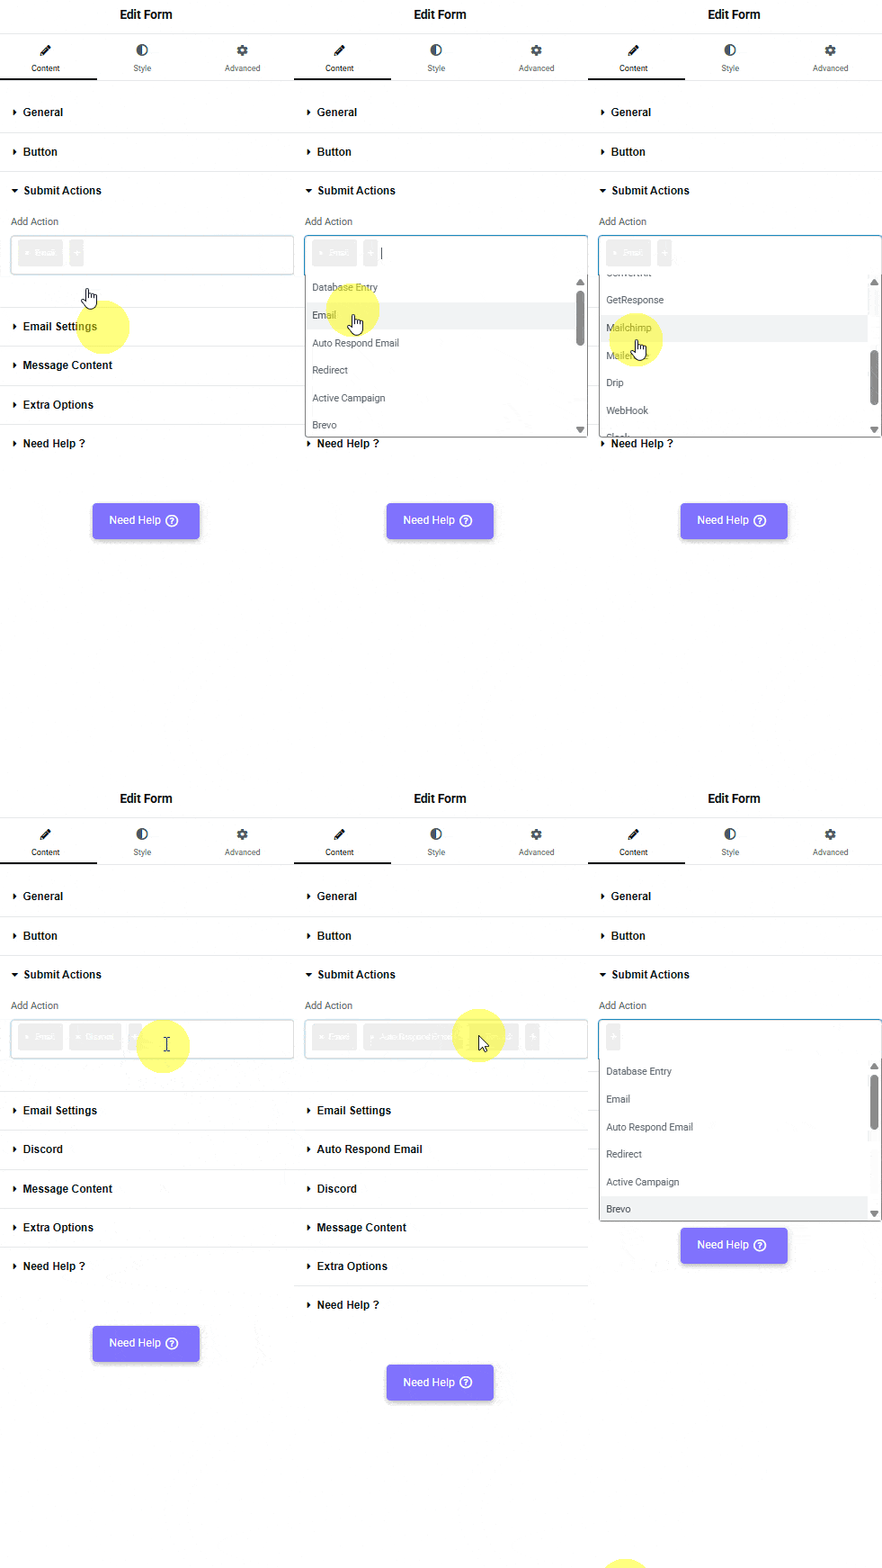
**Add Action** decides what happens when someone submits the form. You can pick more than one.
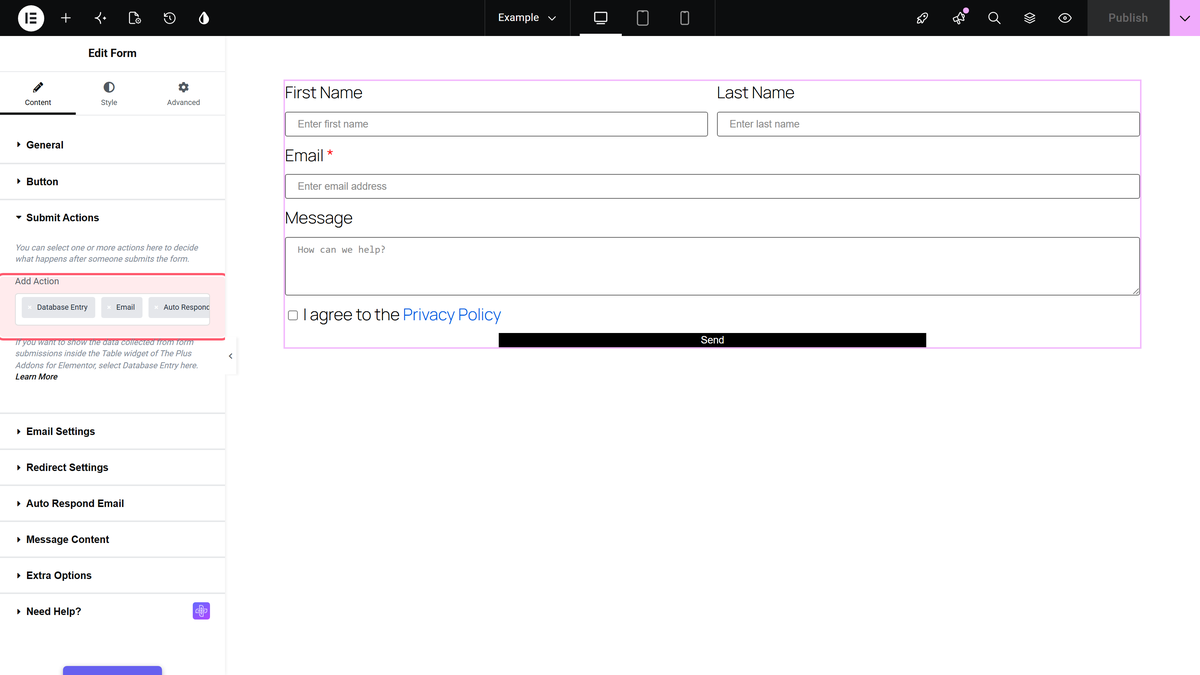
![The Add Action list of the Form widget with several actions selected, including Database Entry and Email](https://theplusaddons.com/wp-content/uploads/2026/09/form-add-action.webp)

- **Email**: [receive each submission by email](https://theplusaddons.com/docs/receive-custom-email-confirmation-from-elementor-form/)- **Redirect**: [send visitors to another page](https://theplusaddons.com/docs/redirect-users-from-elementor-form/)- **Database Entry** *(Pro)*: [save submissions in WordPress](https://theplusaddons.com/docs/save-form-submissions-in-elementor/)- **Auto Respond Email** *(Pro)*: [email the visitor](https://theplusaddons.com/docs/send-custom-email-confirmation-to-the-user-from-elementor-form/)- **Active Campaign, Brevo, ConvertKit, GetResponse, Mailchimp, MailerLite, Drip** *(Pro)*: add the visitor to your email marketing tool (see Related Docs)- **Webhook, Slack, Discord** *(Pro)*: send the submission to another app or a chat channel
![Screenshot: Webhook, Slack, Discord (Pro): send the submission to another app or a chat channel](https://theplusaddons.com/wp-content/uploads/2024/11/form-submit-actions-new.gif)

## Message Content

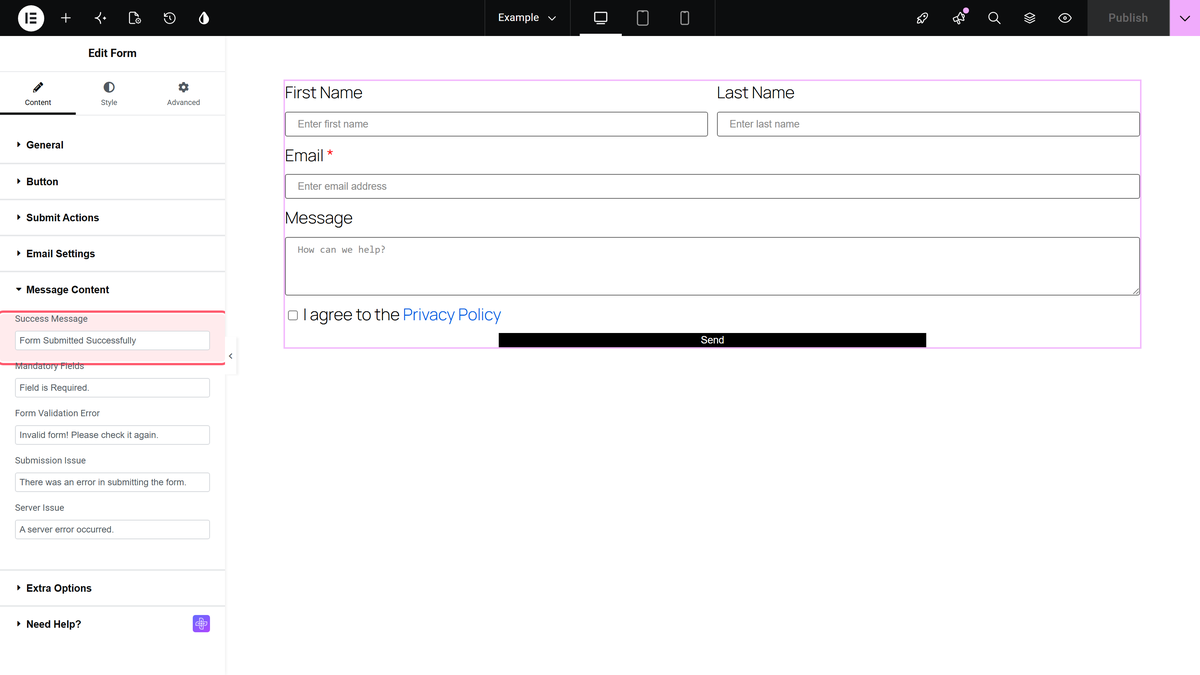
Change the texts visitors see after they click the button. In Pro, the success and error messages disappear after 5 seconds; in the free plugin they stay on the page. In the free plugin, an empty required field is flagged by the browser's own check.

![The Message Content section with the Success Message and error message texts](https://theplusaddons.com/wp-content/uploads/2026/09/form-messages.webp)

| Message | When it shows | Default |
| ------- | ------------- | ------- |
| Success Message | The form was sent | Form Submitted Successfully |
| Mandatory Fields | Under a required field left empty | Field is Required. (free: This field is required.) |
| Form Validation Error | The form has invalid input | Invalid form! Please check it again. |
| Submission Issue | An action failed, for example an integration. Add `%error%` to show the reason | There was an error in submitting the form. |
| Server Issue | The request to your site failed | A server error occurred. |

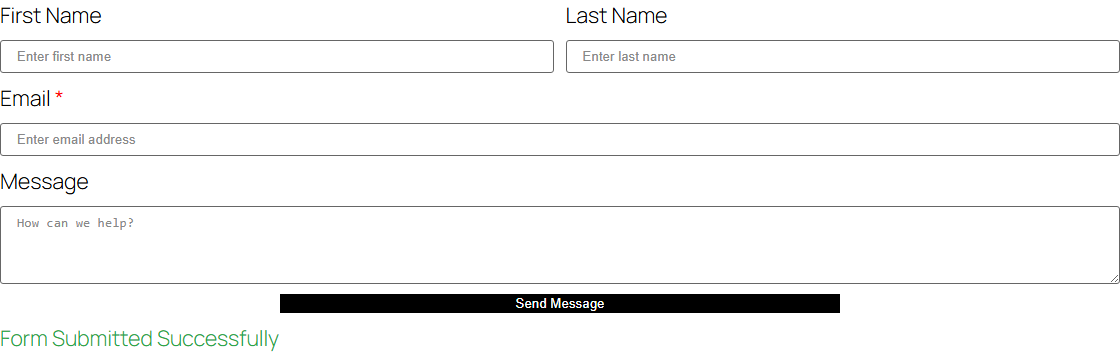
This is how the success message looks on the page after a submission:

![A submitted contact form on the page with the success message below the button](https://theplusaddons.com/wp-content/uploads/2026/09/form-result-success.webp)

## Extra Options

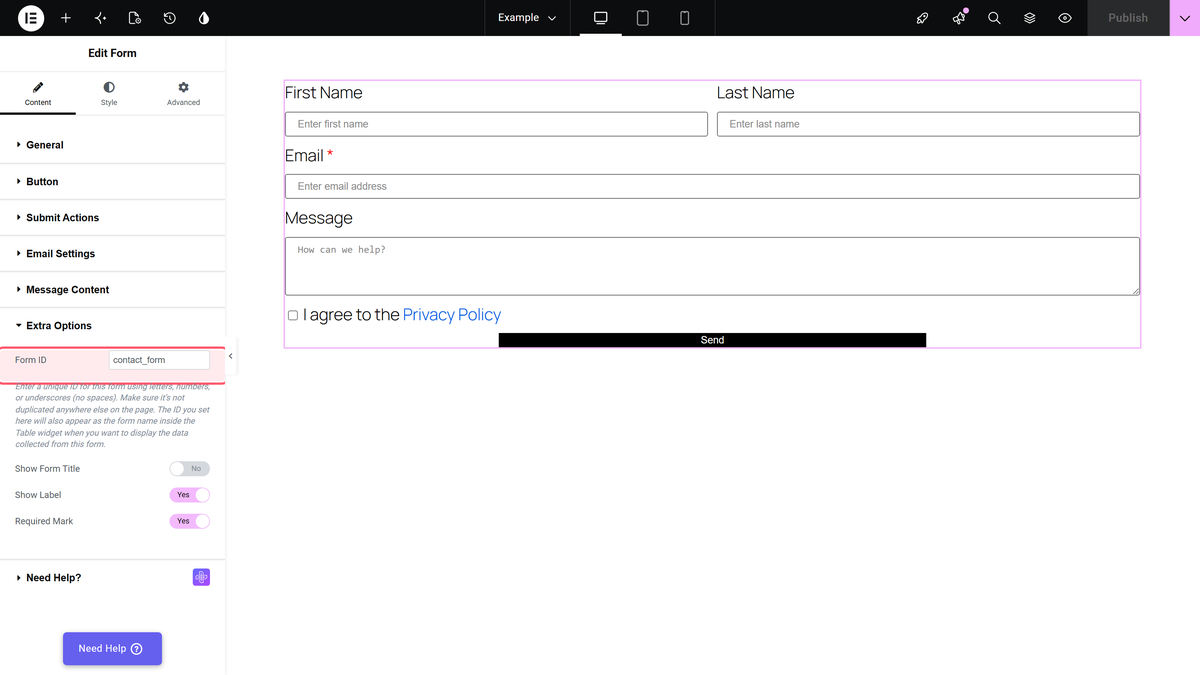
**Form ID** gives the form an HTML ID (and names it in saved submissions). **Show Form Title** shows the Form Name above the form, **Show Label** shows the field labels, and **Required Mark** shows the * next to required fields.

![The Extra Options section with Form ID, Show Form Title, Show Label and Required Mark](https://theplusaddons.com/wp-content/uploads/2026/09/form-form-id.webp)

## Style the Form

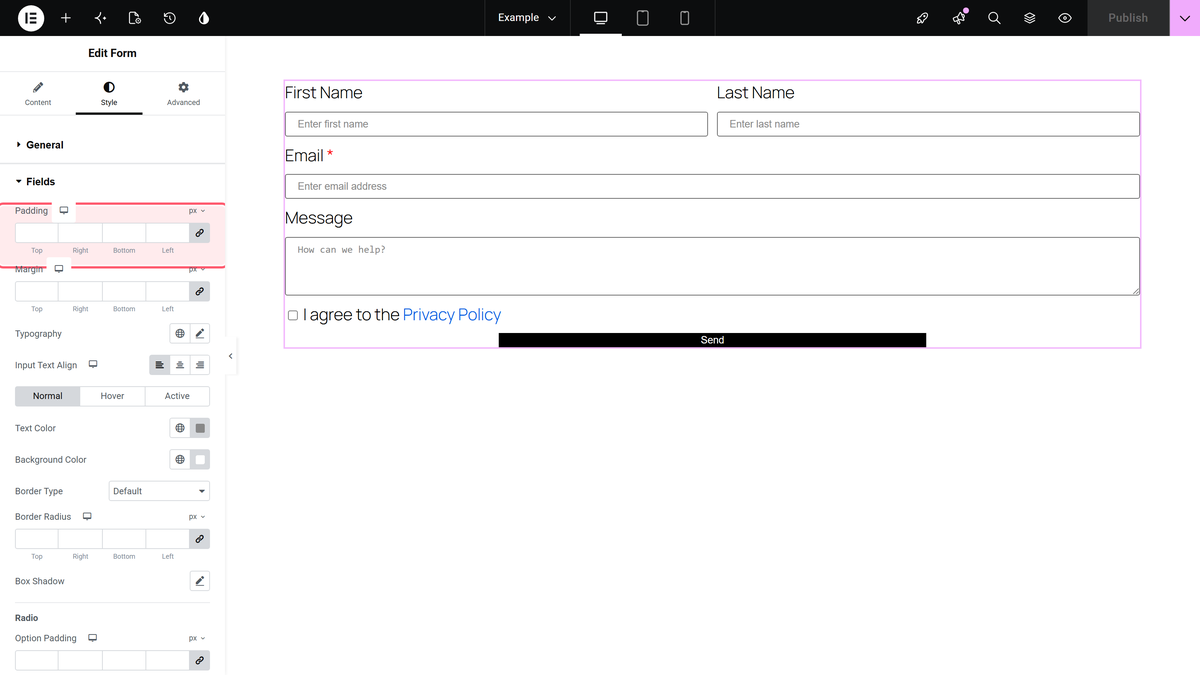
On the **Style** tab you'll find **General** (row and column gaps, form title), **Fields**, **Submit Button**, **Help Text** and **Message Content**.

![The Style tab of the Form widget with the Fields section open](https://theplusaddons.com/wp-content/uploads/2026/09/form-style-fields.webp)

## Limitations

- **The HoneyPot field currently does not stop submissions.** In our test, a filled-in HoneyPot was still sent. Use reCAPTCHA or Cloudflare Turnstile (Pro) against spam.- There is no file upload field.- Each email box (To, CC, BCC) takes one address.

## Related Docs

- [Add Google reCAPTCHA to the form](https://theplusaddons.com/docs/add-google-recaptcha-in-elementor-form/)- [Add Cloudflare Turnstile to the form](https://theplusaddons.com/docs/add-cloudflare-turnstile-captcha-in-elementor-form/)- [Set up SMTP for form emails](https://theplusaddons.com/docs/set-up-smtp-to-get-email-confirmation-securely-from-elementor-form/)- [Connect Mailchimp](https://theplusaddons.com/docs/connect-mailchimp-to-an-elementor-form/)- [Connect Brevo](https://theplusaddons.com/docs/connect-brevo-to-an-elementor-form/)- [Send submissions to Slack](https://theplusaddons.com/docs/send-a-message-to-a-slack-channel-from-elementor-form/)

## Frequently Asked Questions

**Q: What do I need before creating a free Elementor form with The Plus Addons for Elementor?**
A: The form widget works in the free plugin and in Pro, but it only appears after The Plus Addons for Elementor is installed and activated, and Elementor free is installed and activated too. That matters because the widget is not a standalone form builder. In the free edition, you get the basics like text, email, number, dropdown, date, time, Email and Redirect actions, plus HoneyPot spam protection.

**Q: How do I turn on the Form widget in Elementor?**
A: The Form widget is enabled from The Plus Addons &gt; Widgets in your WordPress dashboard. Search for Form and switch its toggle on. That step matters because the widget stays hidden until it is activated there. The Plus Addons for Elementor, The Plus Addons, Plus Addons for Elementor, POSIMYTH provides this widget inside the Elementor editor once it is switched on.

**Q: What can I build with the free version of the Elementor form widget?**
A: The free version covers basic contact-style forms such as a contact form, lead form, or quote request form. It includes field types like Text, Long Text, Email, Number, Hidden, HoneyPot, Dropdown, Date, and Time. It also supports Email and Redirect submit actions. That makes it enough for simple capture flows without moving to Pro.

**Q: Which form fields and actions require Pro?**
A: Pro adds the more advanced pieces: Phone Number, Radio, Checkbox, URL, Agree to Terms, Cloudflare, and ReCAPTCHA field types. It also unlocks Database Entry, Auto Respond Email, Active Campaign, Brevo, ConvertKit, GetResponse, Mailchimp, MailerLite, Drip, Webhook, Slack, and Discord submit actions. If you need marketing or automation hooks beyond basic email or redirect behavior, that is where Pro starts to matter.

**Q: Why is my Elementor form showing an error even though I filled it out?**
A: The most common issue on this page is validation around required fields or submission actions. In the free plugin, an empty required field is flagged by the browser’s own check. The page also notes that a submission issue can happen when an action fails, such as an integration problem. For spam control or harder validation cases in Pro, Google reCAPTCHA v3 and Cloudflare Turnstile are available.
**Q: How do I save Elementor form submissions or send them to email marketing tools?**
A: Saving submissions in WordPress uses Database Entry in Pro. Sending visitors an auto-response email also requires Pro through Auto Respond Email. For marketing tools like Mailchimp or Brevo there are dedicated Pro actions listed on the page. The related docs point to setup guides such as [save submissions in WordPress](https://theplusaddons.com/docs/save-form-submissions-in-elementor/) and [Connect Mailchimp](https://theplusaddons.com/docs/connect-mailchimp-to-an-elementor-form/), which fits when you want the form to feed a CRM or inbox workflow instead of just showing a message.