





A team page with eight people. A product with a dozen specs. A course with a list of lessons, each with a title, a length and a link. Advanced Custom Fields handles this kind of content with one field type: the Repeater. Editors add as many rows as they need, and every row keeps the same set of sub fields.
The catch comes when you open Elementor. A heading or an image widget expects one value, and a repeater holds a list of rows. So the usual question is not “where is my field?” but “how do I loop over it?” This guide answers that with three working methods: a card loop with the Dynamic Listing widget in The Plus Addons for Elementor, an accordion built from repeater rows, and a short code snippet for anyone who prefers to write the loop by hand.
The setting names in this guide come from our own documentation and the widget code of The Plus Addons for Elementor, checked on 15 November 2026.
What Is an ACF Repeater Field?
A Repeater is a field that contains other fields, called sub fields, and lets an editor add those sub fields again and again as rows. The ACF documentation for the Repeater describes it as a solution for repeating content such as slides, team members and CTA tiles.
Picture a repeater named team_members with three sub fields: name, role and photo. On one page the editor adds four rows, on another page twelve. The field group stays the same, only the number of rows changes. That flexibility is the whole point, and it is also why the data needs a loop to show up on the front end.
One thing to check before you build anything: the Repeater is not part of the free Advanced Custom Fields plugin. You need ACF PRO, or Secure Custom Fields (SCF), the community version on WordPress.org, which includes repeater fields.

Why a Repeater Needs a Loop in Elementor
Elementor shows custom fields through dynamic tags. You click the dynamic icon next to a control, pick a tag, pick a field, and the widget shows that value. This works well for a single value, such as one text field or one image.
A repeater is different because its sub fields only exist inside a row. There is no single “photo” value on a team page, there is a photo for row one, another for row two, and so on. The ACF dynamic tags in The Plus Addons for Elementor Pro follow the same logic: they list your regular fields and the fields inside an ACF Group, but they skip repeater sub fields on purpose, because those only have a value per row.
So the job is to find a widget that walks through the rows one by one and renders a design for each. The rest of this guide covers three ways to do that.
What You Need Before You Start
| You need | Why |
|---|---|
| Elementor (the free version works) | The page builder that the widgets run in |
| ACF PRO or Secure Custom Fields | The free ACF plugin has no Repeater field |
| The Plus Addons for Elementor Pro | Methods 1 and 2 use Pro features: the Dynamic Listing widget and the ACF Repeater source in the Accordion |
| A single template for your post type | The widgets read the rows of the post being viewed, so they belong in a single post template. Build it with the Elementor Pro Theme Builder or the free Nexter Builder |
If you only need the code method, Elementor and ACF PRO (or SCF) are enough.
Step 1: Create the Repeater Field Group
Start in WordPress, not in Elementor. The field group defines what each row contains.
- In your dashboard, open ACF and add a new field group. Give it a clear title, for example “Team”.
- Add a field, set its Field Type to Repeater, and give it a name such as
team_members. Write the name down, because Elementor will ask for the name, not the label. - Inside the repeater, add the sub fields that each row needs: for example a Text field
name, a Text fieldroleand an Image fieldphoto. - Set the location rules so the group appears on the right content, for example on a custom post type called Projects or on your Team page.
- Save the field group.
Keep sub field names short, lowercase and without spaces. You will type them into widget settings later, and a single wrong character is the most common reason a loop shows nothing.
Step 2: Add Rows to a Post
Open a post or page that uses the field group. Below the editor you will see the repeater with an Add Row button. Add a few rows and fill in every sub field, then update the post.
Add a few rows while you build the design. A single row hides layout problems such as uneven card heights, which only appear once several rows sit side by side.
Method 1: Show Repeater Rows as Cards With the Dynamic Listing Widget
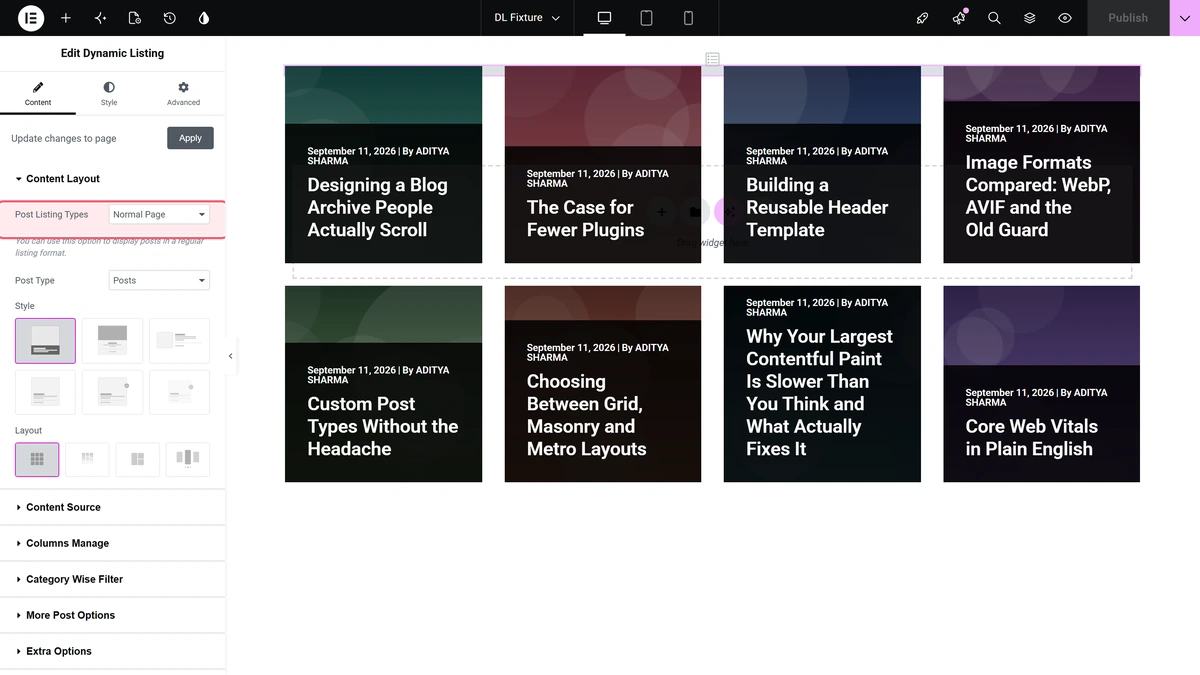
The Dynamic Listing widget is the Pro widget in The Plus Addons for Elementor for building loops. Its main switch, Post Listing Types, offers Normal Page, Archive Page, Single Page Related Posts, ACF Repeater, Custom Query, Search List and Wishlist. The ACF Repeater option loops over the rows of a repeater instead of running a WordPress query, and repeats a card template for every row. Our doc on showing ACF repeater data on a single post page covers the same setup in reference form.
Turn On the Widget
Go to The Plus Addons > Widgets, search for Dynamic Listing and switch it on. It needs The Plus Addons for Elementor Pro with an active licence, so it will not appear in the free plugin.
Add It to the Single Template
Open the single template for the post type that holds the repeater and drag the Dynamic Listing widget into it. In the Content tab, set Post Listing Types to ACF Repeater. The panel then shows the settings for this mode.
Choose or Create the Card Template
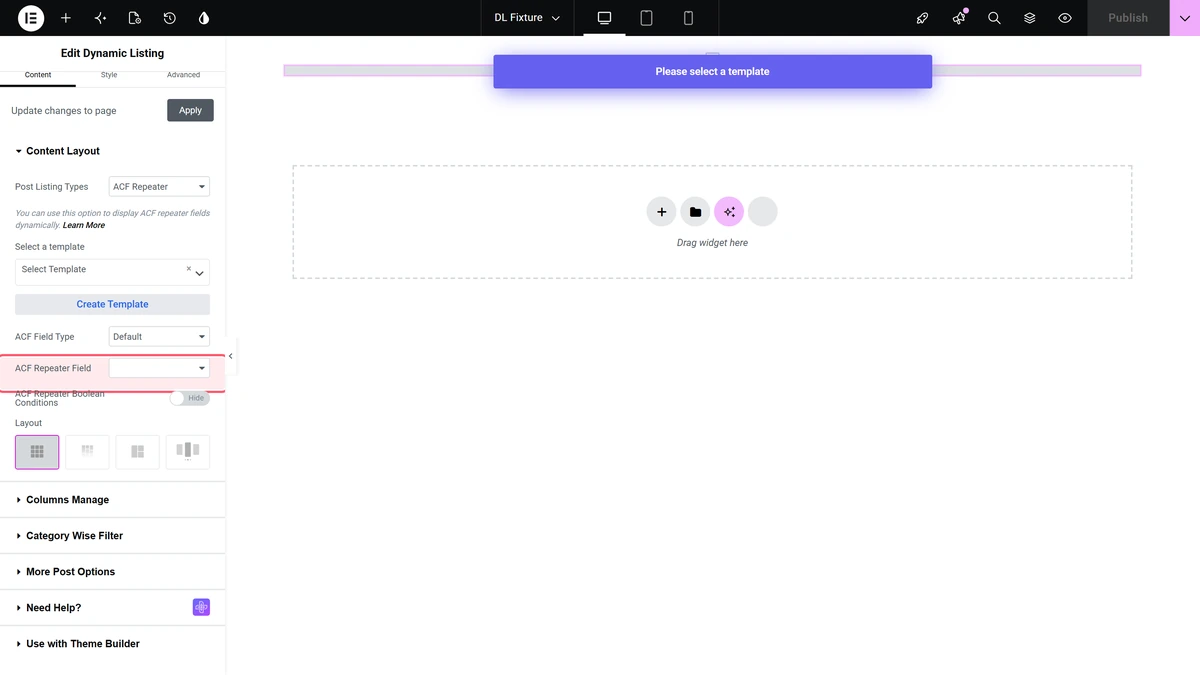
Each row is rendered with an Elementor template that you design once. Use Select a template to pick a saved template, or Create Template to start one. Until a template is selected, the widget shows the message “Please select a template” in place of the listing.
The card template needs one setting outside Elementor so that it reads repeater rows. Open the template’s WordPress edit screen (the regular post editor for the template, not the Elementor canvas) and find the box called ThePlus Elementor Options. Set Render Mode to ACF Repeater Content, choose a post that has rows in Select Preview Post, pick your repeater in Select ACF Field, and update the template. Without this, the card has no row to read.
Now design the card in Elementor. Place the TP Custom Field widget from The Plus Addons for Elementor Pro wherever a value from the row should appear, and type the sub field name into its Name setting, for example name or role. Its Field Type setting tells it what kind of value to print, with options such as Default, Image, Link, Video, Audio, Date, Html and oEmbed. When the listing renders, the template is printed once per row, and each card shows the values of its own row.
Point the Widget at Your Repeater
Set ACF Field Type to Default to pick the repeater from the ACF Repeater Field list, or to Custom to type its name. If your field group was registered with PHP and does not appear in the list, switch to Custom and type the name. Our documentation notes that typing the name works even when the picker misses the field.
Hide Rows You Do Not Want to Show
Need to keep some rows out of the listing without deleting them? Add a True/False sub field to the repeater, for example show_on_site. Then turn on ACF Repeater Boolean Conditions and type that sub field name into Boolean Field Name. Rows where that sub field is off or empty are skipped. This is handy for seasonal items, past team members or draft entries.
Pick a Layout
The Layout setting offers Grid, Masonry, Metro and Carousel, the same layouts as other Dynamic Listing modes. Grid suits uniform cards such as team members, Masonry suits cards with text of different lengths, Metro mixes tile sizes for portfolios, and Carousel keeps a long list in one sliding row.
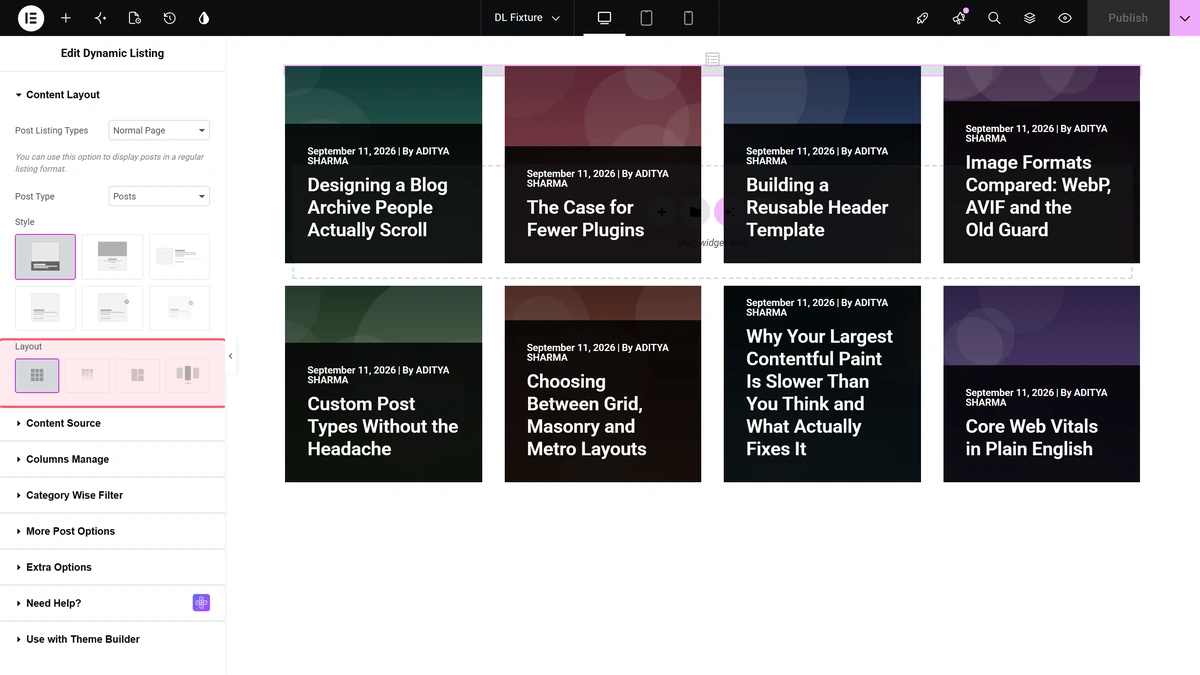
Save the template and open a post that has rows. Each row now appears as its own card, and when an editor adds a row to the post, a new card appears with no change in Elementor.
Method 2: Turn Repeater Rows Into an Accordion
FAQs, product details and course outlines are often stored as a repeater with one title and one block of text per row. For that shape, the Accordion widget in The Plus Addons for Elementor can build its items straight from the repeater. The ACF Repeater source is a Pro feature; in the free plugin the option shows an upgrade notice instead.
- Create a repeater, for example
product_details, with two sub fields: a Text fieldtitleand a Text Area or WYSIWYG fieldcontent. - Fill in the rows on your posts.
- Add the Accordion widget to the single template of that post type.
- Set Content Source to ACF Repeater.
- In Repeater Field Key, enter the repeater name, here
product_details. - In Title and Content, enter the sub field names, here
titleandcontent. - Save the template.
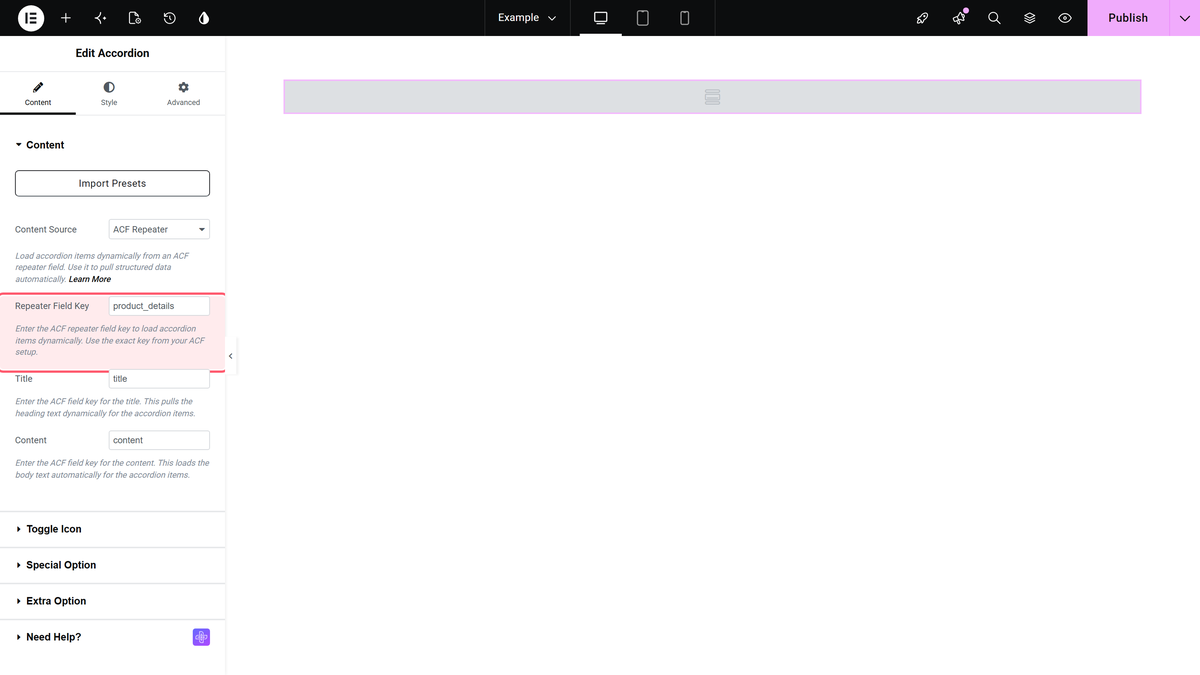
Each post now shows its own rows as accordion items. Keep two limits in mind: each item uses one title field and one content field, and items built from ACF have no per-item icons or unique IDs. The full walkthrough is in our doc on creating an accordion with repeater field data, and our post on building an FAQ accordion in Elementor covers styling.
Method 3: Loop Over the Repeater With a Shortcode
If you are comfortable with PHP, or you only need a simple list, you can write the loop yourself. ACF provides these functions for it: have_rows, the_row, get_sub_field and the_sub_field. The snippet below registers a shortcode that prints the name and role of each team member on the current post as a list.
add_shortcode( 'team_members', function () {
    if ( ! function_exists( 'have_rows' ) || ! have_rows( 'team_members' ) ) {
        return '';
    }
    $html = '<ul class="team-members">';
    while ( have_rows( 'team_members' ) ) {
        the_row();
        $html .= '<li><strong>' . esc_html( get_sub_field( 'name' ) ) . '</strong> '
               . esc_html( get_sub_field( 'role' ) ) . '</li>';
    }
    return $html . '</ul>';
} );
Add the code with a code snippets plugin or in a child theme, never in a parent theme that updates. Then place Elementor’s Shortcode widget in your single template and enter [team_members]. The function names and the loop pattern follow the have_rows documentation from ACF.
The trade-off is clear: you get full control of the HTML, but every design change means editing code, and styling happens in CSS rather than in the Elementor panel.
Which Method Should You Use?
| Dynamic Listing | Accordion | Shortcode | |
|---|---|---|---|
| Best for | Cards: team, projects, products, testimonials | FAQs, specs, course outlines | Simple lists, developer builds |
| Design | Any Elementor template per row | Accordion styling in the panel | Your own HTML and CSS |
| Layouts | Grid, Masonry, Metro, Carousel | Accordion | Whatever you code |
| Hide rows without deleting | Yes, with a True/False sub field | Not covered in our docs | Yes, with your own condition |
| Needs | The Plus Addons for Elementor Pro | The Plus Addons for Elementor Pro | PHP knowledge |
For most sites, Dynamic Listing is the most flexible choice because the card is a normal Elementor template. Use the Accordion when the data is question and answer shaped. Keep the shortcode for cases where you want plain markup or no extra widgets.
Practical Tips for Repeater Layouts
- Name fields once, then reuse. A consistent naming scheme such as
team_members,name,rolemakes widget settings easy to fill and easy to check. - Set a fallback for empty values. Editors skip fields. Design the card so it still looks fine when a role or photo is missing.
- Use the Carousel layout for long lists. Twenty cards in a grid push the rest of the page down. A carousel keeps them in one row.
- Use a True/False sub field instead of deleting rows. It keeps old content for later and lets editors hide rows themselves.
- Test with a post that has many rows and one that has none. Both cases happen on real sites.
Troubleshooting ACF Repeater Fields in Elementor
- The listing shows “Please select a template”. Pick or create a card template under Select a template.
- The listing or accordion is empty. Check that the names match exactly, that the post has rows, and that you are viewing a post that uses the field group. A widget in a single template reads the post being viewed, so it shows nothing on a page without repeater data.
- Your repeater is missing from the ACF Repeater Field list. Set ACF Field Type to Custom and type the field name. Field groups registered in PHP may not appear in the list.
- A repeater inside a repeater is missing. Nested repeaters may not display. Our documentation lists nested repeaters as not tested, and the listing loops over one level of rows, so plan for a single level.
- The cards are empty or show the same value on every row. Open the card template’s edit screen and check that ThePlus Elementor Options has Render Mode set to ACF Repeater Content and the right field in Select ACF Field. Then check that each TP Custom Field widget uses a sub field name, not the repeater name.
- Styles look broken after an update. Go to The Plus Settings > Performance and click Purge all cache, then clear any cache plugin and your browser cache. This is the fix the plugin FAQ gives for broken styles.
Going Further With Dynamic Content
Repeaters are one part of building dynamic sites in Elementor. For regular single-value fields, the Dynamic Tag extension adds Plus tag groups to Elementor’s dynamic picker; the Post and Site groups are free, and the ACF, User, Archive and WooCommerce groups need Pro. Our guide on adding dynamic content in Elementor explains each group, and the post on dynamic tags without Elementor Pro covers the free side.
If you want to sort or filter normal post loops as well, read about custom order in an Elementor loop grid and the guide to custom loop skins. To compare what the free and Pro plans include, see The Plus Addons free vs Pro, or look at the ACF Repeater feature page for live examples.
Frequently Asked Questions
Does the Free Version of ACF Include the Repeater Field?
No. The Repeater field is part of ACF PRO. Secure Custom Fields, the community plugin on WordPress.org, also includes repeater fields.
Can I Show ACF Repeater Fields in Elementor Without Elementor Pro?
Yes. The Plus Addons for Elementor works with the free version of Elementor, and you can build the single template with the free Nexter Builder. The Dynamic Listing widget and the ACF Repeater source in the Accordion need The Plus Addons for Elementor Pro. The shortcode method needs no addon at all.
Can Elementor Dynamic Tags Read Repeater Sub Fields?
Not on their own. Dynamic tags show one value, while repeater sub fields only have a value inside a row. Use a widget that loops over the rows, such as Dynamic Listing in ACF Repeater mode, or write the loop with ACF functions.
Can I Show Repeater Rows in a Carousel?
Yes. In the Dynamic Listing widget, set Post Listing Types to ACF Repeater and choose Carousel under Layout.
Can I Hide Some Rows Without Deleting Them?
Yes. Add a True/False sub field to the repeater, turn on ACF Repeater Boolean Conditions in Dynamic Listing and enter the sub field name in Boolean Field Name. Rows where that sub field is off or empty are not shown.
Does This Work With Nested Repeaters?
Plan for one level. The Dynamic Listing loop reads the rows of one repeater, and nested repeaters are not covered by our tested setup.
Suggested Reading
- Add an ACF Repeater Field in an Elementor Accordion (Dynamic FAQ)
- Dynamic Tags for Elementor Without Elementor Pro
- The Ultimate Guide to Elementor Custom Loop Skins
- Elementor Loop Grid: Sort Custom Post Type Posts by Custom Order
- How to Create an FAQ Accordion in Elementor
- Elementor Free vs Pro: Is Elementor Pro Worth It?
- Best Free Elementor Addons