There are three ways to add anchor link in Elementor: the Menu Anchor widget, a CSS ID on any section, and a WordPress navigation menu custom link. All three work with Elementor Free, no Elementor Pro required.
Anchor links take a visitor directly to a specific section on click. For long landing pages, one-page websites, and detailed guides, this reduces scrolling and helps visitors reach the right content in one click. This guide covers each method step by step, with a smooth scrolling setup and a troubleshooting table for common anchor link errors.
All steps in this guide were last verified in June 2026 on WordPress 7.0 with Elementor v4.1.3 (free) and The Plus Addons for Elementor v6.4.16.
What Is an Anchor Link in Elementor?
An anchor link is a hyperlink that scrolls the page to a named section when clicked. In Elementor, you assign an ID to any section, container, or widget, then create a link to that ID using a # prefix, for example, #services. When a visitor clicks the link, the browser jumps to that section immediately.
This is standard HTML behavior, no plugin required. Elementor’s built-in tools let you set it up visually without writing any code.
Anchor links are most useful in four situations:
- One-page websites where the navigation menu links to page sections
- Long landing pages with a “Jump to Section” feature
- Blog posts with a clickable table of contents
- FAQ sections where question links scroll to answers further down the page
How to Add Anchor Link in Elementor, 3 Methods Compared
All three methods are free and work with Elementor Free, Elementor Pro is not required. The table below shows when to use each.
| Method | Best For | Where You Set the ID | Free? |
|---|---|---|---|
| Menu Anchor Widget | Long pages, one-page sites | Dedicated anchor widget in the Elementor panel | Yes |
| CSS ID on Element | Sections, containers, individual widgets | Advanced tab of any Elementor element | Yes |
| WordPress Navigation Menu | Site-wide menu linking to page sections | WordPress Appearance > Menus | Yes |
Method 1: How to Add Anchor Link in Elementor With the Menu Anchor Widget
The Menu Anchor widget is a dedicated Elementor tool. Place it above the section you want to scroll to, give it an ID, then reference that ID in any link field on the page. It creates a named, invisible marker inside the editor that’s straightforward to identify and update later.
Step 1. Open the page you want to edit and click Edit with Elementor.

Step 2. In the widget search panel, type Menu Anchor and locate the widget.

Step 3. Drag and drop the Menu Anchor widget inside the section you want to link to, placing it as the very first element at the top of that section. This ensures the scroll lands at the correct position. The same drag-and-drop approach works for any element, so if you also want to add a countdown timer in Elementor, you can drop that widget into a section the same way.
Step 4. In the widget settings, enter an ID for the anchor. Use a short, lowercase, hyphenated name with no spaces, for example, services.

Step 5. Select the element you want to use as the clickable link. This can be a button, text, image, or any other widget, it is your choice.
Step 6. In the Link field of that element, enter the anchor ID preceded by a # symbol, for example, #services. Click Update.

Step 7. Preview the page. Clicking the button should scroll directly to the section where you placed the Menu Anchor widget.
Building a one-page site with section navigation? See How to Create One Page Navigation in Elementor
Method 2: How to Add Anchor Link in Elementor With a CSS ID
Every Elementor element, sections, containers, columns, and individual widgets, has an Advanced tab with a CSS ID field. Setting a CSS ID turns that element into an anchor target without adding a separate widget to the layout.
Step 1. Click the section, container, or widget you want to scroll to. Open its Advanced tab in the left panel.
Step 2. In the CSS ID field, enter a short, unique ID. Use lowercase letters and hyphens only, no spaces or special characters. For example: our-services.

Step 3. Click Update to save.
Step 4. On the element you want to use as a link, enter #our-services in its Link field. Click Update.
When to use Method 2 over Method 1: CSS IDs are faster when you already know which element to target and don’t need a separate named marker in the editor. Use Method 1 when working with multiple anchors on a long page, the named widget makes each anchor easier to locate inside the Elementor panel.
Curious how Elementor compares to native WordPress? Read WordPress vs Elementor: 6 Key Differences
Method 3: How to Add Anchor Link in Elementor Using the WordPress Navigation Menu
This method links a menu item in your site’s navigation to a specific section on a page. It works for one-page websites where the sticky header menu scrolls visitors to different sections.
Step 1. First, set up the anchor target. Use the Menu Anchor widget (Method 1) or a CSS ID (Method 2) on the section you want to link to. For this example, the ID is about-us.
Step 2. Click Update to save the anchor ID, then publish the page.

Step 3. In your WordPress dashboard, go to Appearance > Menus.
Note for block theme users: If your theme is a full-site editing (FSE) block theme, Appearance > Menus may not be available. Go to Appearance > Editor instead, open your Navigation block, and add a custom link there.
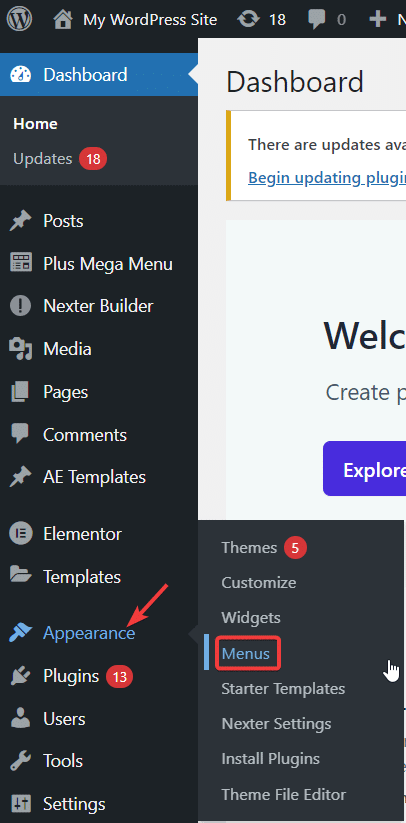 menus in wordpress dashboard" class=" wp-image-145272" title="How to Add Anchor Link in Elementor: 3 Methods [2026]" sizes="(max-width: 406px) 100vw, 406px" />
Step 4. In the menu editor, expand Custom Links. In the URL field, enter #about-us. In Link Text, enter the display name, for example, About Us. Click Add to Menu.

Step 5. Drag the new menu item to its correct position in the menu structure. Click Save Menu.
Step 6. Preview your site. Clicking the menu item should scroll the page to the correct section.
Linking to a section on a different page: If the anchor target is on another page, use the full URL plus the anchor ID, for example, https://yoursite.com/about/#team. The browser loads the page first, then scrolls to the target section.
How to Add a Smooth Scrolling Effect to Anchor Links in Elementor
By default, anchor links jump abruptly to the target section. Smooth scroll adds a fluid animated transition that feels more polished. The scroll-behavior: smooth CSS property is supported across all modern browsers, so it works reliably for nearly all visitors.
Method 1, CSS (free, global):
In Elementor, go to the element’s Advanced tab and open Custom CSS. Paste the following code and click Update:

html {
  scroll-behavior: smooth;
}
This applies smooth scrolling to every anchor link on the page. To target only specific elements, replace html with the element’s CSS selector.
Method 2, Smooth Scroll widget by The Plus Addons for Elementor (Free):
If you need visual control over scroll speed, easing curves, and per-device behavior, the Smooth Scroll widget (Free) by The Plus Addons for Elementor gives you a full settings panel, no CSS needed. In our testing across portfolio and service sites, the widget reduced the need to adjust scroll timing manually when switching between desktop and mobile layouts.

Note: Do not apply scroll-behavior: smooth if you are also using a JavaScript-based smooth scroll library. The two will conflict and produce erratic behavior. Pick one approach.
Is Elementor the right page builder for your project? Read our detailed Elementor Review
Anchor Link in Elementor Not Working? 5 Common Fixes
Most anchor link failures in Elementor trace back to one of five causes. Use this table to identify the issue and apply the correct fix.
| Issue | Likely Cause | Fix |
|---|---|---|
| Link scrolls to the wrong position, lands above the target section | Sticky header is overlapping the scroll target | Add scroll-margin-top: 80px; (or your header height) to the target element’s Custom CSS |
| Click does nothing | ID mismatch, the link and the anchor ID do not match exactly | Check that the #id in the link field matches the CSS ID or Menu Anchor ID exactly, including capitalization and hyphens |
| Anchor does not work on another page | Incomplete URL format | Use the full URL plus anchor: https://yoursite.com/page/#section-id |
| Smooth scroll not working | An older or niche browser does not support scroll-behavior: smooth | Use a JavaScript fallback, or the Smooth Scroll widget (Free) by The Plus Addons for Elementor, which handles scroll behavior without relying on the CSS property |
| Anchor link conflicts with another plugin | A performance or script management plugin is deferring scroll scripts | Temporarily deactivate plugins one at a time, Perfmatters and similar optimization plugins can interfere with scroll behavior scripts |

Are Anchor Links in Elementor Worth Setting Up?
Yes. For any page over 1,000 words or with more than three distinct sections, anchor links reduce friction and keep visitors oriented. They are standard on professional landing pages and long-form blog posts for a reason, they work.
For most Elementor builds, Method 1 (Menu Anchor widget) is the most reliable choice. It creates a named, visible marker inside the editor and works across sections, containers, and flexbox layouts. Use Method 2 (CSS ID) when you want to target a specific widget or container directly. Use Method 3 (WordPress menu) when you need anchor navigation in the site’s global header.
All three methods are free. Elementor Pro is not required. The Smooth Scroll widget (Free) by The Plus Addons for Elementor is also free and gives you a visual settings panel as an alternative to writing CSS.
The Plus Addons for Elementor by POSIMYTH has 100,000+ active installs on WordPress.org as of June 2026. Beyond smooth scroll, it includes 120+ widgets and 1,000+ Starter Templates. See the full widget library, check pricing, or compare Free vs Pro plans.