


Want a login experience that’s more than just a username and password? Learn how to create a custom WordPress login page.
A default WordPress login page is functional, but it lacks personality and branding. For users logging into your website, this can be a rather lackluster experience.
Customizing your WordPress login page offers an opportunity for branding and white-labeling, creating a more personalized user experience.
This also allows you to add security features to help prevent unauthorized access.
In this article, we explore how to create a custom login form in WordPress and customize it to your specific needs.
What is a Custom WordPress Login Page?
A custom WordPress login page is a modified version of the standard WordPress login screen.
It allows you to move beyond the default, generic look and feel, giving you control over the design and functionality of this user interaction point.
Instead of the default login page on WordPress branding and limited options, a custom login page reflects your own brand identity and can offer a more tailored experience for your users.
By default, WordPress provides a basic login page with only a username and password field.
Customizing this page allows you to add a variety of elements, including:
- Your logo
- Custom colors and fonts
- Background images or videos
- Social login buttons
- Custom messages or instructions
- Links to relevant resources
- Two-factor authentication integration
Looking for inspiration to create custom login pages? Here are 8 login page examples for your website!
How to Create a Custom WordPress Login Page [Step-by-Step]
Using specialized Login form plugins allows you to create custom login registration forms without having to write extensive custom code.
The Plus Addons for Elementor provides a user-friendly Login Form widget specifically designed for creating custom login forms.

This feature packed widget offers:
- Diverse Form Layouts: Choose from various layouts, including standard forms, hover forms, click-to-open forms, and popup forms, to integrate the login experience into your website’s design.
- Social Login Integration: Enable users to log in conveniently using their existing Facebook or Google accounts, to simplify the process and improve user experience.
- Customizable Branding: Add your logo, adjust colors, and tailor the form’s appearance to match your website’s branding, creating a consistent and professional user experience.
- Enhanced Security: Implement measures like Google reCAPTCHA fields to protect your website from bot submissions and spam registrations.
- User-Friendly Options: Offer features like “Remember Me,” password strength meters, and customizable error messages to improve the overall user experience.
Here’s a step-by-step guide to help you get started:
Step 1: Install and Activate Necessary Plugins
Ensure you have Elementor Free and The Plus Addons for Elementor (Pro version) installed and activated on your WordPress website.
Go to The Plus Addons > Widgets and activate the WP Login & Register widget.

Step 2: Create a New Page
Before you start building your custom login form, it’s a good practice to create a dedicated page for it.
This keeps your login functionality separate from other content on your site and allows for more focused design and customization.
To create a new page go to your WordPress dashboard, navigate to Pages > Add New.
With Elementor open, search for “WP Login & Register” in the widget panel and drag it onto your page.

Step 3: Build the Login Page
Now to start actually building your login page, navigate to the Settings Menu> Forms Layout Tab. Begin by choosing the form type that you want to use on your page. There are 4 options to choose from:
- Login: This is a classic login form for existing users
- Registration : This is a sign up form for new users.
- Login & Register: Versatile form that combines both login and registration with a simple switch.
- Forgot Password: A form for those who’ve forgotten their passwords.

Next, select the form layout. Here too you have 4 options:
- Standard Form: Displays the form directly on the page.
- Button Hover: The form appears when hovering over a button.
- Button Click: The form appears when clicking a button.
- Button Popup: The form opens in a popup window.
In the next Login Option Tab, you can customize the labels and button on your login page.

Here are some settings you can tweak:
- Custom Labels and Placeholders: Use this option to personalize the text and make it more relevant to your brand and audience. For example, you could change “Username” to “Email Address” or “Member ID.”
- Remember Me Button: Give your users the convenience of staying logged in. Enable this option and customize the button text to something more engaging, like “Keep Me Signed In” or “Stay Connected.”
- Register Link: If you’re accepting new registrations, make it easy for users to find the signup form. Add a clear “Register” link to your login form and customize the redirect link to send them to a specific page after registration.
Step 4: Customize Further
We’ve now set up the basic structure of your login page. The next step is to add those personal touches that make it truly shine.
Let’s start with the Form Heading Tab.

A well-crafted heading can set the tone for your login experience. Use the Form Heading Tab to add a clear and concise heading that reflects your brand’s personality.
For example, you could use something like “Welcome Back!” or “Sign In to Your Account.”
Next, make it easy for your users to log in or register by enabling social login options.
With just a few clicks, they can use their existing Facebook or Google accounts to access your site.

To enable social login, simply toggle the Facebook and Google options in the Social Login and Register Option tab.
You can also customize the redirect URL to send users to a specific page after they log in using their social accounts.

To help users you’ve lost their passwords you can add a clear and easy-to-use “Lost Your Password?” option.
Customize the labels, placeholders, and button text to match your brand’s voice and tone.

Keep your users informed and engaged throughout the login process with custom notification messages.
You can add personalized messages in the Notification Messages Tab for different scenarios, such as:
- Loading: Let users know that the form is being processed.
- Success: Display a congratulatory message upon successful login.
- Validation: Provide clear error messages if there are any issues with the form submission.
- Error: Display a general error message if something goes wrong.
Reset Password Option:
If you’re using the “Forgot Password” form type, you can configure settings related to password resets in the Reset Password Option tab. For example, you can enforce strong passwords to enhance security.
Want to change your site password easily? Here’s How to Reset WordPress Password (step-by-step)
Step 5: Preview Changes and Publish
Once you’re happy with how your login page looks, preview your changes to make sure everything is in order, and then publish the page to make it live on your website.
Keep your website safe from spam. Learn how to add reCAPTCHA in WordPress login pages.
Taking security even further, here’s how you can easily add 2 Factor Authentication on your WordPress login page for Free:

Examples of Top Custom WordPress Login Pages
Let’s now take a look at some example of custom login page designs that you can get inspired by.
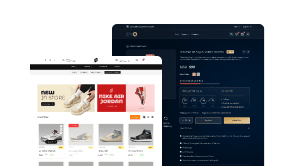
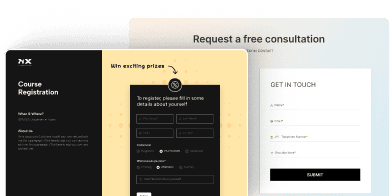
1. Login Form with Remember Me Checkbox

This customized login form improves the login process by using a friendly mascot, a prominent call-to-action button, and social login integration, creating a more engaging and user-friendly experience.
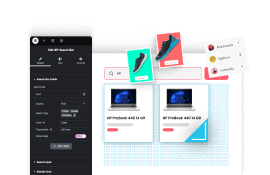
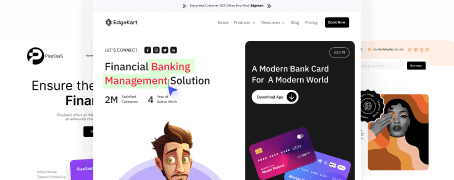
2. AI Website Themed Login Switcher Form

This custom login form enhances user experience by using a visually appealing split layout with a captivating image, clear and concise input fields, a contrasting call-to-action button, social login integration, and a helpful “Watch Demo” button to guide new users.
3. Elementor Login Form on Button Click

This customized login page replaces the default login screen with a branded design featuring the podcast logo, a brief description, and a prominent “Get Started” button, promoting the podcast and encouraging user engagement instead of a standard, impersonal login experience.

Wrapping Up
Your login page is one of the most important points of contact with your users.
It’s often the first impression they have of your site beyond the initial landing page, and it’s where they directly interact with your website.
Customizing this default login page gives you an opportunity to remind users of your brand, create a more welcoming experience, and even enhance security.
The easiest way to customize your login page is to use the Login Form Widget from The Plus Addons for Elementor plugin.
Apart from this widget, the plugin also offers over 120 other Elementor widgets that help you enhance the functionality and aesthetic appeal of your website.
The Plus Addons for Elementor is a performance-optimized, lightweight plugin that allows your website to perform at its best while giving you unlimited customization options.
FAQs on Creating a Custom WordPress Login Page
What are some common issues when customizing the login page?
When customizing your WordPress login page, you might encounter issues like broken layouts due to theme or plugin conflicts. Incorrectly modifying code can lead to login errors or even lock you out of your site. Always back up your website before making changes.
Is it safe to edit the functions.php file for login page customization?
While you can edit the functions.php file to customize your login page, it requires caution. Errors in this file can cause your entire website to malfunction. If you choose this method, make sure you have a backup of the file and a good understanding of PHP.
Can I change the default WordPress login URL?
Yes, you can change the default WordPress login URL (wp-login.php) to enhance security and make it harder for attackers to find. This can be done using plugins like Nexter Extension.
Is it possible to customize a WordPress login page without a plugin?
Yes, you can customize the login page without a plugin by directly editing your theme’s files or using custom code in your functions.php file. However, this method requires coding knowledge and can be more complex. Plugins offer a more user-friendly method.