The right WordPress featured image size makes up the visual front door to your website content. It sets the tone for your posts and pages, grabbing the attention of visitors and providing context before they even start reading.
Yet, you might often struggle with ensuring these images display correctly or suit their website’s layout.
Since it’s the first thing that will grab a visitor’s attention when they land on your website, it is one of the most important visual elements.
A featured image of poor quality or incorrect sizing will affect website engagement and make it look unprofessional.
So, if you’re frustrated with images that appear stretched, pixelated, or cut off, this guide is for you. In this guide, we’ll take you through various methods to change the WordPress featured image size for your website.
Key Takeaways
- Best size: 1200×628 px.
- Resize using media editor, code, or plugin.
- Optimize for speed and responsiveness.
What is a Featured Image in WordPress?
A featured image, or a post thumbnail, is a representative image for a specific post, page, or custom post type in WordPress. These images appear on your website, social media shares, and even search engine previews, acting as visual hooks to engage your audience.
The featured image is a key element for drawing user attention, hinting at what your post or page is all about.
Why are Featured Images Important?
Featured images are essential for your website for several reasons-
- Visual appeal: They instantly capture attention and enhance the overall look of your website while giving the users an idea of what your post is about.
- High engagement: No one likes big blocks of text on a website. Images are a great way to enhance the visual appeal of text-heavy websites and increase engagement with a ‘show and tell’ approach.
- Boosts SEO: Properly optimized featured images with alt texts can boost your website’s visibility and search engine rankings.
- Brand building: They help establish a cohesive aesthetic with consistent style, color, or typography, reflecting your brand identity.
Struggling with your featured image not being visible on the website? Learn How to Fix WordPress Featured Image Not Showing Issues.
How to Set a Featured Image in WordPress?
Setting a featured image in WordPress is super easy. All you need to do is follow these simple steps-
Step 1: Open a post or a page
Log in to your WordPress admin dashboard and open the page or post for which you want to set the featured image.
Step 2: Featured image section
In the page editor, navigate to the settings icon in the top right corner to open the settings panel.
Under the Post tab, select Featured Image > Set featured image.
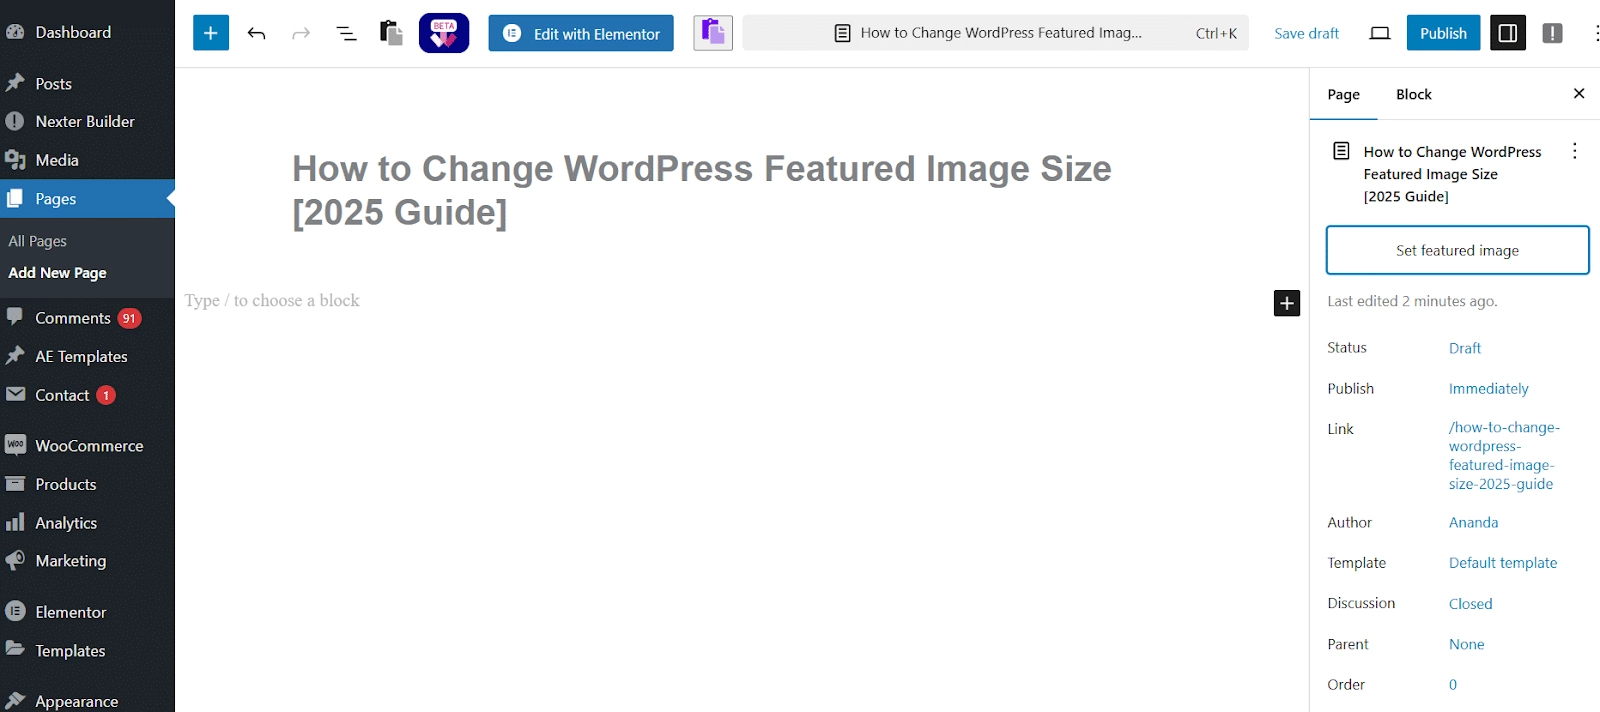
Step 3: Set the featured image
Select an image from your media library. You will see various options for configuring the image.
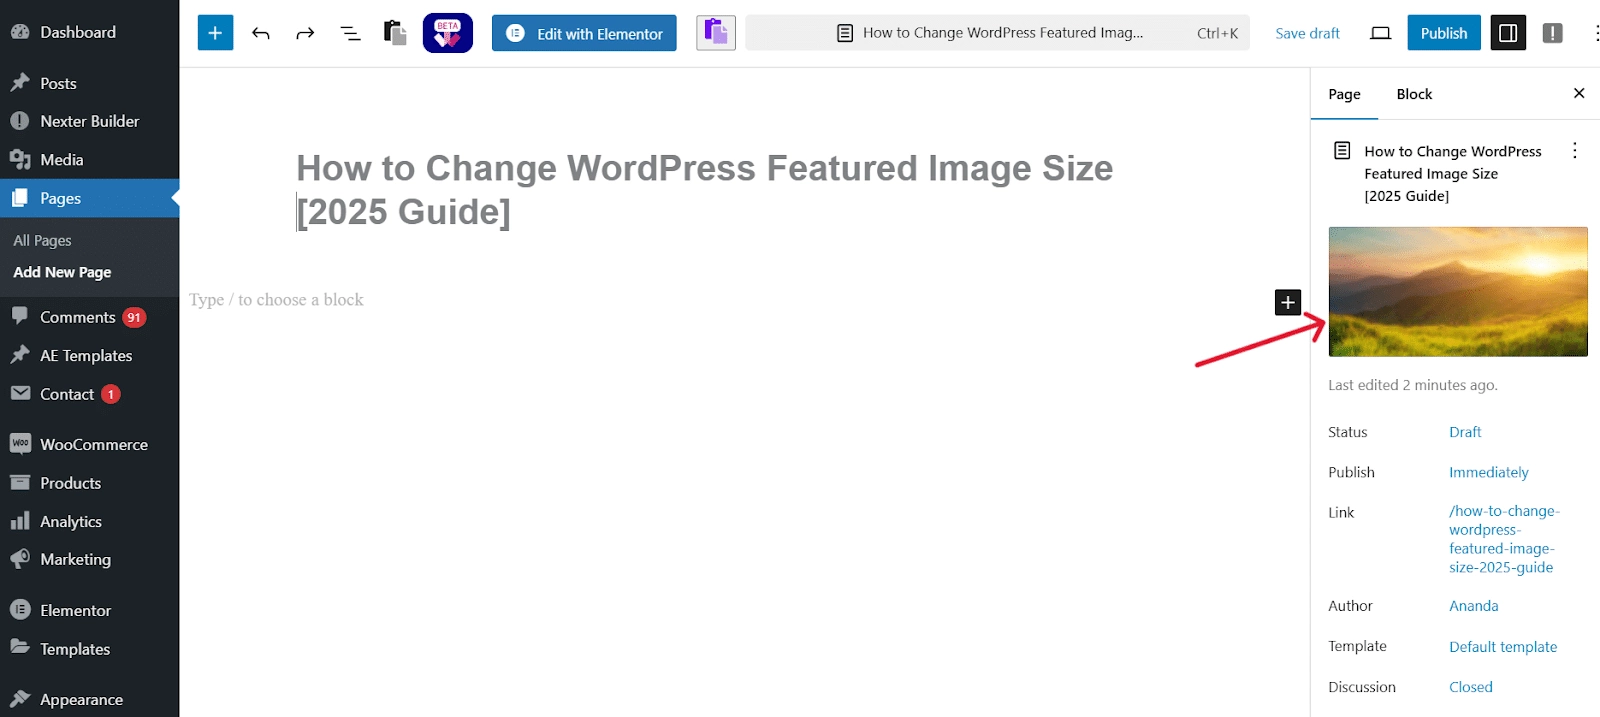
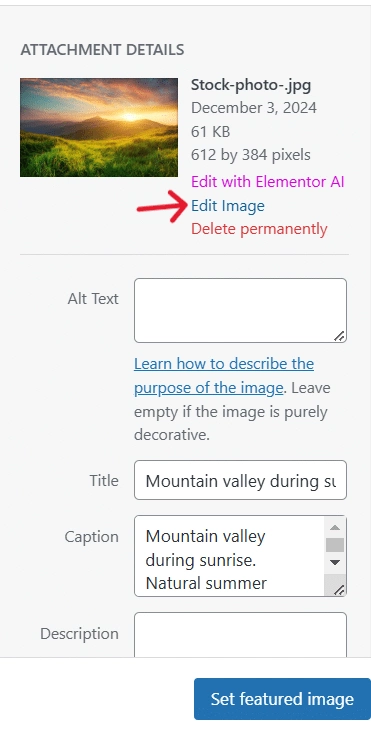
Here, you can add the image Title, Caption, Alt text, and Description. Click on Set featured image to display the featured image.
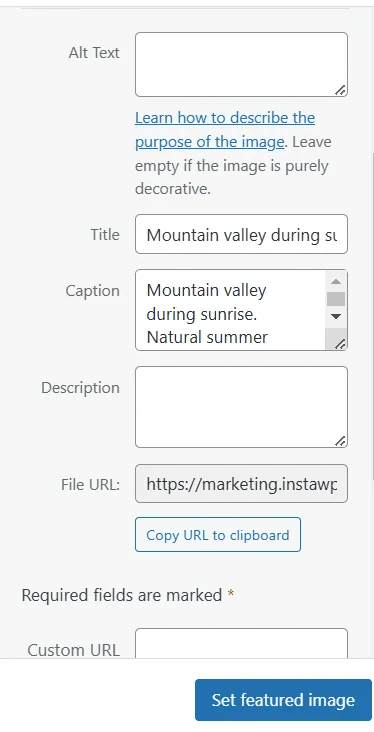
Is There an Ideal WordPress Featured Image Size?
The ideal size for a featured image in WordPress is 1200 pixels by 628 pixels, as this size is compatible with most WordPress themes.
However, WordPress’s featured image size ratio can depend on the theme you choose, the website layout, or your personal performance.
For instance, you may want to pick a different WordPress featured image dimension that looks good on social media.
Here are various image sizes in pixels in WordPress-
| Thumbnail size in WordPress | 150 x 150 pixels |
| Medium image size in WordPress | 300 x 300 pixels |
| Large image size in WordPress | 1024 x 1024 pixels |
| Full image size in WordPress | Original size of the image |
Depending on the image resolution, theme, or layout of the website, you can resize the image for WordPress.
Want to set custom image thumbnail size in WordPress for Free? Here’s how to do it:
How to Change the Featured Image Size in WordPress?
There are various simple and easy ways to change the featured image size in WordPress. Let’s explore five different methods to do so.
Method 1: Resize the Image in WordPress
If you want to resize featured images for your website posts and pages, you can quickly do so from WordPress’ built-in settings.
To resize manually, select the image in your media library and click on Edit Image at the bottom of the page.
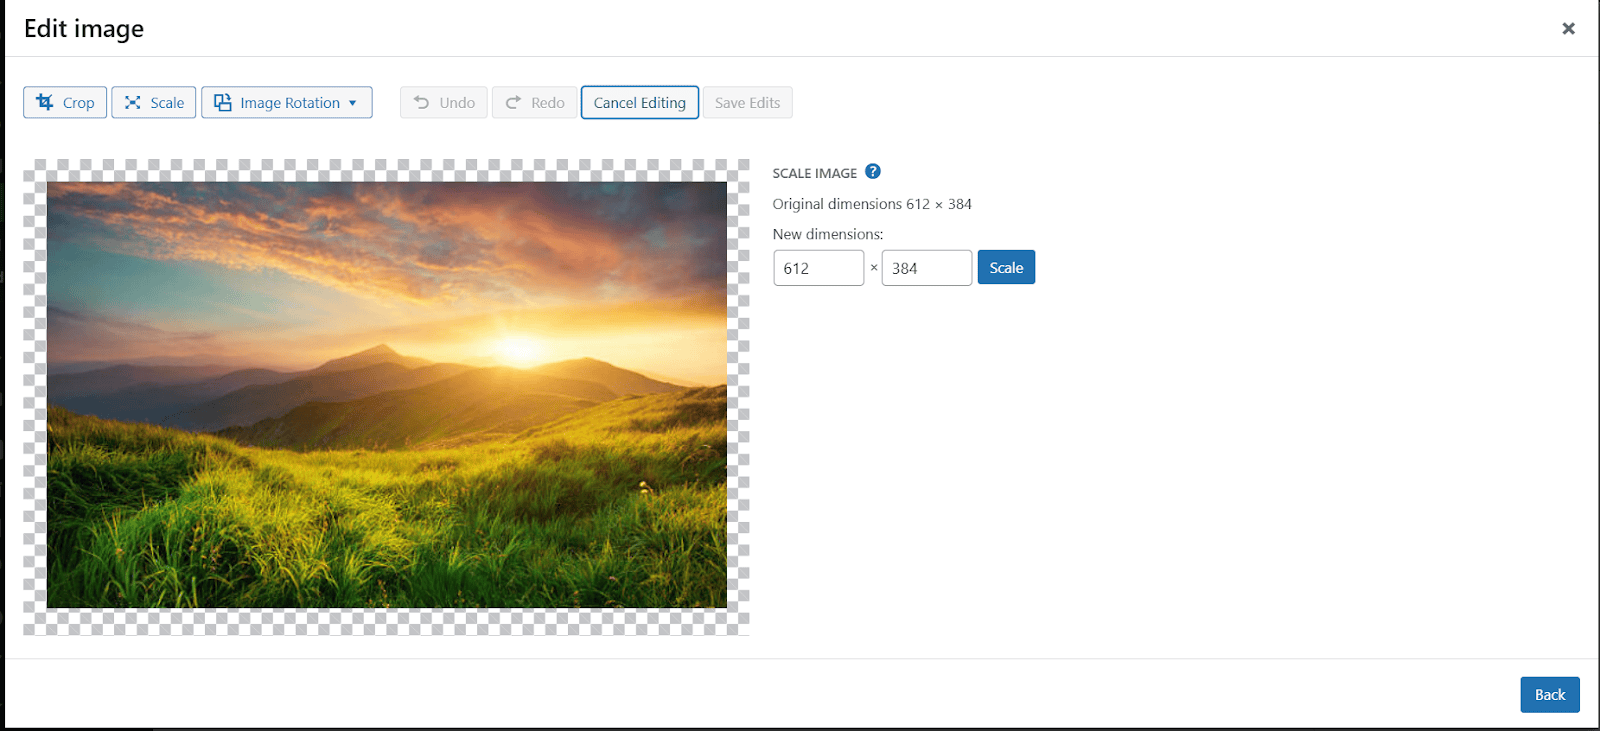
Navigate to Scale and set your desired dimensions. Click on Scale, and WordPress will resize the image and save it.
Want to upload custom media to WordPress but restricted due to large file size? Here’s How to Increase the Maximum File Upload Size in WordPress.
Method 2: Size the Image Correctly Before Uploading
The featured image on your website will be set to the size of the original image.
So, the best way to change the image size for the WordPress featured image is to resize it before uploading.
For this, you can use software like Photoshop and manually adjust it.
With the right tool, you can change the size, borders, or other elements of the image based on ideal WordPress sizing and place an optimized image on your website.
Method 3: Use Code PHP (Not recommended for beginners)
The next method involves adding some code to your theme’s PHP file to change the size of the featured image. Since it is a more technical method, it is ideal for advanced users who have experience with coding.
While adding the code to your theme’s functions.php file is not too complicated, even a single typing error or any other mistake can damage your website. So, it is always a good idea to backup your site before editing its core files.
Once you’ve made a backup of the site, go to Appearance > Editor on your WordPress dashboard, and you will see a list of all your theme files on the right side of the screen.
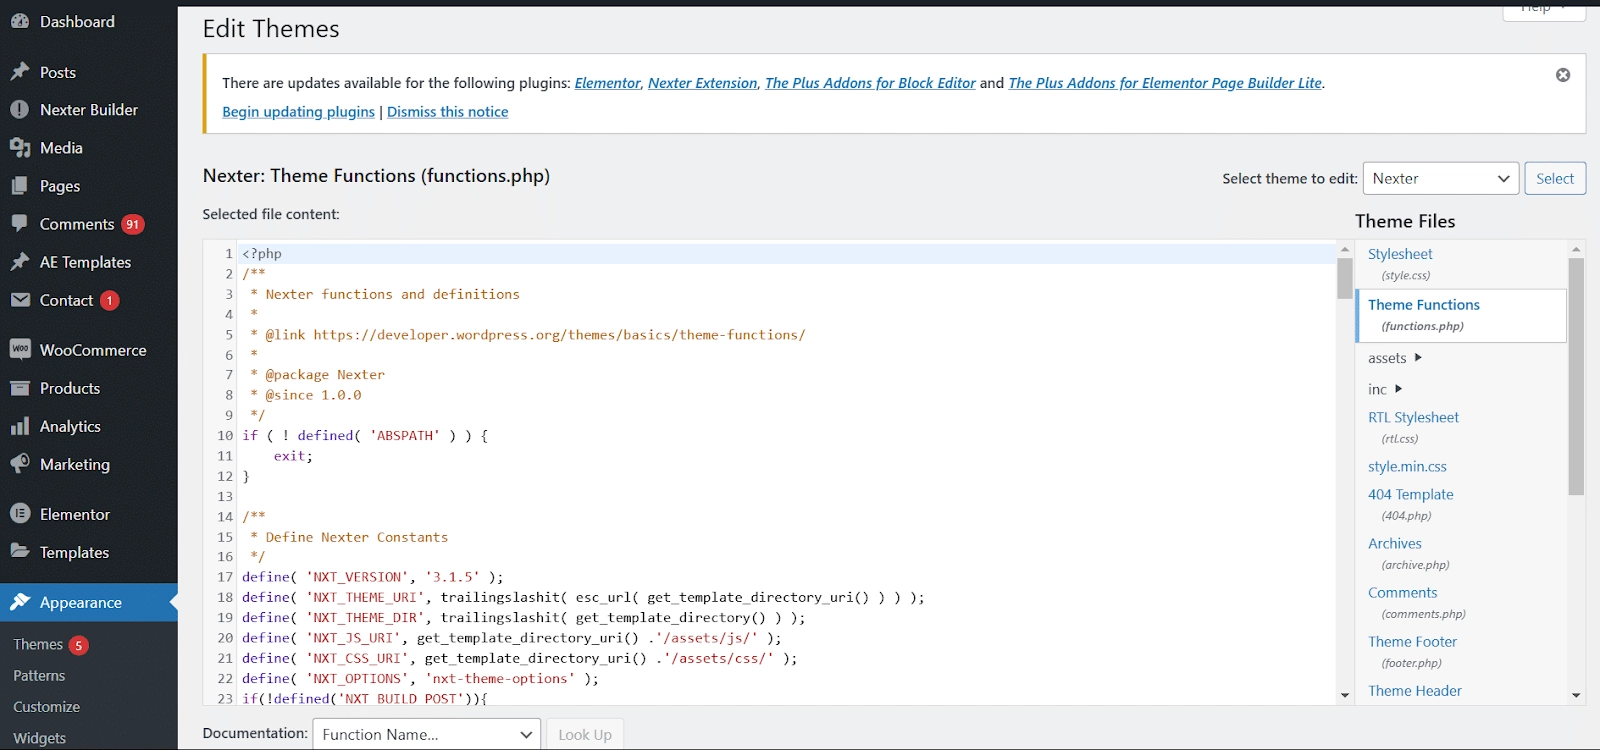
Locate your theme’s functions.php file, open it in the editor, and add the following line of code-
<!--?php set_post_thumbnail_size( $width, $height, $crop );

?-->
Here, add your desired image dimensions for “width” and “height.” Also, if you want to crop an image to the specified height and width, add “$crop” to the code; otherwise, leave this space blank.
Once you save the changes, you will have your featured image resized to the specified dimensions.
Looking to resize your featured image but cannot find the Appearance Menu? Learn How to Fix Missing Appearance Menu in WordPress Admin Quickly.
Method 4: Use Media Settings to Change Image Dimensions
Another quick and easy way to change featured image dimensions for your website is to use the media settings and customize the default size.
To do this, go to Settings > Media. Navigate to Image Sizes, and next to the Thumbnail size, enter the desired image size for your website featured image.
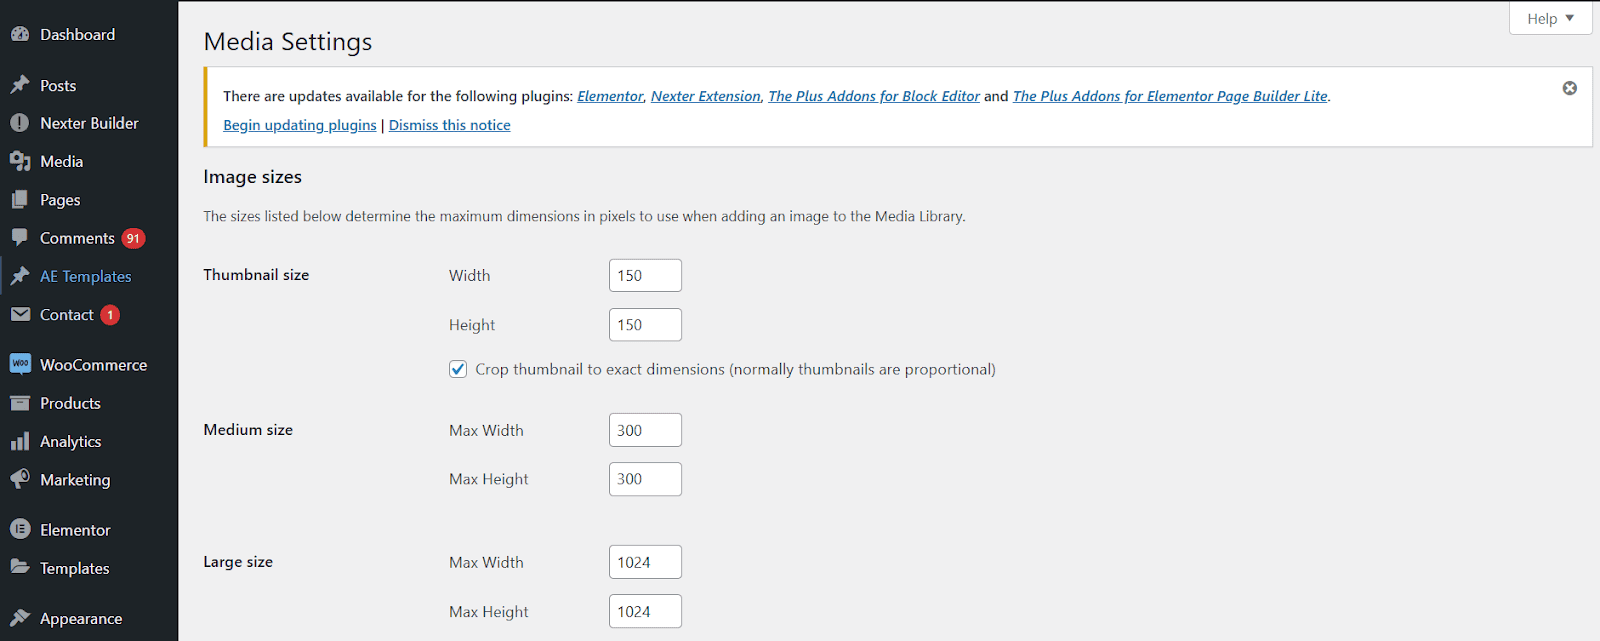
Click on Save Changes.
Method 5: Resize Your Old Featured Images
When you make changes to the default WordPress featured image size using any of the above methods, it will only apply these dimensions to the new image you upload.
Then, what about the existing featured images on your site? You can either resize and reupload them manually, which can be time-consuming. Or use the Nexter Extension plugin to resize the image.
Here’s a quick video tutorial on how to use it:
Additional Tips for Optimizing WordPress Featured Image Size
To ensure your featured images look their best and enhance your website’s overall appeal, here are some tips to optimize the images-
- Use high-quality images: Always use high-resolution images to avoid pixelation, especially when resizing. Low-quality images can harm the professional look of your site.
- Compress images for faster loading: Optimize your images using third-party plugins before uploading them to WordPress. This reduces file size without sacrificing quality, improving page loading speed and overall site performance.
- Stick to consistent dimensions: Maintain uniform dimensions for all featured images to ensure a consistent design across your website. This is especially important for blogs and grid-style layouts.
- Test responsiveness: Once you add a featured image, preview your website on different devices to check how it appears. A responsive theme should automatically adjust the image size, but verifying this ensures a seamless user experience.
Wrapping Up
For a WordPress website, having a high-quality, optimized, responsive featured image is a must-have. It will make your website look professional and visually attractive while boosting your SEO ranking and engaging the audience.
Plus, you can easily add a featured image in WordPress and resize it manually using a reliable plugin to ensure the image is optimized for the web.
To take your WordPress experience to the next level, install The Plus Addons for Elementor. With more than 120 Elementor widgets, you have access to a range of feature-rich tools to enhance the functionality of your Elementor editor, making it easier than ever to create stunning, feature-rich websites.
FAQs on WordPress Featured Image Size
Are featured images automatically device-responsive?
Yes, WordPress ensures that featured images are responsive. However, using optimized images and testing on different devices is important to ensure a consistent user experience.
What size should a WordPress featured image be?
The recommended size depends on your theme, but 1200 x 628 pixels is the ideal size for most layouts and themes.
Why is my featured image cut off in WordPress?
This often happens due to incorrect dimensions or image crop settings in your theme. You need to resize the image or adjust settings to fix this issue.
What is the difference between an image and a featured image in WordPress?
An image can appear anywhere in your content, while a featured image specifically represents the post or page.
Why is my WordPress featured image not showing on Facebook?
If WordPress’s featured image is not showing on Facebook, it could be a caching issue. You can resolve this by clearing the page cache in WordPress using a caching plugin and then resetting the Facebook cache using their debug tool.
