If you have a WordPress website, two-factor authentication for WordPress is essential to ensure the security of your website.
When setting up your website, you are required to set login details with a username and password to facilitate authorized access to the site only. However, it might not be enough to prevent hackers or malicious bots from accessing the website.
If unauthorized users gain access to your website, it may affect your data, performance, and customer experience. As a result, two-factor authentication for WordPress is a useful feature that offers an additional layer of security against bots or hackers.
In this article, we’ll explore how you can add WordPress 2-factor authentication for your website.
Key Takeaways
- Two-factor authentication improves WordPress login security.
- Set up easily using the Nexter Extension and Google Authenticator.
- Includes backup codes and multiple 2FA method options.
What does Two Factor Authentication for WordPress mean?
Two-factor authentication for WordPress involves 2-step authentication to log in to WordPress. With this setting enabled, you will need to enter both your WordPress login password and a secondary code to log in to your WordPress dashboard.

The second verification step requires users to enter a code sent via text, email, app, links, or QR code. This adds an extra layer of security to your WordPress login, as hackers won’t have access to this external verification channel.
What is an Authenticator App?
An authenticator app is a smartphone application that generates a one-time password whenever you log in to a third-party app or website like WordPress.
An authenticator app like Google Authenticator or Authy is an easy and convenient way to add WordPress 2FA to your website.
Simply put, your website server and the app use a secret key to encrypt information and create a temporary code that you can use to add another layer of security.
So, even if a hacker can know your WP username and password, they won’t be able to log in to the website unless they have the time-restrained security code generated by the authenticator app.
Secure your WordPress website against hacking attempts with a protected login page. Learn How to Secure WordPress Login Page with 11 Proven Ways.
How to Add Two-Factor Authentication for WordPress [Step-by-step]
Adding WordPress two-step authentication for your website is a straightforward process.
For this guide, we’ll use the Nexter extension plugin to set up WordPress multi-factor authentication and the WordPress Google authenticator app as our default 2-factor authentication.
Let’s dive into the step-by-step process to enable WordPress 2FA for your website.
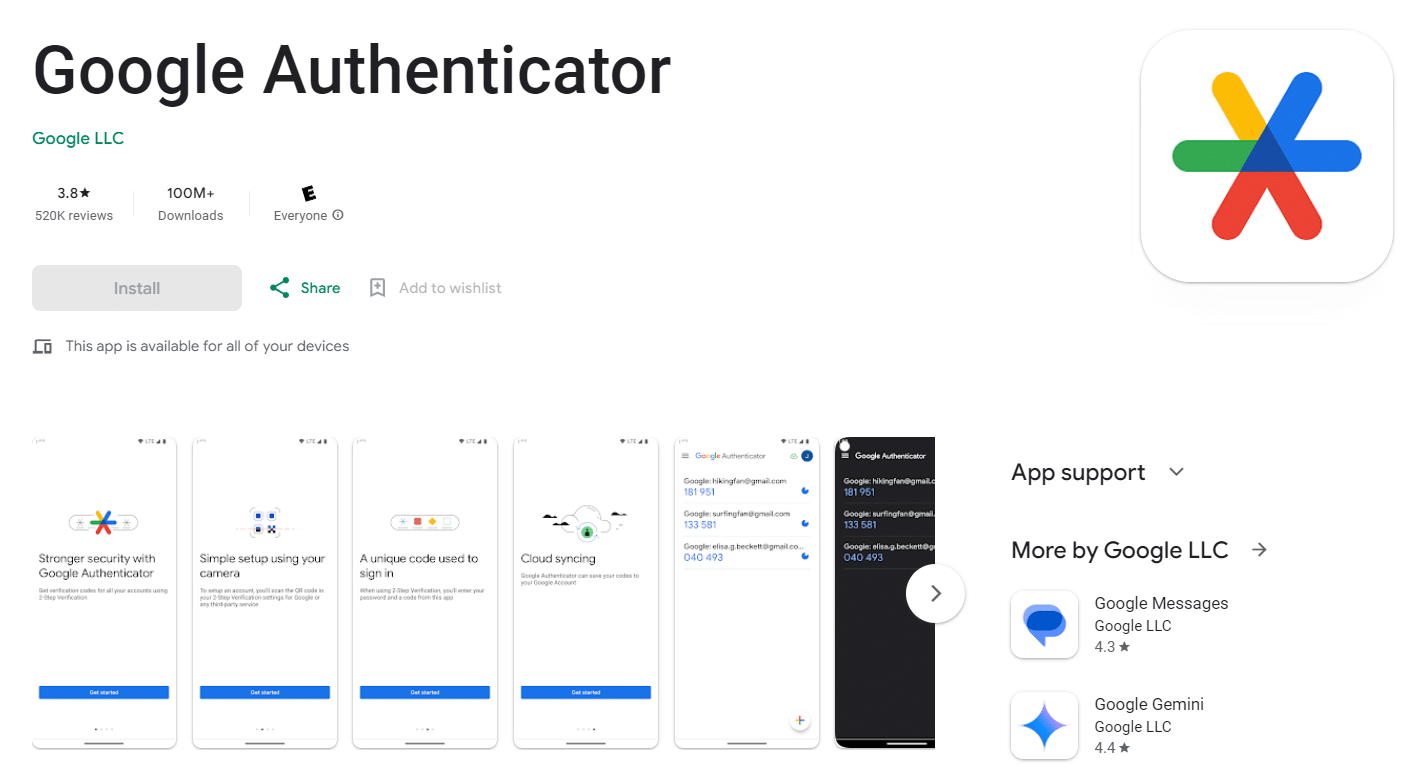
Step 1: Install Google Authenticator App
Visit your mobile device’s Google Play app store to install the Google Authenticator app. If you’re an Apple user, get the app from here.
Step 2: Set Up Two-Factor Authentication with Nexter Extension Plugin
To enable two-factor authentication, you’ll need the Nexter Extension plugin. Once installed and activated, go to Nexter Extension > Security from your WordPress dashboard.

Find 2-factor Authentication and enable the toggle to use it.
Step 3: Set Up Two-Factor Authentication Login
Next, click the Gear icon to open the Two Factor Authentication Login popup. Here, you can select the User Roles for which you want to enable WordPress two-step authentication.
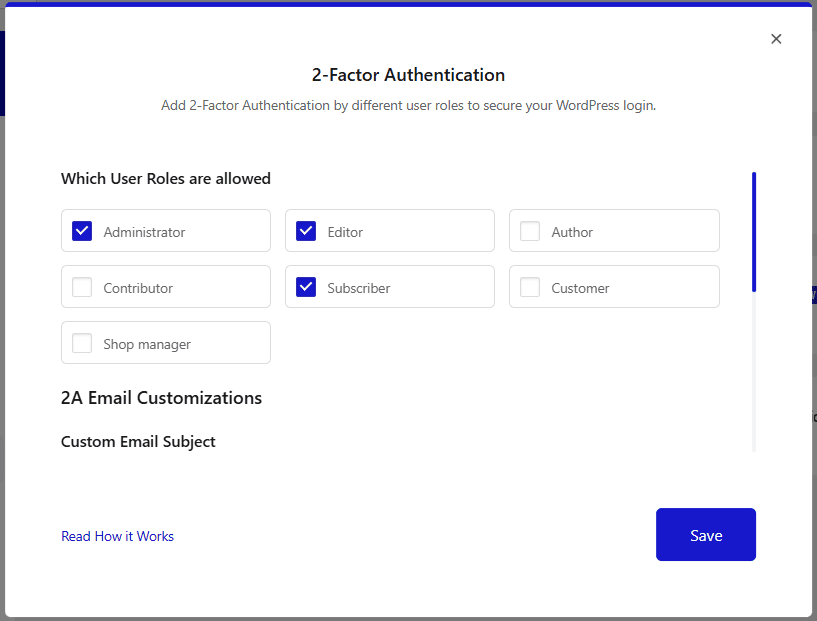
You can also add a custom email subject and message. Once done, click Save.
Step 4: Enable 2 Factor Authentication for Specific Users
On your WordPress dashboard, go to Users > All Users and edit the user based on the roles you selected in the previous step.
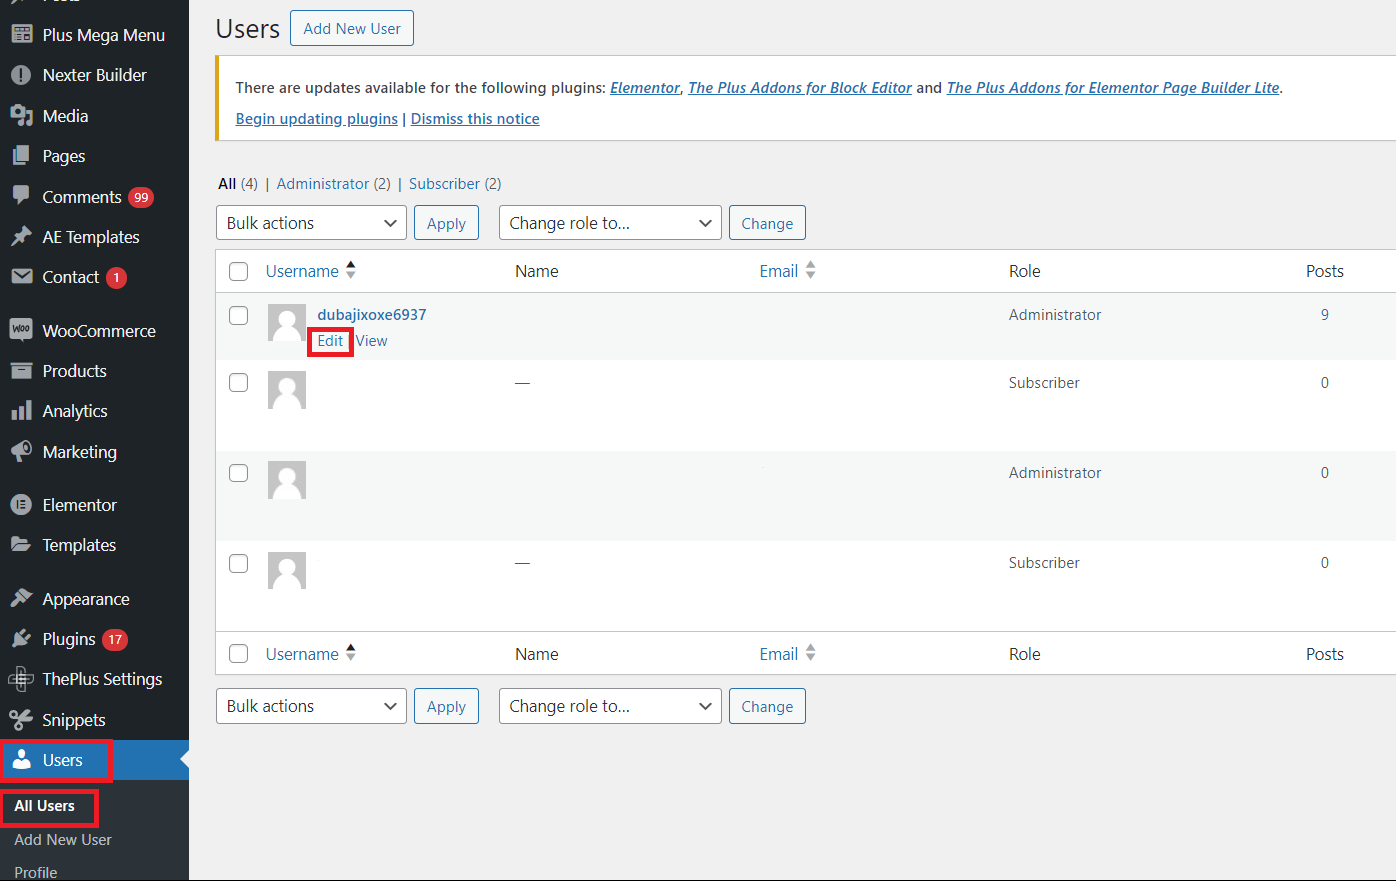
Scroll down to Two-Factor Options. Here, you will find three authentication options-
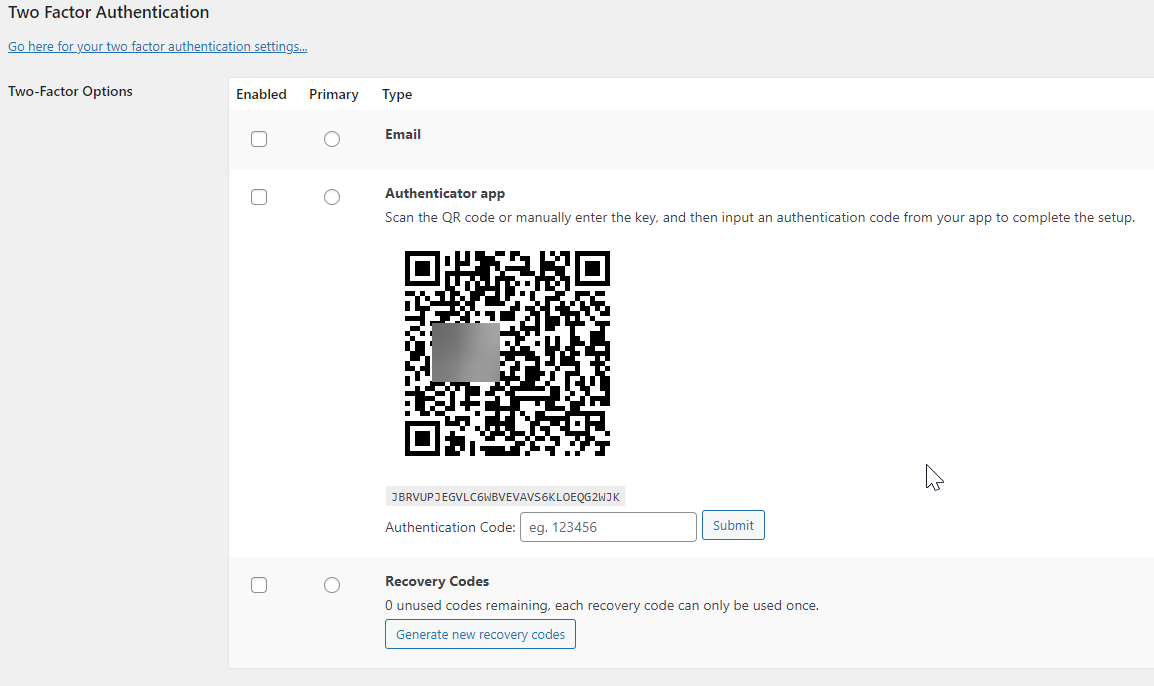
- Email: When enabled, you’ll receive an email with the verification code.
- Authenticator App: If you choose this method, you’ll need to connect your website with an authenticator app like Google Authenticator and generate verification codes.
- Recovery Codes: In this method, you can generate recovery codes beforehand and use them.
You can easily use all the methods together and choose one as a default whenever you log in to your WordPress website.
Step 5: Use the Authenticator App Method
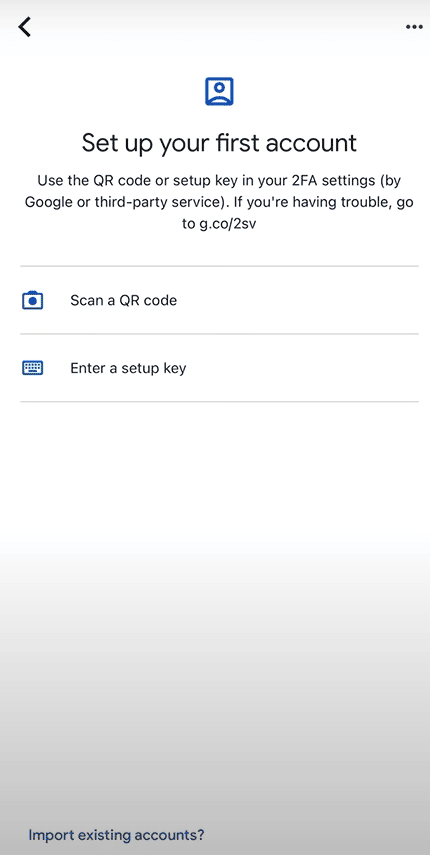
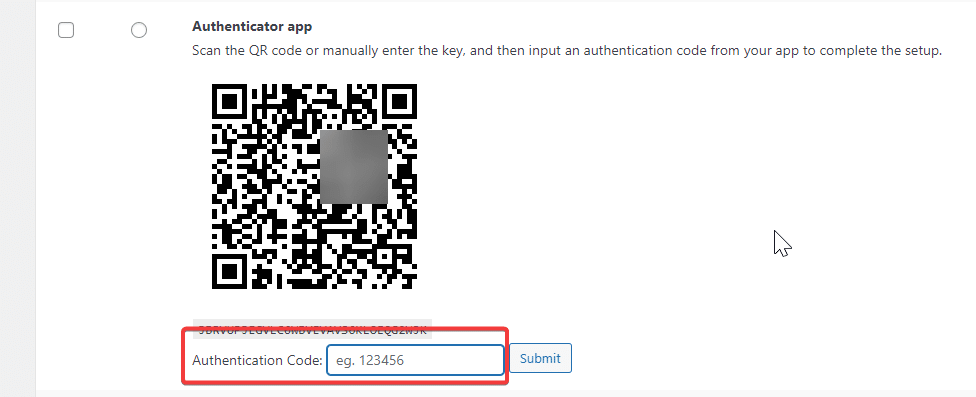
To use the Authenticator App method, enable it or set it as default. In this step, you’ll be prompted to scan the QR code or enter the code manually.
To do this, open the Google Authenticator app and click the ‘+’ icon at the bottom. Click on “Scan a QR code” and point your camera to the QR code available under the authenticator app option (as shown in the previous step).
Alternatively, enter the authentication code from the app to the Authentication Code field and click Submit.
Next, click on Update Profile to save the changes.
Step 6: Test the Log in Using Authenticator App
Once set up, try the two-factor authentication for WordPress set up. Log out of the WordPress dashboard and log in again using your username and password.
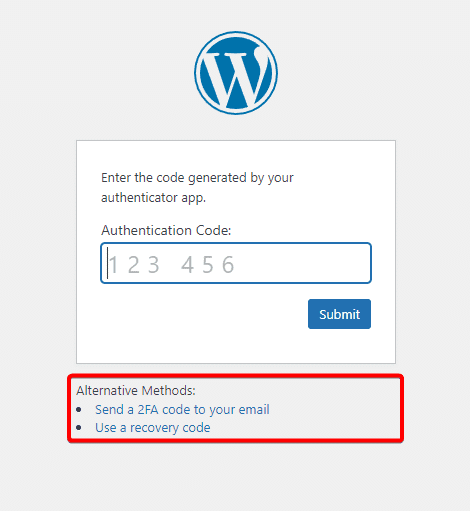
The login page will prompt you to enter the authentication code generator using your linked Google Authenticator app.
Moreover, with Nexter Extension’s two-factor authentication plugin, you can enable all three authentication methods together. If you’re using multiple methods, you get the option to switch between verification methods.
Protect your website against unauthorized access and malicious attacks. Check out the 6 Best WordPress Security Plugins for your WordPress website.
Want additional tips on how to secure your WordPress website? Check this quick tutorial:
Wrapping Up
The two-factor authentication for WordPress is a critical security feature that will help you prevent unauthorized access to the WordPress website.
When enabled, you can add an extra layer of security and ensure hackers or unauthorized users cannot access or affect your WordPress website.
Using the Nexter Extension plugin, you can quickly enable two-factor authentication and enhance website security.
The set-up is easy, as you only need to install the plugin and Google Authenticator app.
Once you’ve ensured WordPress security with the two-factor authentication setting, install The Plus Addons for Elementor to enhance the performance and functionality of your website.
The plugin gives you access to unique widgets to help you create a feature-rich website – from design and website layout to WooCommerce, social media, post styling, and more.
FAQs on WordPress Two Factor Authentication
What are the security risks associated with 2FA?
While two-factor authentication offers added protection for your WordPress website, it might still be vulnerable to phishing attacks which attempt to intercept a user’s messages or emails to get access to one-time passwords and other information. Backup codes can also make your site vulnerable if not stored properly.
Can I log in with 2FA if I don’t have access to my phone?
If you’re using authenticator apps like Google Authenticator and do not have access to your phone, you cannot log in with 2FA. You might have to opt for alternate methods like email or recovery codes.
Can I use multiple 2FA methods simultaneously?
Yes, you can. With Nexter Extension Plugin, you can use multiple 2FA methods simultaneously. This gives you added security and the flexibility to switch between different methods.
What do I do if I lose my two-factor authentication device or backup codes?
You must set up a backup method for use when you lose your two-factor authentication device. When that happens, you can request the verification code to be sent via SMS to your registered mobile number when setting up the backup method.
Do I need coding skills to add two-factor authentication on WordPress?
With two-factor WordPress plugins like Nexter Extension plugin, you don’t need coding skills to add two-factor authentication for your website. Simply activate the plugin with an Authenticator app and follow the process mentioned in this article.
What is the 2FA status in WordPress?
2FA status in WordPress is a security process that requires users to provide two different authentication options to verify themselves and log in to their account.
How to set up Google Authenticator for WordPress?
To set up Google Authenticator for WordPress, install the app on your smartphone. Click on the ‘+’ icon and select Scan a QR Code to scan the code on your computer. You can also add an authentication code manually to link Google Authenticator to your WordPress site.


