---
title: "How to Set Up SMTP to Get Email Confirmation Securely from Elementor Form?"
url: https://theplusaddons.com/docs/set-up-smtp-to-get-email-confirmation-securely-from-elementor-form/
date: 2026-02-26
modified: 2026-04-09
lang: en
author: "Aditya Sharma"
description: "Are your Elementor Form email confirmations going to spam or not being delivered at all? By default, WordPress uses the PHP mail function to send emails. However, many hosting providers..."
image: https://theplusaddons.com/wp-content/uploads/2026/02/How-to-Set-Up-SMTP-to-Get-Email-Confirmation-Securely-from-Elementor-Form-1024x538.jpg
word_count: 1068
---

# How to Set Up SMTP to Get Email Confirmation Securely from Elementor Form?

## 

- Configuring SMTP with Gmail SMTP ensures reliable delivery of Elementor Form email confirmations.
- Nexter Extension (Free) plugin simplifies the setup of Gmail SMTP for Elementor forms.
- Google Developers Console is used to generate a Client ID and Client Secret for Gmail API integration.
- The Plus Addons for Elementor allows customization of email notifications using shortcodes in the Form widget.

Are your Elementor Form email confirmations going to spam or not being delivered at all? By default, WordPress uses the PHP mail function to send emails. However, many hosting providers don’t fully support or properly configure it.

As a result, important emails like form confirmations may land in spam folders — or fail to send completely.

If you’re using Elementor forms on your business or eCommerce website, this can lead to missed leads, lost customers, and a poor user experience. Setting up SMTP ensures your email confirmations are sent securely, authenticated properly, and delivered reliably to your users’ inboxes.

Using Gmail SMTP (Simple Mail Transfer Protocol) is a reliable way to ensure your Elementor Form emails are delivered successfully. With the Nexter Extension (Free) plugin, you can easily set up SMTP using Gmail SMTP and send authenticated, secure email confirmations directly to your users’ inboxes.

*To check the complete feature overview documentation of The Plus Addons for Elementor Form widget, [click here](/docs/create-an-elementor-form-for-free/).*

***Requirement  - This widget is a part of The Plus Addons for Elementor, make sure its installed & activated to enjoy all its powers.***

[LIVE WIDGET LINK](https://theplusaddons.com/elementor-builder/form-builder/?utm_source=tpae&utm_medium=docs&utm_campaign=text)

### Set Up Gmail SMTP with the Nexter Extension

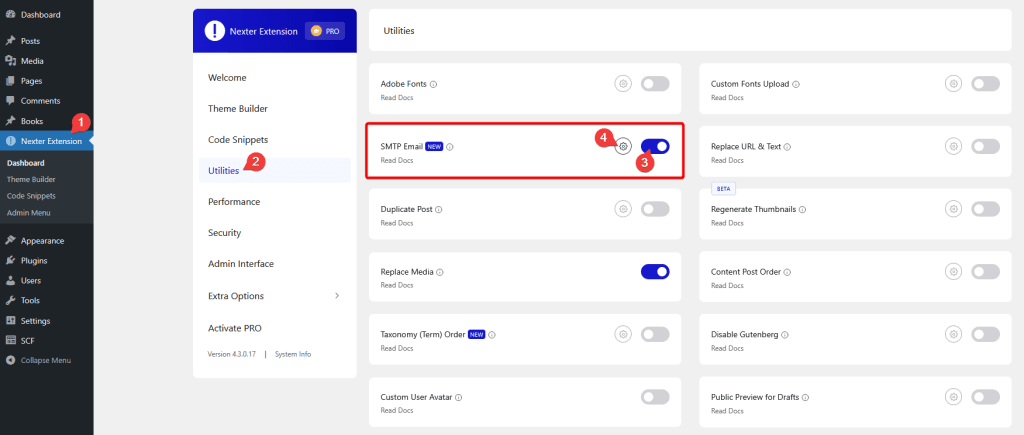
To set up Gmail SMTP with Nexter Extension, from the WordPress Dashboard, go to **Nexter Extension** > **Utilities**.

Then go to the **SMTP Email **section, enable the toggle and click on the gear icon (⚙).

![](https://theplusaddons.com/wp-content/uploads/2026/02/enable-smtp-email-1024x435.png)

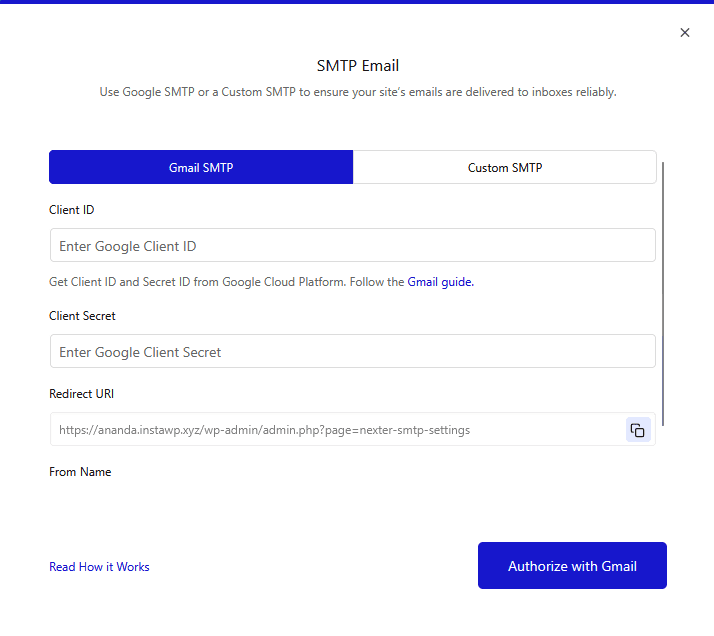
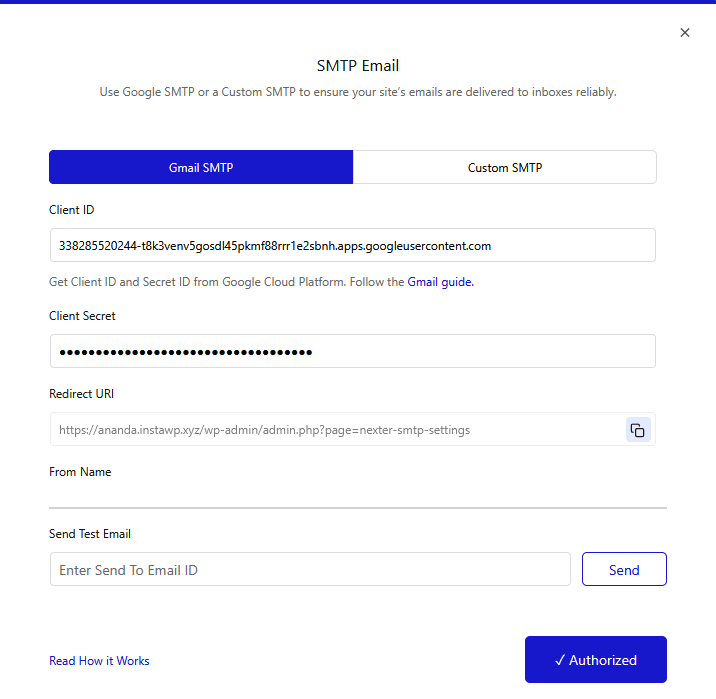
It will open the SMTP Email pop-up, then go to the **Gmail SMTP** tab.

![](https://theplusaddons.com/wp-content/uploads/2026/02/smtp-email-popup.png)

To use Gmail SMTP, you have to generate a client ID and a client secret.

### Generate Google Client ID and Client Secret

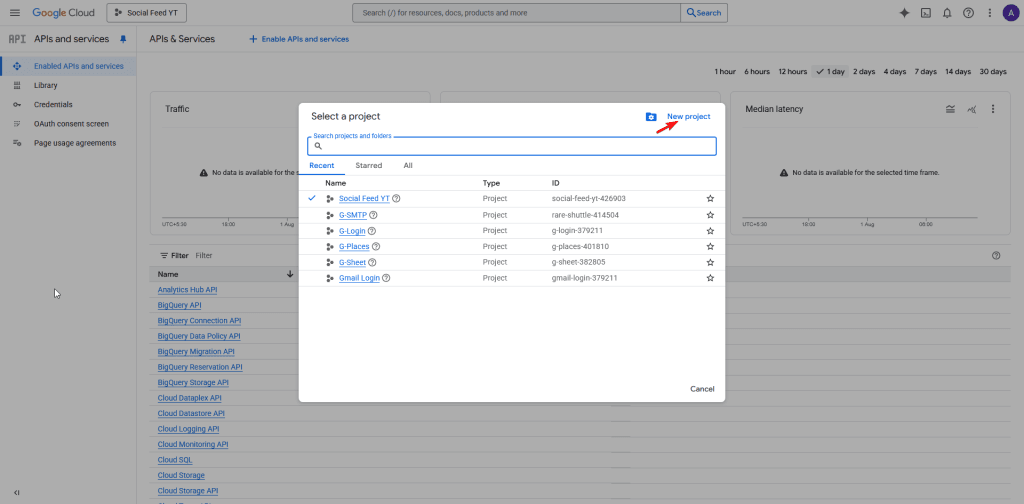
1. For this, you have to log in to your Google account and go to the[ Google Developers Console](https://console.developers.google.com/).

2. If you don’t have any projects created, then click on the **CREATE PROJECT **link, but if you already have a project, then click on the current project name. It will open a pop-up, then click on the **New Project** link there.

![](https://theplusaddons.com/wp-content/uploads/2026/02/google-client-id-secret-1-1024x504.png)

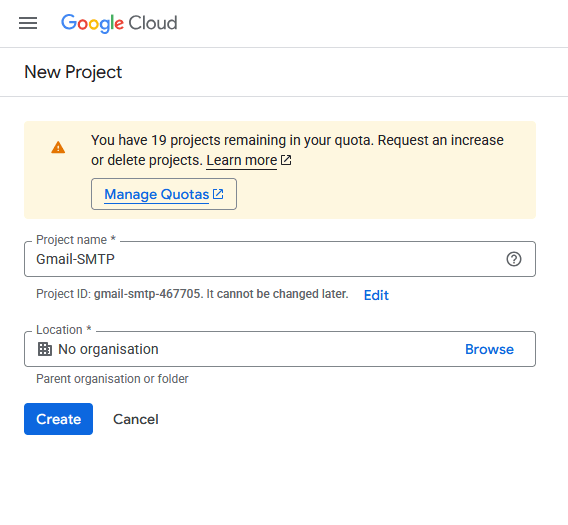
3. On the next screen, add your **Project name** and click the **CREATE** button.

![](https://theplusaddons.com/wp-content/uploads/2026/02/google-client-id-secret-2.png)

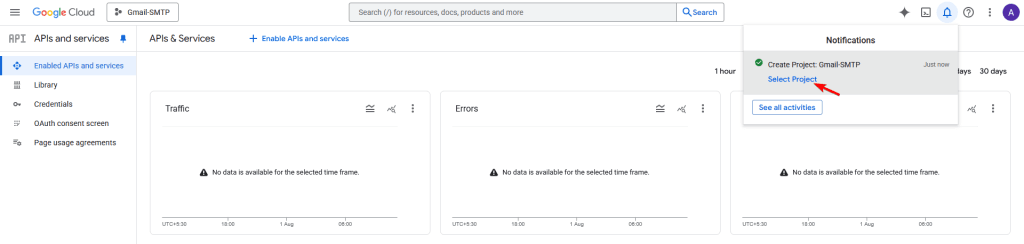
4. Once the project is created, a notification will show; click on the **Select Project** link there to switch to the new project.

![](https://theplusaddons.com/wp-content/uploads/2026/02/google-client-id-secret-3-1024x244.png)

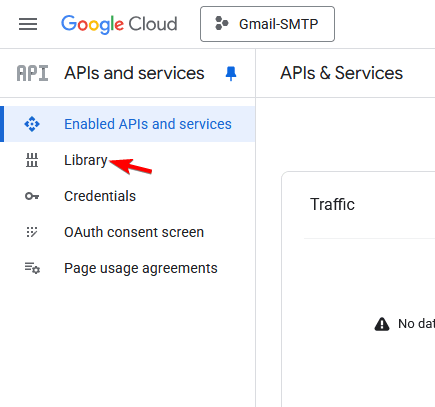
5. Then go to the **Library** from the left sidebar.

![](https://theplusaddons.com/wp-content/uploads/2026/02/google-client-id-secret-4.png)

6. Then search for “**Gmail API**”.

7. From the search result, click on the **Gmail API**.

8. On the next page, click the **Enable** button. 

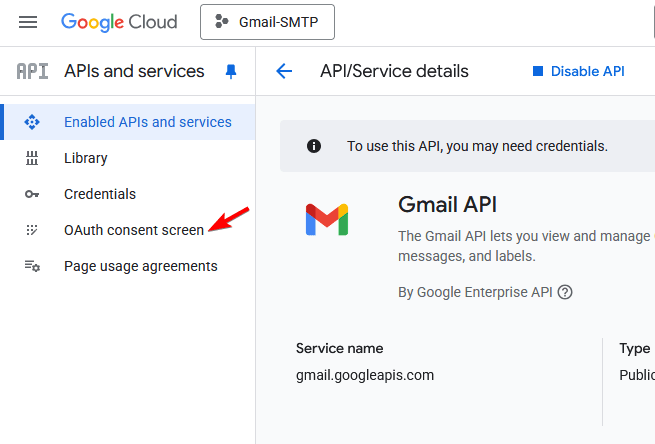
9. After that, click on the **OAuth consent screen** from the left sidebar.

![](https://theplusaddons.com/wp-content/uploads/2026/02/google-client-id-secret-6.png)

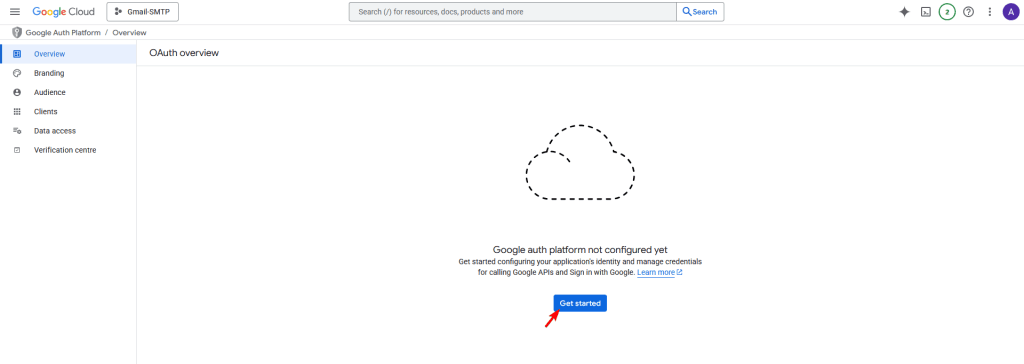
10 Then click on the **Get Started** button.

![](https://theplusaddons.com/wp-content/uploads/2026/02/google-client-id-secret-7-1024x364.png)

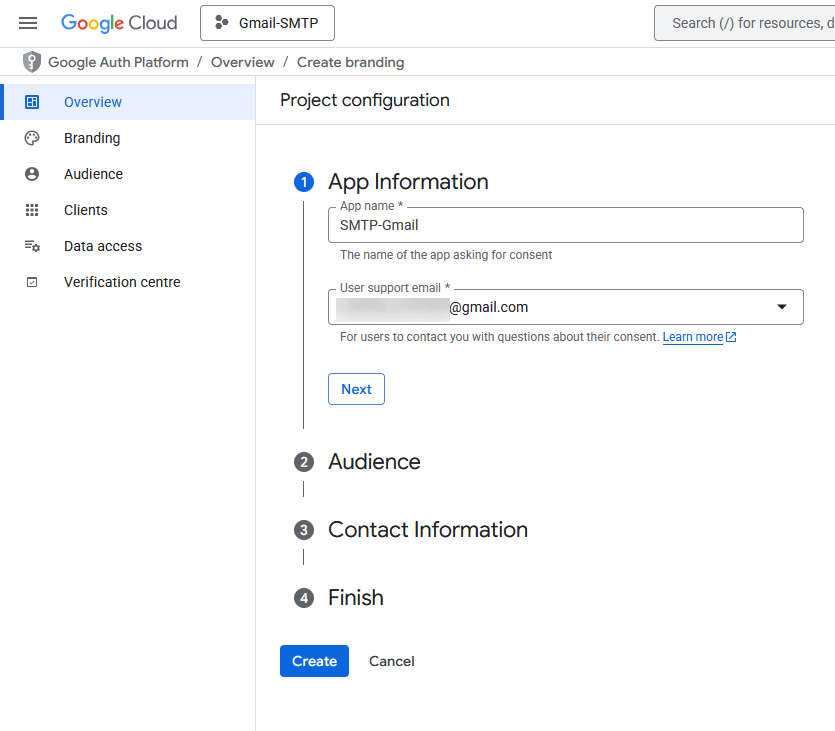
11. Then add your app information. Enter the app name and the user support email, then click on the **Next** button.

![](https://theplusaddons.com/wp-content/uploads/2026/02/google-client-id-secret-8.png)

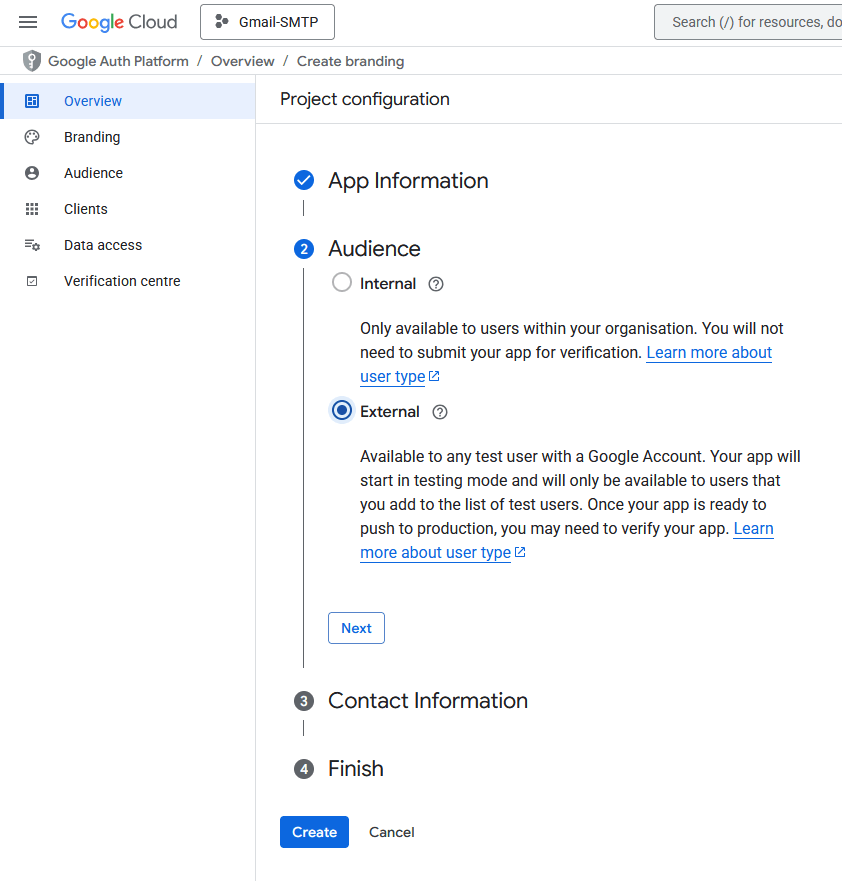
12. Then select the Audience as **External** and click on the **Next** button.

![](https://theplusaddons.com/wp-content/uploads/2026/02/google-client-id-secret-9.png)

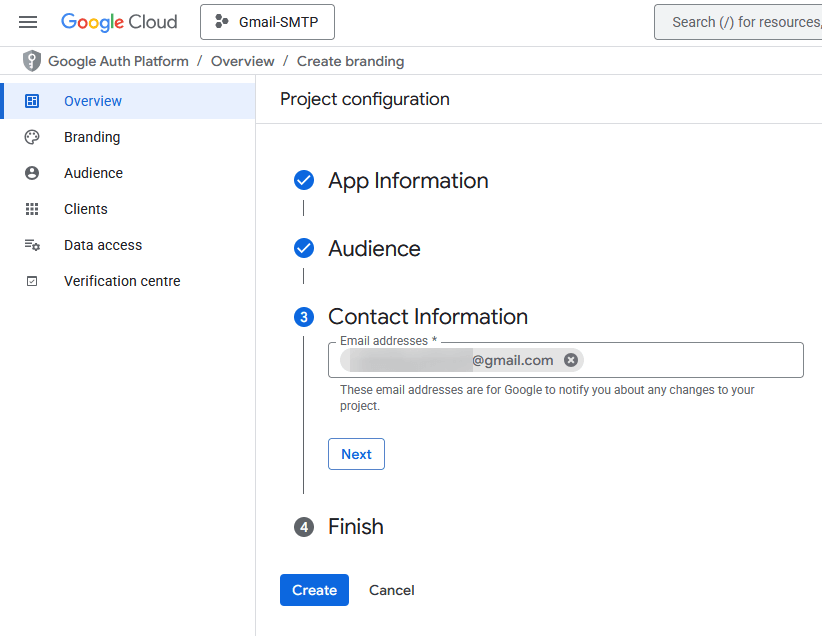
13. After that, add a contact email address and click on the **Next** button.

![](https://theplusaddons.com/wp-content/uploads/2026/02/google-client-id-secret-10.png)

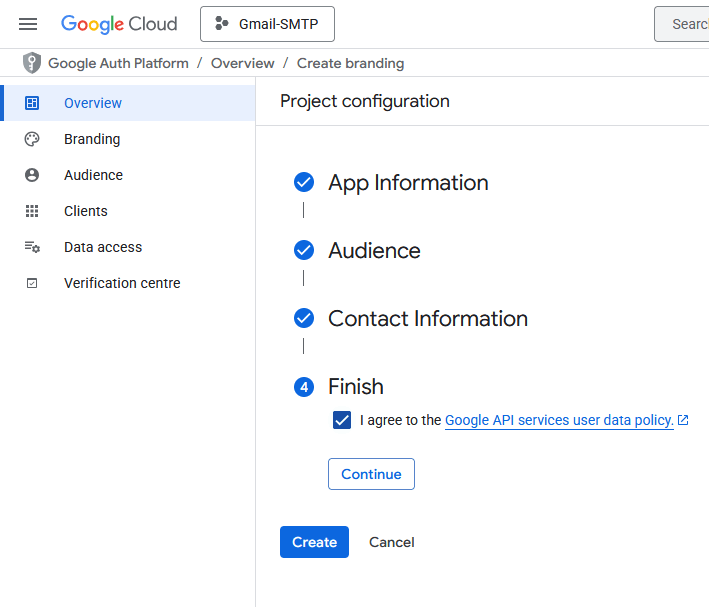
14. Then, check the Google API services user data policy and click on the **Continue** button.

Once done, click on the **Create** button.

![](https://theplusaddons.com/wp-content/uploads/2026/02/google-client-id-secret-11.png)

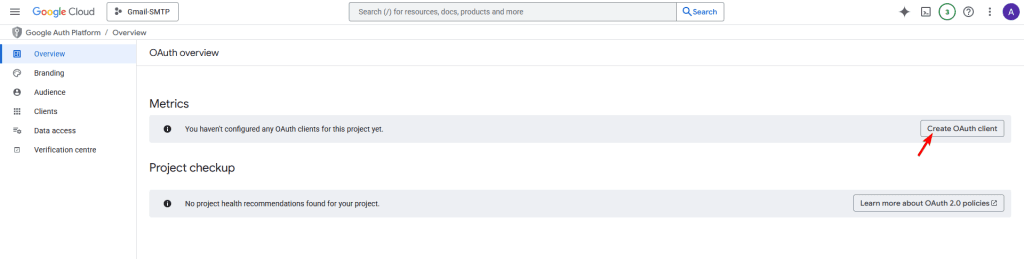
15. On the next page, click on the **Create OAuth client** button.

![](https://theplusaddons.com/wp-content/uploads/2026/02/google-client-id-secret-12-1024x259.png)

16. Then, from the **Application type** dropdown, select **Web application**. 

You can keep the Name as it is.

17. After that, in the **Authorised JavaScript origins** section, click the **ADD URI** button and add your website URL – Example: *http://www.yourwebsite.com*.

18. Then, in the **Authorised redirect URLs **section, click on the **ADD URI** button, then go back to the Nexter Email SMTP popup and copy the Redirect URI and paste it here.

19. Once done, click on the **Done** button.

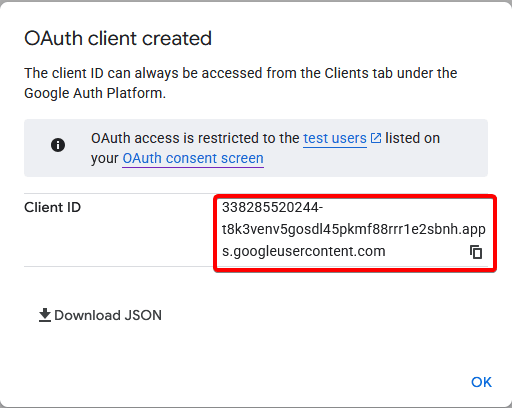
20. Now you’ll see the **Client ID** in a pop-up. You can copy it into a notepad and click on the **OK** button.

![](https://theplusaddons.com/wp-content/uploads/2026/02/google-client-id-secret-14.png)

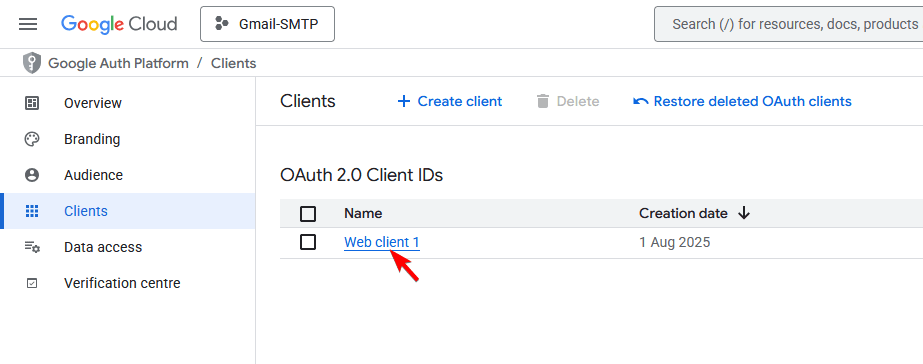
21. On the next screen, click on your client name.

![](https://theplusaddons.com/wp-content/uploads/2026/02/google-client-id-secret-15.png)

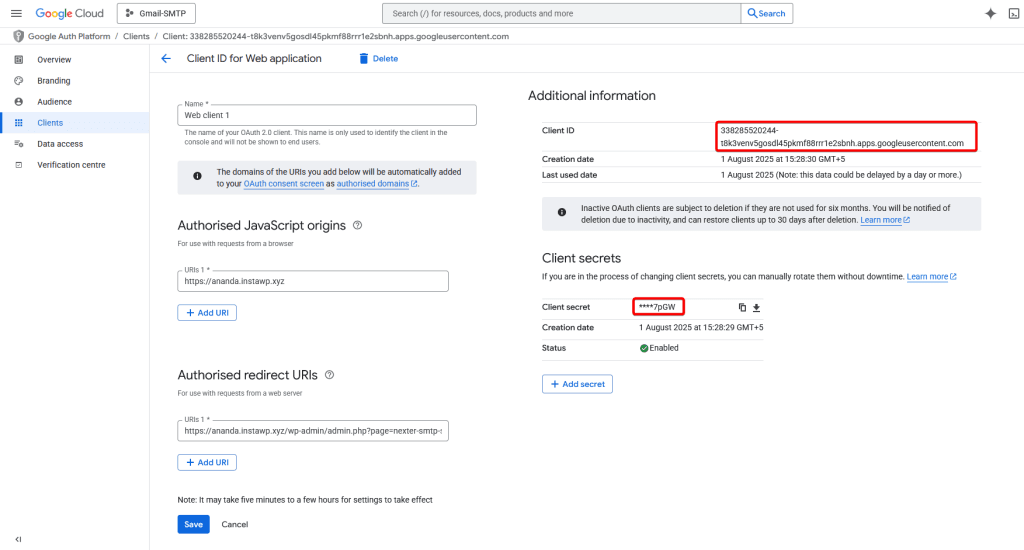
22. On the next screen, you’ll see both Client ID and Client Secret. 

Copy both in a notepad.

![](https://theplusaddons.com/wp-content/uploads/2026/02/google-client-id-secret-16-1024x550.png)

### Set up Gmail SMTP with the Nexter Extension

1. Now, in the Nexter SMTP pop-up, add the Client ID and Client Secret in the **Client ID** and **Client Secret** fields.

2. Then add a sender name in the **From** field.

3. After that, click on the **Authorize with Gmail** button.

**add-client-id-client-secret.mp4**

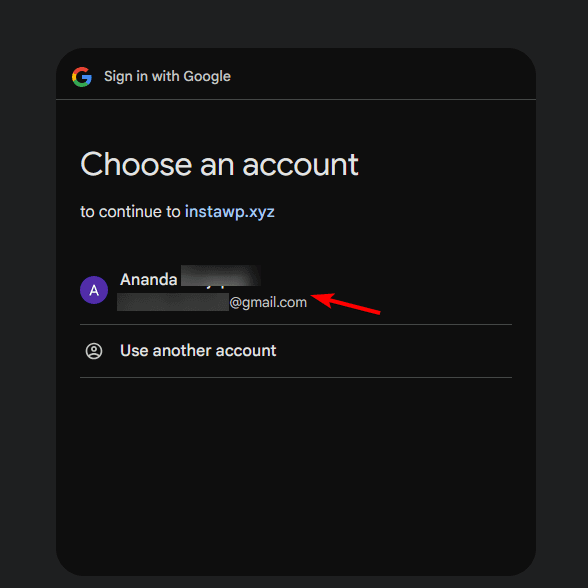
4. It will open a pop-up, select the same Gmail account that you’ve used to create the app.

![](https://theplusaddons.com/wp-content/uploads/2026/02/gmail-smtp-connection-1.png)

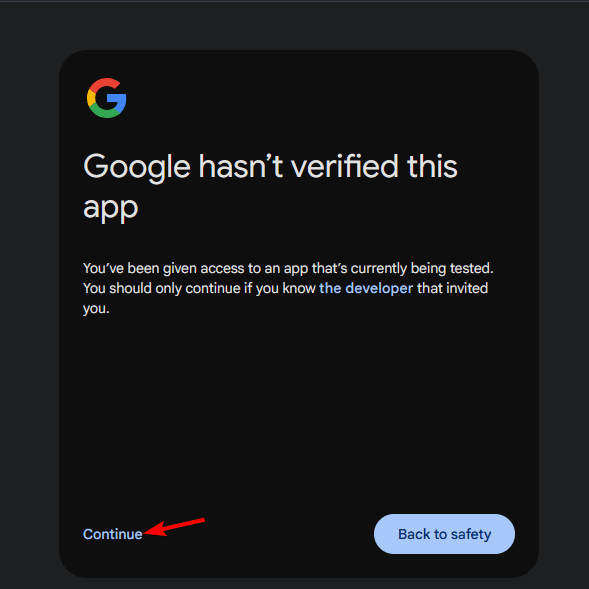
5. Then click on the **Continue** link to bypass the Google verification.

![](https://theplusaddons.com/wp-content/uploads/2026/02/gmail-smtp-connection-2.png)

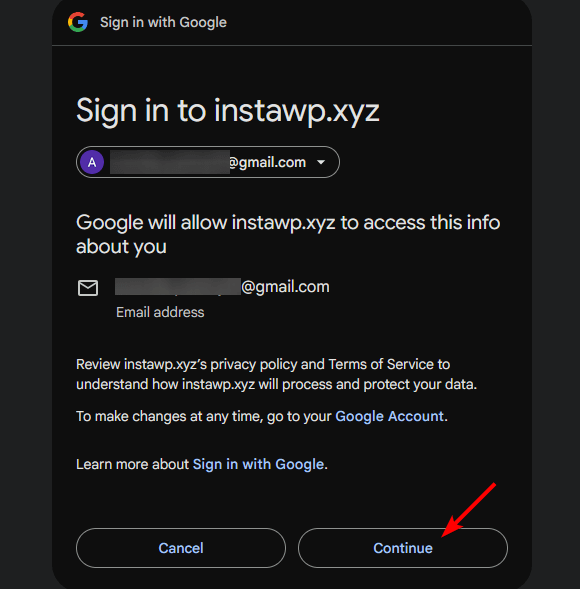
6. On the next screen, again click on the **Continue** button. 

![](https://theplusaddons.com/wp-content/uploads/2026/02/gmail-smtp-connection-3.png)

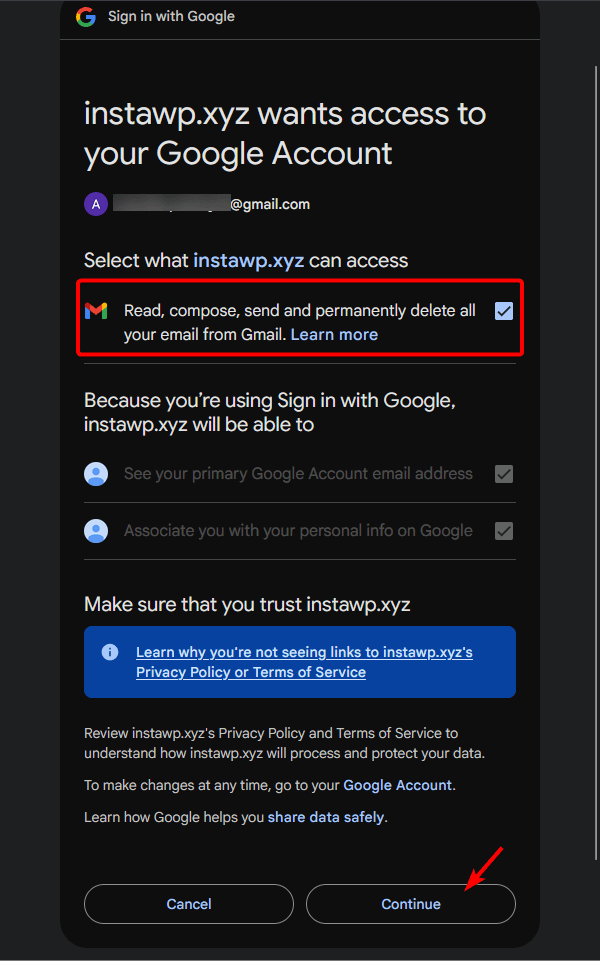
7. Then, in the next screen, allow all permissions and click on the **Continue** button.

![](https://theplusaddons.com/wp-content/uploads/2026/02/gmail-smtp-connection-4.png)

8. Now you’ll see your app has been authorized.

![](https://theplusaddons.com/wp-content/uploads/2026/02/gmail-smtp-connection-5.png)

### Send Test Email

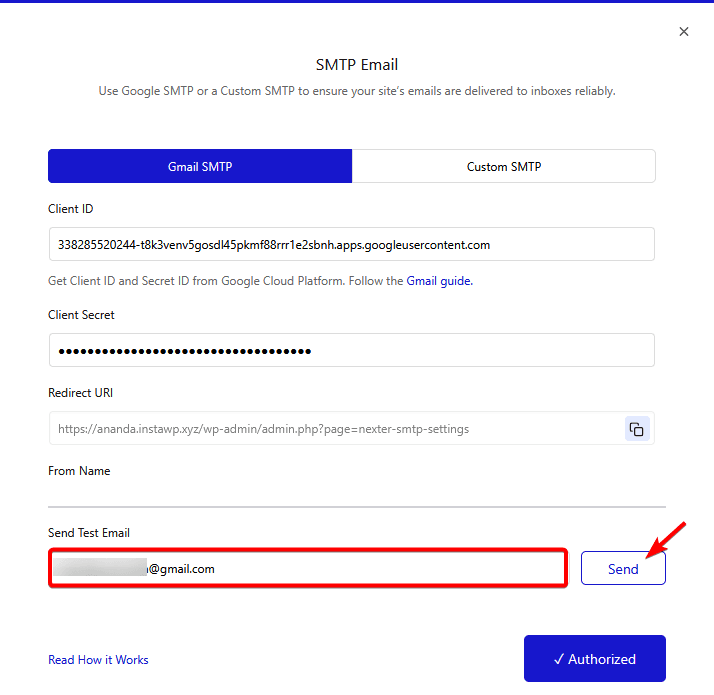
Once authorized, you’ll see a field to send a test email, add an email ID, and click on the **Send** button to verify the connection.

![](https://theplusaddons.com/wp-content/uploads/2026/02/gmail-smtp-send-test-email.png)

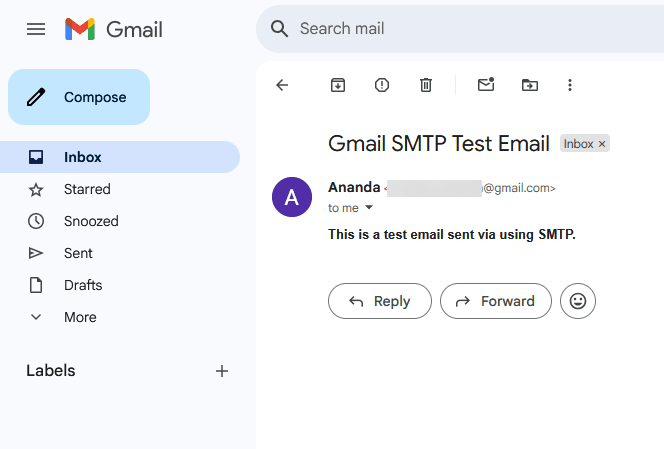
You should receive a test email at the email address.

![](https://theplusaddons.com/wp-content/uploads/2026/02/gmail-smtp-test-email.png)

### Set Email Action in the Form Widget

Now you have to set the Email action in the Form widget from The Plus Addons for Elementor.

To do this, add the Form widget to the page and follow the steps - 

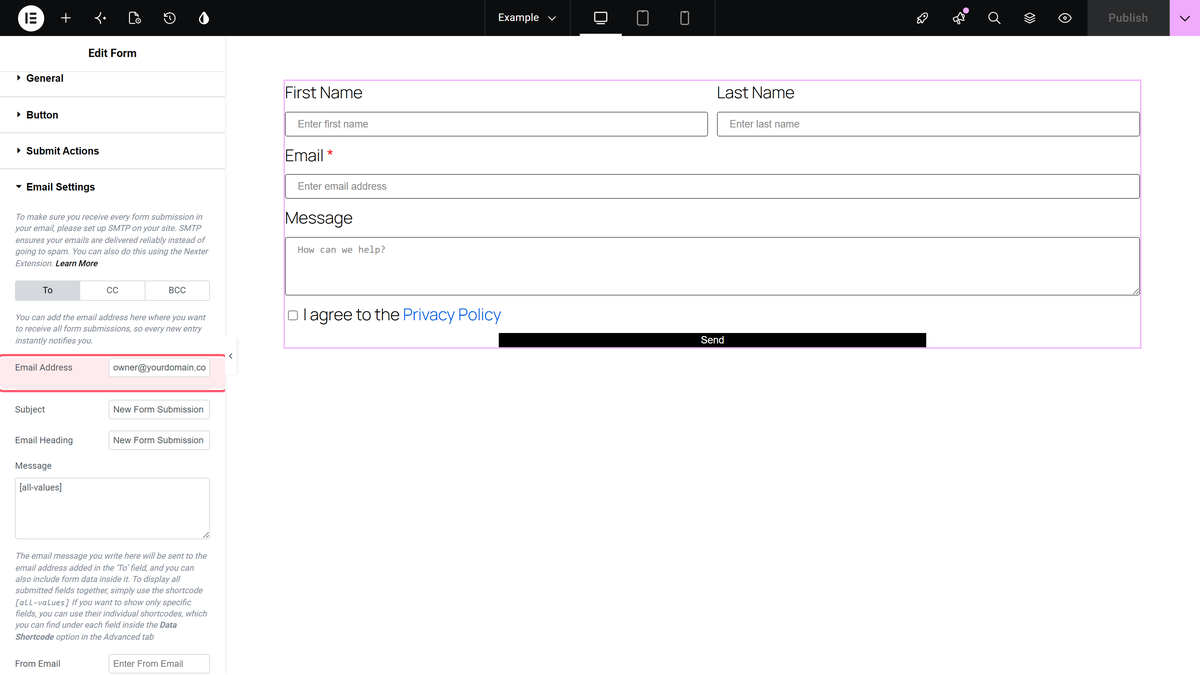
1. After adding the form fields, go to the **Submit Actions** tab and select **Email** from the **Add Action** section.

2. Now you’ll see the **Email Settings** tab, open it.

3. In the **To** tab, add the email ID you want to receive the notification for the form submission in the **Email Address** field.

You can change the email subject from the **Subject** field.

From the **Email Heading** field, you can change the email heading.

After that, from the **Message** field, you can customize the email message. To receive all the values from all the fields, use the **[all-values]** shortcode.

You can also receive individual field values by using the shortcode of the **Data Shortcode** field from the **Advance** tab of that repeater item. You can customize the message by using custom text with the shortcodes.

> *Note: You can only use the shortcode value of the ****Data Shortcode**** field from the ****Advance**** tab for the email notification; you can’t use any other shortcode from any other plugin.*

In the **From Email** field, you can add a custom email ID for the email sender.

Then, in the **From Name** field, you can add a custom sender name.

In the **Reply-To** field, you can add a custom email for the email reply receiver.

Similarly, you can send cc and bcc emails from the **CC **and **BCC **tabs.

Now, when the user submits the form, you’ll receive the email confirmation securely.