---
title: "How to Send a Message to a Discord Server from Elementor Form?"
url: https://theplusaddons.com/docs/send-a-message-to-a-discord-server-from-elementor-form/
date: 2025-05-22
modified: 2026-09-13
lang: en
author: "Aditya Sharma"
description: "Want new form submissions to show up in your Discord server right away? The Form widget from The Plus Addons for Elementor has a Discord action that posts each submission..."
word_count: 334
---

# How to Send a Message to a Discord Server from Elementor Form?

## 

- Connects Elementor Form to Discord using The Plus Addons for Elementor's Form widget.
- Requires a Discord server WebHook URL, created through server settings and integrations.
- Sends notifications to a Discord channel upon form submission by configuring the Submit Actions tab.

Want new form submissions to show up in your Discord server right away?

The Form widget from The Plus Addons for Elementor has a **Discord** action that posts each submission to a Discord channel through a webhook.

*To check the complete feature overview documentation of The Plus Addons for Elementor Form widget, [click here](https://theplusaddons.com/docs/create-an-elementor-form-for-free/).*

***Requirement - This widget is a part of The Plus Addons for Elementor, make sure it's installed & activated to enjoy all its powers.***

[LIVE WIDGET LINK](https://theplusaddons.com/elementor-builder/form-builder/?utm_source=tpae&utm_medium=docs&utm_campaign=text)

## Before You Start

- **Edition:** **Pro** — The Discord action needs The Plus Addons for Elementor Pro. The free plugin does not list it.- **Widget to enable:** Form, switched on under **The Plus Addons > Widgets**.- A Discord server where you can manage webhooks, and its **webhook URL**.

## Get a Discord Webhook URL

Open Discord, then:

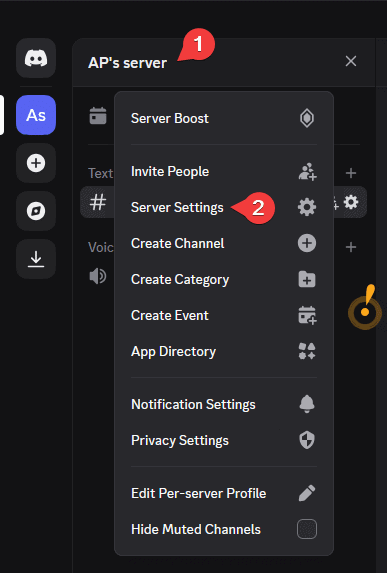
- Click your server name and choose **Server Settings**.

![Screenshot: Click your server name and choose Server Settings](https://theplusaddons.com/wp-content/uploads/2025/05/tpae-discord-server-settings.png)

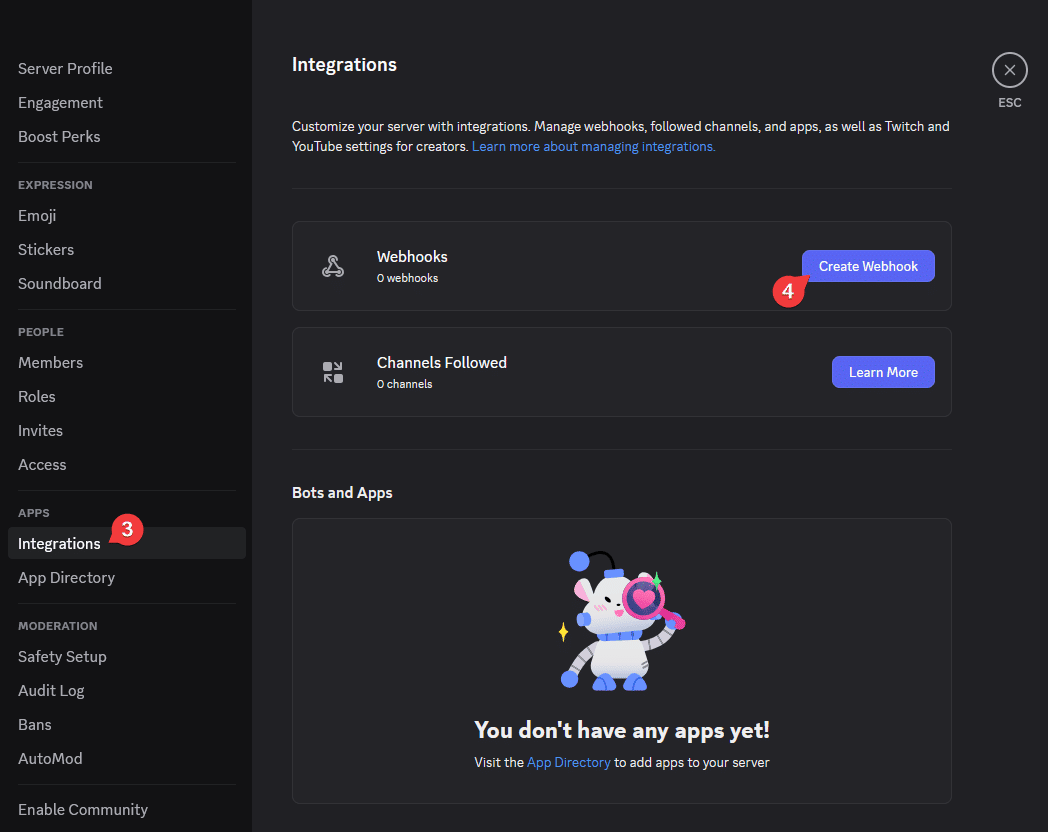
- Click **Integrations** in the left sidebar and create a webhook.
![Screenshot: Click Integrations in the left sidebar and create a webhook](https://theplusaddons.com/wp-content/uploads/2025/05/tpae-discord-create-webhook.png)

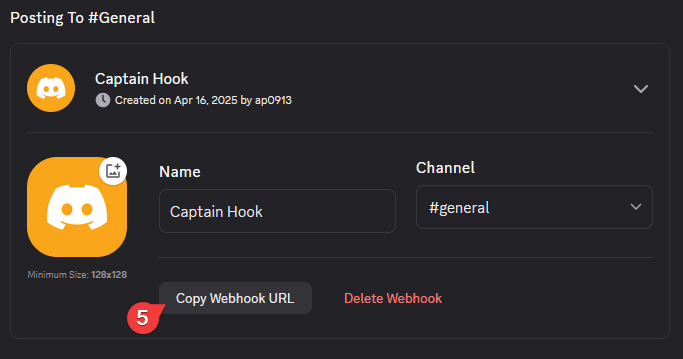
- Open the webhook, pick the channel it posts to, and click **Copy Webhook URL**.

![Screenshot: Open the webhook, pick the channel it posts to, and click Copy Webhook URL](https://theplusaddons.com/wp-content/uploads/2025/05/tpae-discord-copy-webhook-url.png)

## Connect the Form Widget

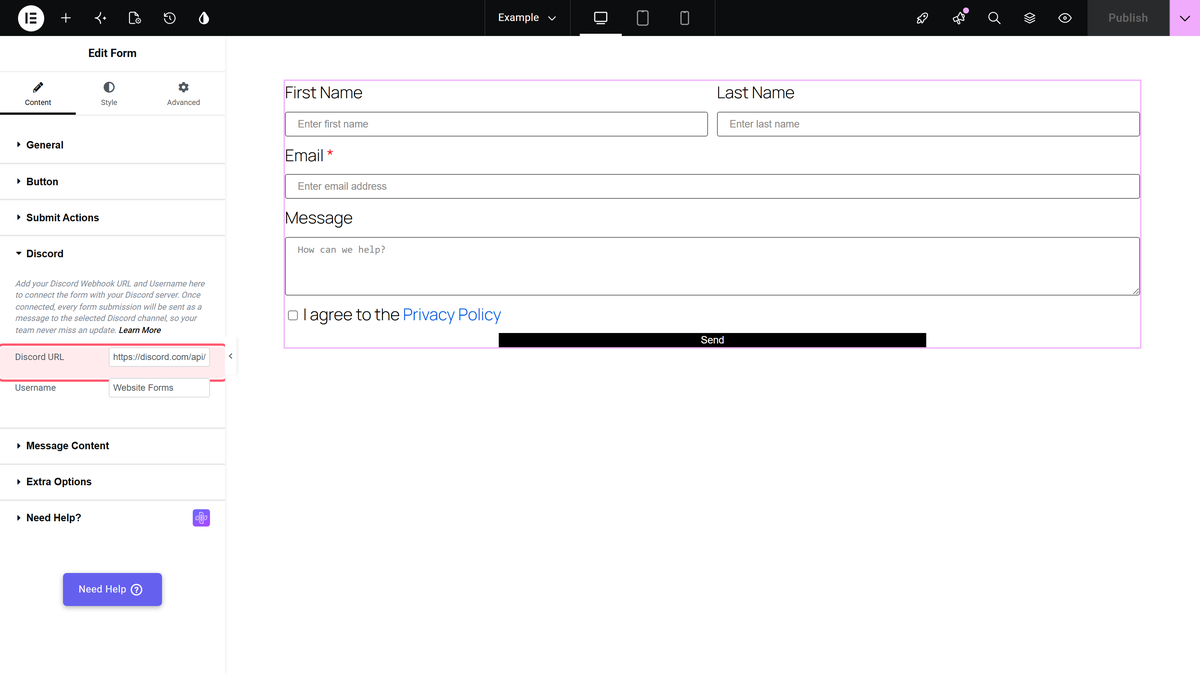
- Add the Form widget to your page and set up your fields.- In **Content > Submit Actions**, add **Discord** to **Add Action**.- Open the **Discord** section and fill in the fields below, then publish.
![The Discord settings of the Form widget in the Elementor editor](https://theplusaddons.com/wp-content/uploads/2026/09/form-discord.webp)

| Setting | What to enter |
| ------- | ------------- |
| Discord URL | The webhook URL you copied (it starts with `https://discord.com/api/webhooks/`) |
| Username | The name the messages are posted under. Empty uses **Form Bot** |

## How It Behaves

- Each submission posts a message with every field and its value, then the date, time, page URL, browser and IP address.- Long submissions are split into several messages.

## Limitations

- Only Discord webhook URLs on discord.com or discordapp.com are accepted.- Every field is sent, including personal data. Post to a private channel if needed.

## Troubleshooting

### Visitors see “There was an error in submitting the form.”

The service rejected the request. Re-copy the URL or token without spaces, and test again. While this error shows, a Redirect action does not run.

## Related Docs

- [Create a form with the Form widget](https://theplusaddons.com/docs/create-an-elementor-form-for-free/)- [Send submissions to a Slack channel](https://theplusaddons.com/docs/send-a-message-to-a-slack-channel-from-elementor-form/)- [Send form data to a Zapier webhook](https://theplusaddons.com/docs/connect-to-zapier-webhook-from-elementor-form/)