Looking to pin multiple locations on Google Maps directly on your WordPress website? We’ve got you covered.
Google Maps helps visitors quickly identify and navigate to your business locations, offices, or events.
However, adding several pins manually can get complicated and frustrating, because default WordPress lacks built-in tools for placing multiple markers directly on Google Maps
Luckily, plugins for the Elementor editor with specialized Google Map widgets simplify this process.
You don’t have to struggle anymore to embed or update your maps.
In this blog, you’ll learn how to easily place multiple location pins using Elementor, step by step, without writing a single line of code.
Quick Answer: To pin multiple locations on Google Maps in Elementor, install The Plus Addons for Elementor, add the Google Map widget to your page, and use +Add Item to place each location by coordinates. This lets you go from pinning a single spot to pinning multiple locations in Google Maps in just a few clicks, no coding needed.
Key Takeaways
- Use Google Map widget to add multiple pins.
- Add each location with +ADD ITEM.
- Adjust zoom to show all pins clearly.
What are Location Pins in Google Maps?
Location pins on Google Maps are visual markers indicating specific points on a map. When visitors click a pin, they see location details, including an address, directions, or additional context about that particular spot.
Pins help users quickly find the exact places they’re searching for.
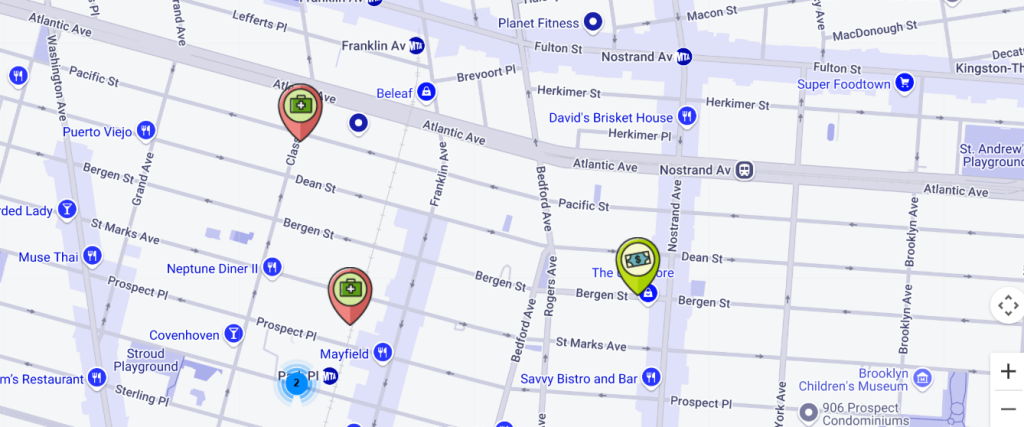
Demo Image of Multiple Location Pins added using The Plus Addons’ Google Maps widget
Pins typically appear as small, colored icons or markers that clearly pinpoint specific addresses or geographic coordinates.
Businesses frequently use these markers to highlight store branches, event venues, or office locations directly on their websites.
Location pins simplify navigation and enhance website usability by offering clear visual cues.
Why Should You Add Multiple Location Pins on Google Maps?
Adding multiple pins to your maps is beneficial if your business or website needs to display more than one location or event.
Here’s why placing multiple pins makes sense:
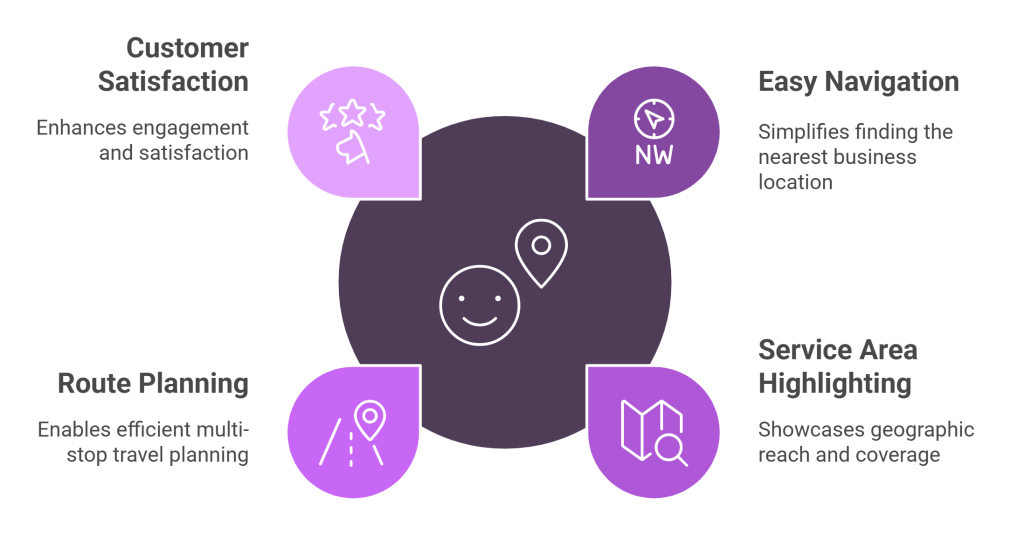
- Easy Navigation for Visitors: Visitors immediately see your business locations displayed visually. This clarity saves their time and effort when finding your nearest branch, office, or event venue.
- Highlight Multiple Service Areas: Displaying multiple pins effectively showcases all areas your business covers. Visitors quickly understand your geographic reach.
- Efficient Route Planning: If your customers often visit different locations, pins enable efficient multi-stop route planning. Customers can conveniently plan visits and optimize their travel between locations.
- Better Customer Experience: Clearly marked multiple locations deliver an improved customer experience. Visitors appreciate the straightforward navigation which increases customer satisfaction and the engagement on your website.
Looking for easy ways to add maps to your website? Here are the best WordPress Map Plugins.
How to Pin Multiple Locations on Google Maps [Step-by-Step]
The Plus Addons for Elementor’s Google Maps widget offers many customization options and comprehensive features that helps you pinpoint locations to help your customers find your accurate location.
In case you’re a visual learner, here’s a quick video tutorial for you:

And if you’re a textual learner, here’s the step-by-step guide to adding and managing multiple pins using this widget.
Step 1: Install and Activate The Plus Addons for Elementor
To begin, install and activate The Plus Addons for Elementor plugin from your WordPress dashboard.
Make sure both the base plugin and the Pro version are active. This widget is part of the Pro pack, so having the upgraded version is essential.
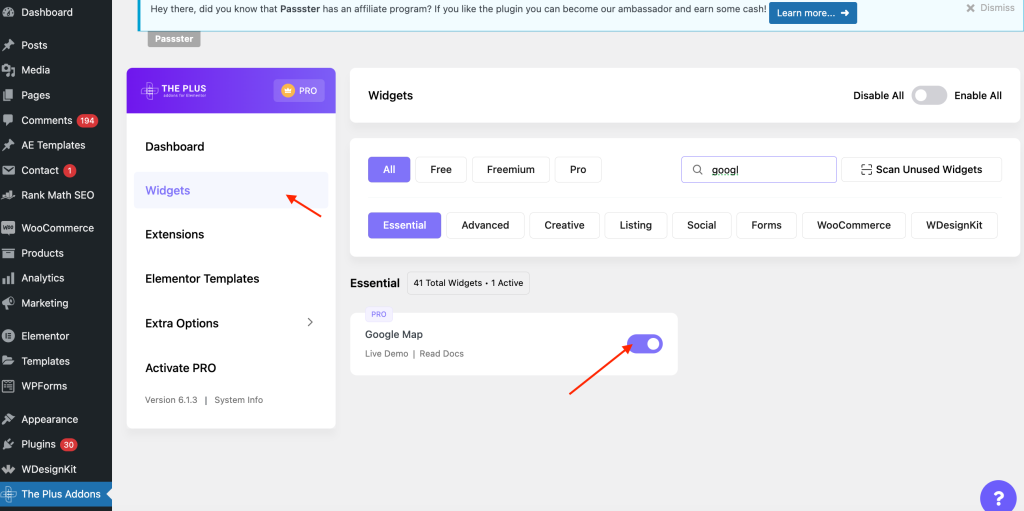
Once activated, head over to The Plus Addons > Widgets. Use the search field to locate “Google Map” and toggle it on.
Hit “Save” to apply your settings. This will enable the specialized widget inside the Elementor editor.
Step 2: Generate and Add Your Google Maps API Key
Before the map can load real-time location details, you’ll need to add a valid API key.
Go to The Plus Addons > Extra Options > Settings and scroll to the “Google Maps API Key” section.
Click the link provided to access the Google Cloud API console.
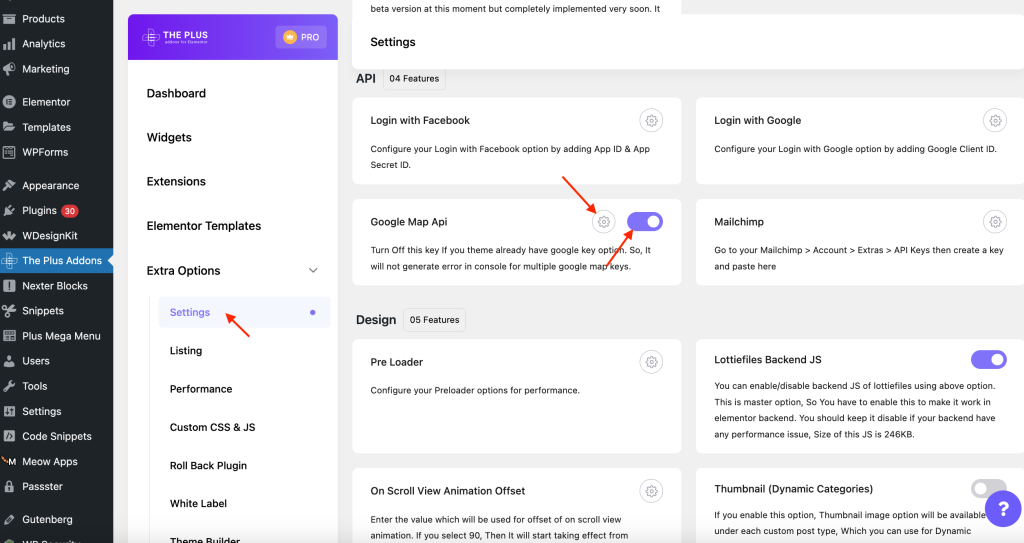
There, create a new project, complete the setup, and copy your API key.
Back in WordPress, paste this key into the designated input field and save your changes.
Without this key, the map won’t display any pin location on the frontend.
For Detailed steps, check How to generate Elementor Google Maps Widget API Key?
Step 3: Drag and Drop the Google Map Widget
Open the page where you want to display the map and click Edit with Elementor.
In the Elementor panel, search for “Google Map.” You’ll see two options: select the one from The Plus Addons (TP written on top right of the box).
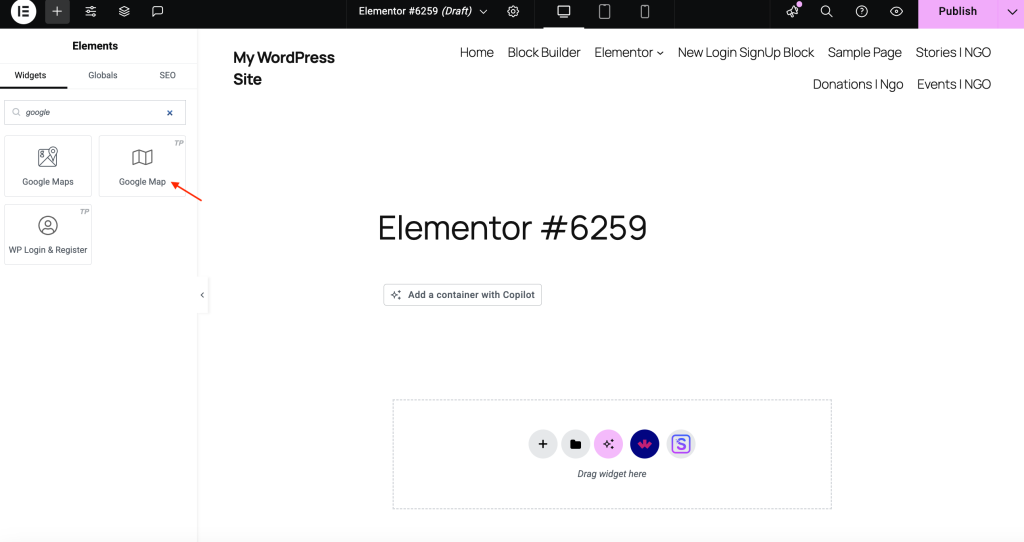
Drag this widget into your layout. Once it loads, you’ll see settings like Map Type, Content, and Map Style.
Under Map Type, select “Google Map” from the dropdown list. This will activate the familiar map interface your visitors expect to see.
Tip: Position your Google Maps section where users naturally expect it, like just above the contact form or on a dedicated Find Us page. You can also place it after location-specific content or alongside your Google reviews section to give users quick context and directions.
Step 4: Add Your First Location Pin
Now go to the Content tab and look for the Add Multiple Location Point section.
Click on the default item, and input the latitude, longitude, and address.
If you don’t know the correct location coordinates, click the provided link to visit latlong.net.
Use the search box to type your location name. Copy the coordinates shown and paste them into the respective fields in Elementor.
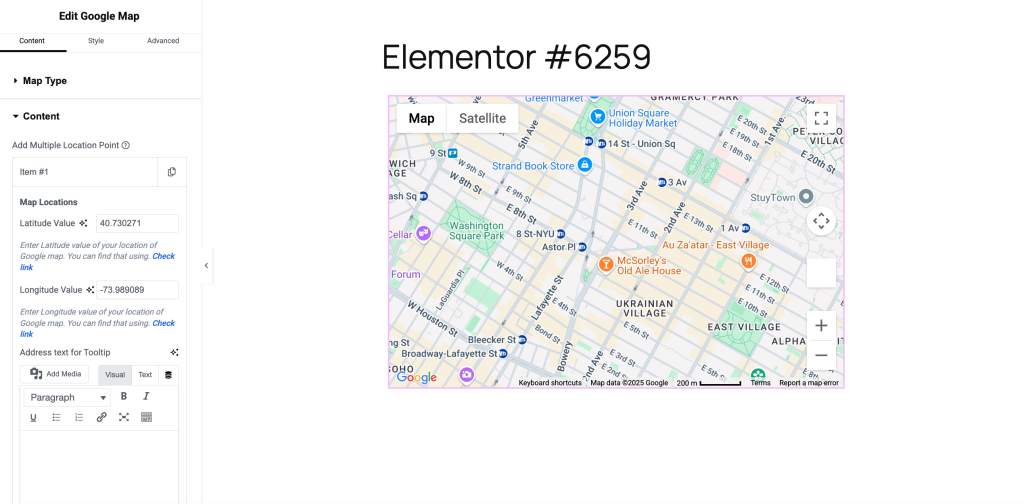
You’ll see the map update with a new marker icon, confirming the first pin location is set correctly.
Step 5: Add More Pins to Map Multiple Locations
To plot another point, click +Add Item. A new set of fields will appear.
Follow the same process: get the coordinates, paste them in, and give your current location a name.
You can add numerous locations, depending on your needs.
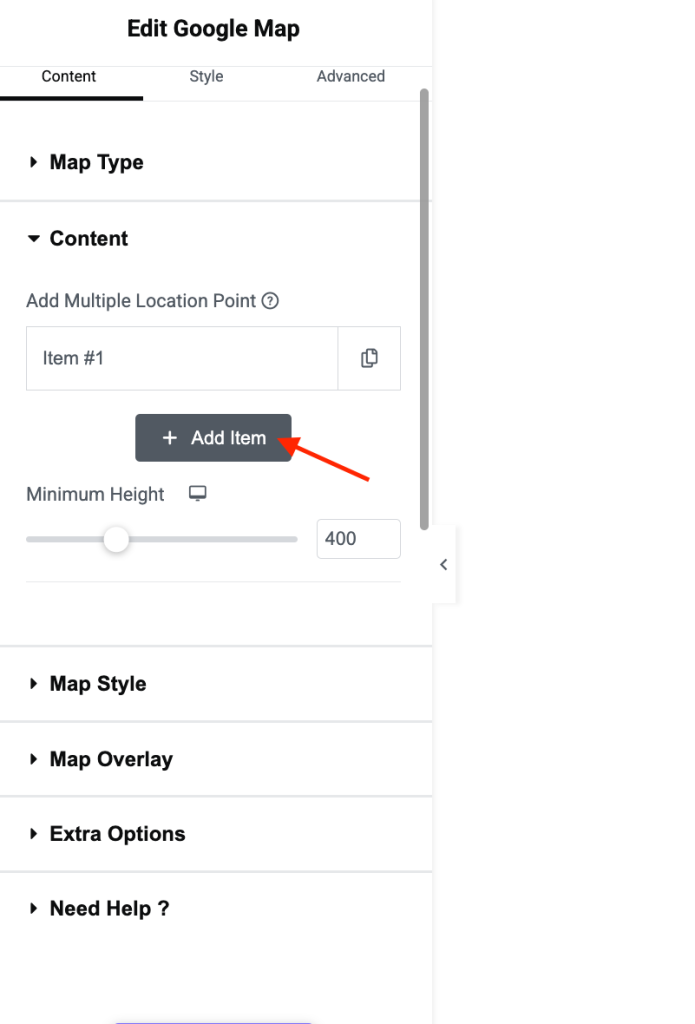
Each item gets its own pin, and all pins appear on the same custom map.
You can update the text custom labels for each pin to match your business branches, event names, or office titles.
Custom labels help users identify places easily on the map.
Step 6 : Customize Pins, Map Style, and Zoom Level
To improve the map’s appearance, head to the Map Style section. Adjust the map zoom level so all pins stay visible at once.
If your pin locations are spread across cities, zooming out helps maintain visibility without losing clarity.
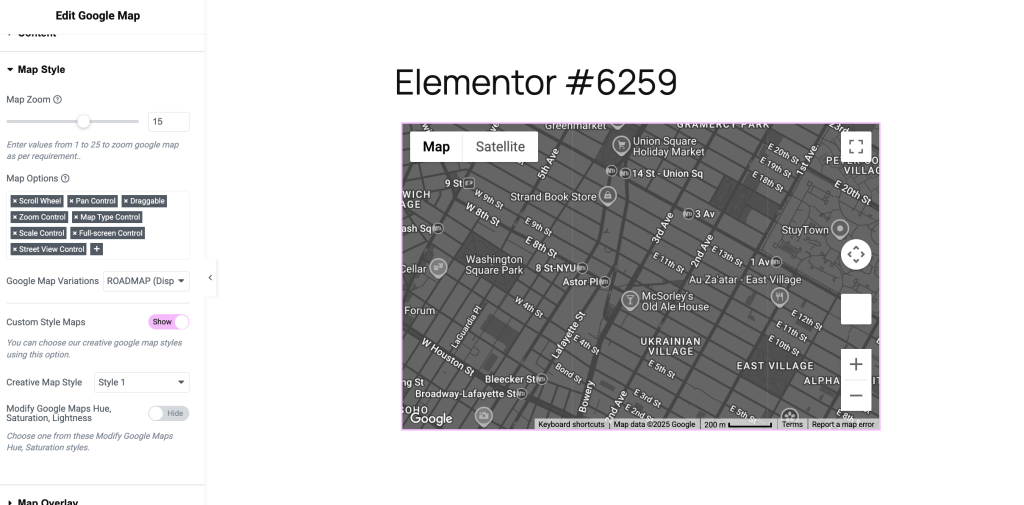
You can change the map type (roadmap, satellite, terrain, hybrid), pin colors, and apply different themes for a more branded look.
You can also add custom map pins to display current locations, branches, fastest routes and more.

Wrapping Up
Displaying multiple location pins on Google Maps helps visitors view all your locations in one place. You can highlight stores, offices, or event spots, to improve navigation and build trust.
With The Plus Addons for Elementor’s Google Maps widget, you can place multiple pins, customize their appearance, and manage everything in the Elementor editor with no code required.
This widget is just one of over 120+ Elementor widgets included in The Plus Addons for Elementor. From advanced content elements to interactive design tools, each widget is built to add functionality, improve visual appeal, and speed up your design process.
The Plus Addons for Elementor is intuitive to use, equipped with advanced features, and fully optimized for performance.
It’s also compatible with the latest versions of Elementor and WordPress, making it a reliable addition to any website built with Elementor.
Want to Add Pins to Google Maps Without Elementor?
If you don’t use WordPress or Elementor, you can still add pins to Google Maps directly:
- Go to Google My Maps and sign in with your Google account.
- Click Create a New Map.
- Use the search bar to find each location, then click Add to map to drop a pin.
- Repeat for every location, then customize pin colors, icons, and labels by clicking each pin.
- Click Share to get an embed code for any website, or use Present to share a live link.
This works for any site, but if you’re on WordPress and Elementor, The Plus Addons’ Google Maps widget above gives you more design control, custom markers, and drag-and-drop styling without leaving the editor.