A mega menu is a fantastic addition to any site and will greatly aid in navigation. Mega menus are expandable menus that can be displayed in a simple dropdown layout.
If you want to make it easy for users to navigate through your website, using a mega menu WordPress Elementor is a no-brainer.
Mega menus don’t just look great – they are also a fantastic choice if you want to keep your website’s UX right.
These menus can help you drive traffic to particular pages, improve conversions, and help you promote different offers.
In this article you will learn how to Build Mega Menu on Elementor with our easy step-by-step process.
What is Mega Menu?
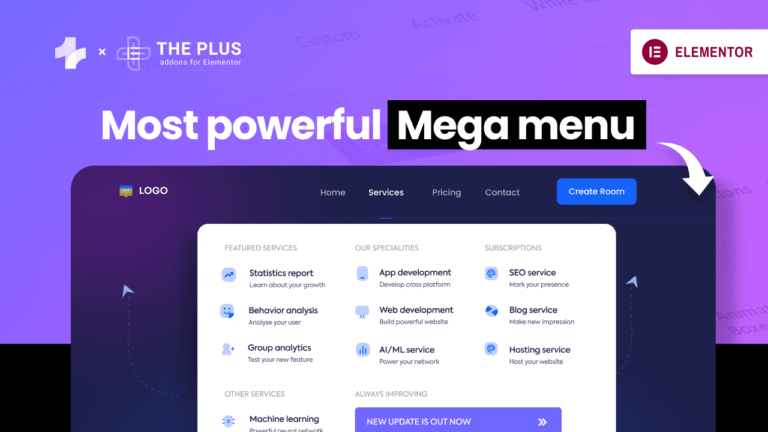
A Mega menu is a basic two-dimensional dropdown menu that allows you to include text and image links to different parts of your site. This is different from a normal menu, which will only reveal items within one single category at a time at most, meaning that most of the available content is hidden.
Only when users actively click on menu items will they see other options, and even then, these will only be a basic list of pages within that category.

Here’s a pretty simple example of a mega menu on BestBuy. As you continue to expand, the mega menu covers the content area, letting you access different parts of the site straight from the home page.
While this one’s fairly basic, Elementor mega menus also let you add images, pictures, labels, and even background pictures if you want.
More importantly, mega menus allow you to organize the links properly.
In some cases, people take Elementor WordPress menu further, including a wide range of features.
Examples of these include:
- Including WooCommerce features and functions, such as product listings, shopping baskets, and checking out
- A contact form, right there in the menu, inviting users to get in touch
- A Google Map showing visually exactly where your business is, highlighting how local to the user it is
- Including product listings in a dynamic way so that new items or bestsellers are highlighted
- A media gallery showcasing attractive visual images of products or case studies
- Using tabs to break the menu down even further into sections
While not all mega menu Elementor plugins will allow for all these functions, The Plus Addons for Elementor lets you enjoy all of these extra benefits as standard.
Why Use a Mega Menu on Your Website?
As you can clearly see, mega menus make it easy for website designers to seamlessly present lots of links in a systematic, organized manner. There are several reasons why you should consider using mega menus on your website:
- They are better than regular dropdown menus. Conventional dropdown menus tend to obscure several options, requiring users to scroll through different options before finding what they need.
- Mega menus allow you to showcase relationships between different items. Mega menus let you create detailed flows and highlight the relationship between different items.
- You can add images. There’s little doubt in the fact that illustrations can greatly improve the aesthetic appeal of your mega menus. They also add color to your site, and add richer typography.
How Do I Build a Mega Menu on WordPress?
By default, WordPress doesn’t let you add a mega menu. So if you’re only using WordPress, without any additional plugins or tools, then you can’t add a mega menu to your site. You’ll require a WordPress Elementor mega menu plugin.
Thankfully, there are a ton of different plugins that you can use to easily add flexible mega menus, especially if you’re using Elementor. Elementor is the most popular page builder in the market, and is used by millions of websites.
The Plus Addons for Elementor is a selection of 120+ advanced widgets that work seamlessly with Elementor, allowing you to add tons of creative functionality to your WordPress website.
The best part is that you don’t need any technical coding expertise to get started. In this article, we’ll show you how to build a mega menu on your WordPress website using The Plus Addons for Elementor.
How to Build a Mega Menu on Your WordPress Website
Here are the steps on how to create a mega menu in Elementor (similar to mega menu Elementor pro):
1. Install and Activate The Plus Addons for Elementor

Your first step is to install and activate The Plus Addons for Elementor. While there are free widgets available in the package, you’ll want to purchase a subscription to get access to the Pro widgets.
Once you’ve installed the plugin, the next step is to activate it. Simply find the plugin in your WordPress dashboard, and go to Activate.
From there, just add your license key to activate your copy of The Plus Addons for Elementor.

2. Activate the TP Navigation Menu Widget

Once you’ve activated your copy, all of the widgets will become accessible. Now, you need to find the TP Navigation Menu widget and activate it. Once you do, make sure to save changes to your site.
In the sidebar to your left, you will now see an additional option appear, entitled “Plus Mega Menu.” Click on it, and then select Add New.
Now you’re all set to create an amazing The Plus Addons Mega Menu.
3. Create Your Mega Menu

Now, you can add a title to your mega menu for Elementor and then click on Edit with Elementor to start creating it!
Once you’re done, the next step is to add it to your WordPress menu.
4. Add the Mega Menu to Your WordPress Menu
To do this, go to your WordPress Dashboard, then select Appearance. From there, choose Menus. You can now customize the structure of the menu, as shown below:

Once you’ve created your menu, click on Save Menu to save the changes. You’ll get a confirmation message saying, “Menu 1 has been updated.”
Now, go to Manage Locations and select the position where you want the mega menu to appear. In this post, it’s set to appear in the primary location on the home page.

5. Review Your New Menu and Make Additions (If Necessary)

Now, your menu will appear on your site. You can customize it by adding new items, categories, or links to it.
If your mega menu doesn’t appear in your WordPress menus section, go to the top of the screen, click Screen Options, and check the box next to Plus Mega Menu.
You can follow a complete video walkthrough of this process here.

6. Customize Your Menu’s Appearance
To customize how your menu appears on the website, you can edit it with Elementor. Simply click on Plus Mega Menu from the sidebar, and select the menu you want to edit.

There really are so many different options and functions that can be added here.
One very popular choice is to include a Product Listing element which allows you to showcase a section of products right there in the menu. This block has various formats and themes, such as this:

Now, you can customize the typeface, design, layout, content, and virtually any element you want.
And, since you’re editing in Elementor, all of these changes will update in real-time, allowing you to create just the mega menu for Elementor you want!
You also have the option of making your Mega Menu in Elementor sticky or having it hide once the user scrolls down (and even reappears when they scroll back up!).
It’s also worth noting that although most mega menus tend to be horizontal, such as in this example:

If your website would look better with a vertical menu, this can also be achieved, as in this example:

These were some easy steps to help you create a mega menu with Elementor.
How to Add a Mega Menu Throughout Your Entire Website for Easy Navigation?
If you want to add a mega menu throughout your entire website, you’ll need Elementor Pro. To get the Elementor pro mega menu, click on Theme Builder and then click on Add New.
From there, you’ll have to select a template type and then name it. Once you create the template, the next step is to import that template into the Elementor Builder page.
Find the TP Navigation Menu widget from Elementor, and then drop it in the main area. Now, you can customize the layout, the style, and any advanced functions for the mega menu for Elementor!

Wrapping Up: Creating a Mega Menu With Elementor is Easy
That’s it for our guide on how to add mega menu in Elementor.
As shown above, you don’t need to jump through different hoops to implement a mega menu on your website easily. With The Plus Addons for Elementor, you can easily create one!
More importantly, The Plus Addons for Elementor also add tons of other widgets that you can use to improve your website’s aesthetic appeal further!
One last point to consider is that while the Mega Menu feature does look amazing on bigger screens like desktops or laptops, there can be issues when trying to view those same menus on tablets and mobiles. It can be impossible to see the whole frame.
However, with The Plus Addons for Elementor, there is an exclusive feature called Mobile Menu, which provides the perfect combination of having a fantastic mega menu, with the responsiveness you need.
You can find out more by visiting the mobile menu page, or by watching this video.
And, if you find this post helpful, do share it, or if you have a query, let us know in the comments below!
FAQs on How to Build Mega Menu on Elementor
What’s the difference between a regular dropdown menu and a mega menu?
A regular dropdown menu typically displays a single column of links, while a mega menu is a larger, multi-column dropdown containing links, images, and additional content. Mega menus offer a more extensive and visually rich navigation experience, accommodating complex site structures and enhancing user engagement.
How to create mega menu in Elementor?
To create a mega menu in Elementor, follow these steps:
1. Plan Layout: Design your mega menu layout, considering columns, images, and links.
2. Create Sections: In Elementor, add sections within your menu item.
3. Column Widgets: Populate columns with widgets like Text, Image, and Nav Menu.
4. Style and Design: Customize colors, typography, and spacing.
5. Responsive Settings: Ensure your mega menu looks good on all devices.
For a smoother process, consider using The Plus Addons for Elementor’s Mega Menu Builder, simplifying the design and integration of mega menus.
Is it possible to create Elementor megamenu without plugin?
Yes, it’s possible to create an Elementor mega menu without a plugin, but it can be challenging as it requires coding expertise. For a more user-friendly approach, we recommend using the Mega Menu Builder by The Plus Addons for Elementor. This tool simplifies the process, allowing you to create dynamic mega menus using Elementor’s intuitive interface without the need for manual coding.
Can I add images, icons, or videos to my Elementor mega menu?
Absolutely, you can enhance your Elementor drop down menu with images, icons, and even videos. Utilize Elementor’s widget options to insert images, icons, and embed videos within the mega menu’s columns. This visual richness can help convey information effectively and create an engaging navigation experience for your website visitors.